background image


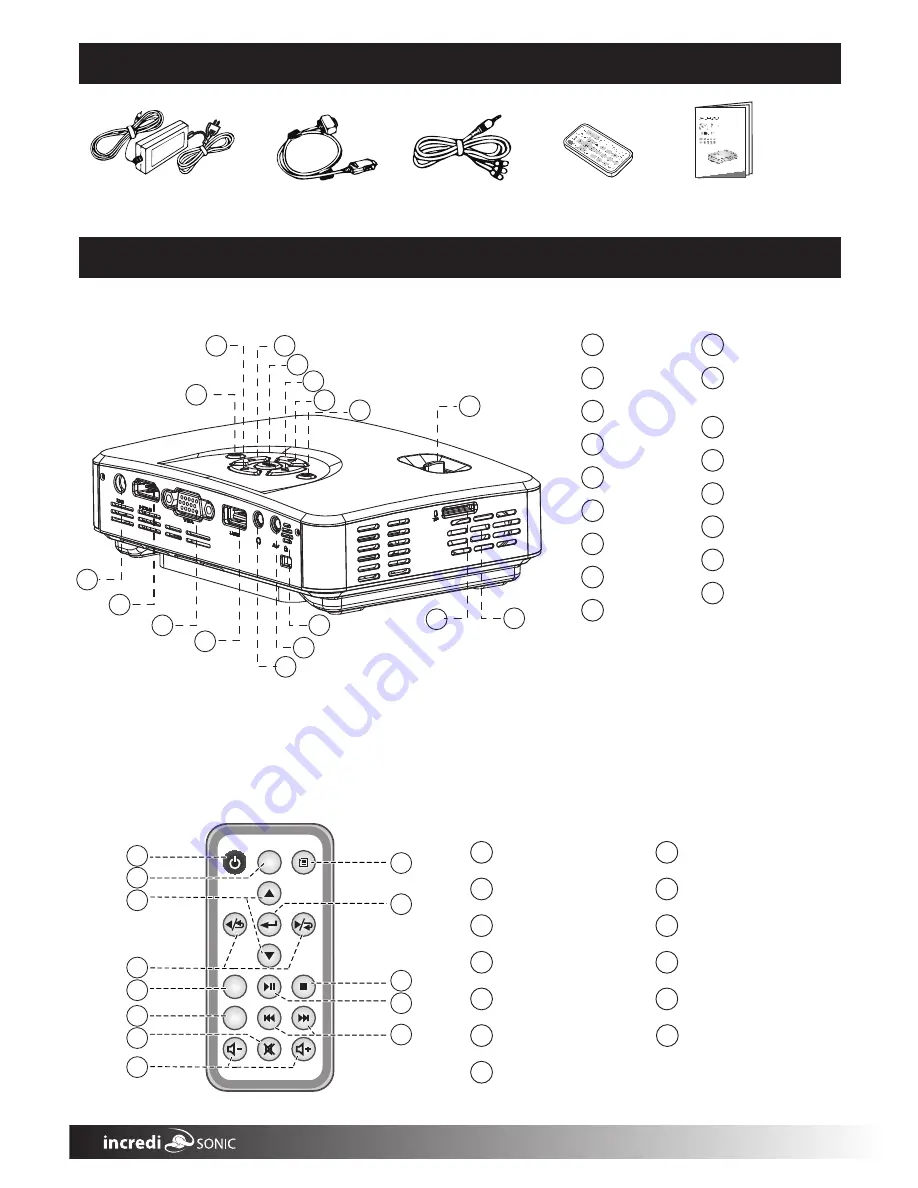
4 VUE Projector, Remote control layout, and features


4

.1 Pico 

3 Package contents

AC Adaptor

Remote Control

User Manual

Power Key

1

Right Key

5

Left Key

3

Enter Key

4

Down Key

2

Focus

8

Up Key

6

Setup Key

7

Speaker

9

HDMI port

16

DC IN port

17

TF card slot

10

Remote control
receptor

11

AV IN port

12

Earphone

13

VGA port

15

14


USB port

4.2 Remote control

3

 -

Volume-/+

8

Menu button

9

Stop button

11

Play/ Pause button

12

Skip/Up/Down button

13

Enter

10

Power button

1

Source switch button

2

Up/Down button

3

Display button

6

Mute button

7

Right / Rotate - R

Source

Power

Menu

Up

Left / Rotate - L

Enter

Return

Down

Play / pause

Stop

Skipb

V -

Display

Skipf

Mute

V +

3

4
5
6

1
2

7
8

10

11

12

13

9

4

Left/Right button

Return button

5

1

2

3

4

5

6

7

8

9

10

11

12

13

14

15

16

17

 button

VGA Cable

AV cable

3

Summary of Contents for PMJ-400 VUE Series

Page 1: ...User Manual ...

Page 2: ......

Page 3: ...cable Connection 5 4 A V file in the USB 5 5 Connect earphone 6 VUE projector button layout 7 VUE projector remote control layout 8 Play a 3D movie 9 Projector input source 10 Projector setup Menu 11 Battery installation of remote control 12 Remote control operate range 13 Troubleshooting 4 VUE projector remote control and projector layout 1 2 3 3 3 3 4 4 4 4 5 5 5 6 7 7 7 8 8 8 ...

Page 4: ... Portable 1 5 lbs Weight Mini Projector fits nicely in laptop case Lamp Life is 20 000 Hours 3D Ready Built in Speaker 4 3 and 16 9 compatible HDMI VGA Composite A V connections along with USB readers For Business Presentations Personal Media Sharing USB Plug n Play for instant set up Apple Mac and PC Compatible Up to 160 inch image in low light condition 1 1 ...

Page 5: ...ance Power consumption 32W S1 20W S2 Power Supply AC 100 240V 50Hz 60Hz Φ3 5mm earphone interface VGA AV HDMI USB 2 0 TF card Input Interface Earphone output Speaker 3Wx1 DC 19V 3 42A Dimension 150 108mm W 44mm H mm L AC Adaptor AC cable VGA cable AV cable Remote control User manual Standard Accessories Weight 425g Operating Temperature 0 C 40 C Operating Relative Humidity 35 85 without condensati...

Page 6: ... port 12 Earphone 13 VGA port 15 14 USB port 4 2 Remote control 3 Volume 8 Menu button 9 Stop button 11 Play Pause button 12 Skip Up Down button 13 Enter 10 Power button 1 Source switch button 2 Up Down button 3 Display button 6 Mute button 7 Right Rotate R Source Power Menu Up Left Rotate L Enter Return Down Play pause Stop Skipb V Display Skipf Mute V 3 4 5 6 1 2 7 8 10 11 12 13 9 4 Left Right b...

Page 7: ...tion 5 1 Using a VGA cable Connect equipment please press Source switch key and choose HDMI and then press Enter key into HDMI mode 5 2 Using an HDMI cable 4 VGA cable Laptop HDMI cable Digital Video Camera Set Top Box DVD player Laptop 5 3 Using an AV cable Yellow White Red Video Game Console Digital Video Camera Digital Video Camera DVD player Special AV cable for Equipment When connecting equip...

Page 8: ... playing audio it functions as fast rewind When playing images it will enlarge the files When displaying text files it scrolls up the files Right button volume fast forward When playing audio it fast forwards When playing images for every press images will rotate 90 degrees in clockwise way Whendisplaying text press and choose Whendisplaying text press and choose nextfile Long press to increase th...

Page 9: ...ying a video it will fast forward When playing images every press will rotate the image 90 degrees clockwise When playing audio it fast forwards When playing video images file it will reduce When playing text files it can scroll down the files When displaying text files will skip to the next file When displaying text files will skip to the previous file Right Rotate R Down n o t t u b n w o D imag...

Page 10: ... and Text which can be supported by the device from USB and TF card When reading the TF card press the left button on the top or the remote control to choose the TF card then press the enter button to select AV source input display use the standard AV cable to connect to Input Source AV HDMI PC RGB DMP USB SD OK 10 projector setup menu 1 Picture mode standard display mode standard dynamic mild use...

Page 11: ...ote control source button and then choose the right signal input source No 3D effect 1 Didn t transfer to 3D mode 2 3D glass is not power on 3 3D glass is not match 1 Transfer to 3D mode 2 power up the 3D glass 3 Glasses must be DLP Link 3D glass blinking 3D Glass s battery is low Charge the 3D glass o 20 o 2 0 8 m 3 5m 11 Battery installation of remote control 1 Remove battery box and plastic iso...

Page 12: ......

Reviews: