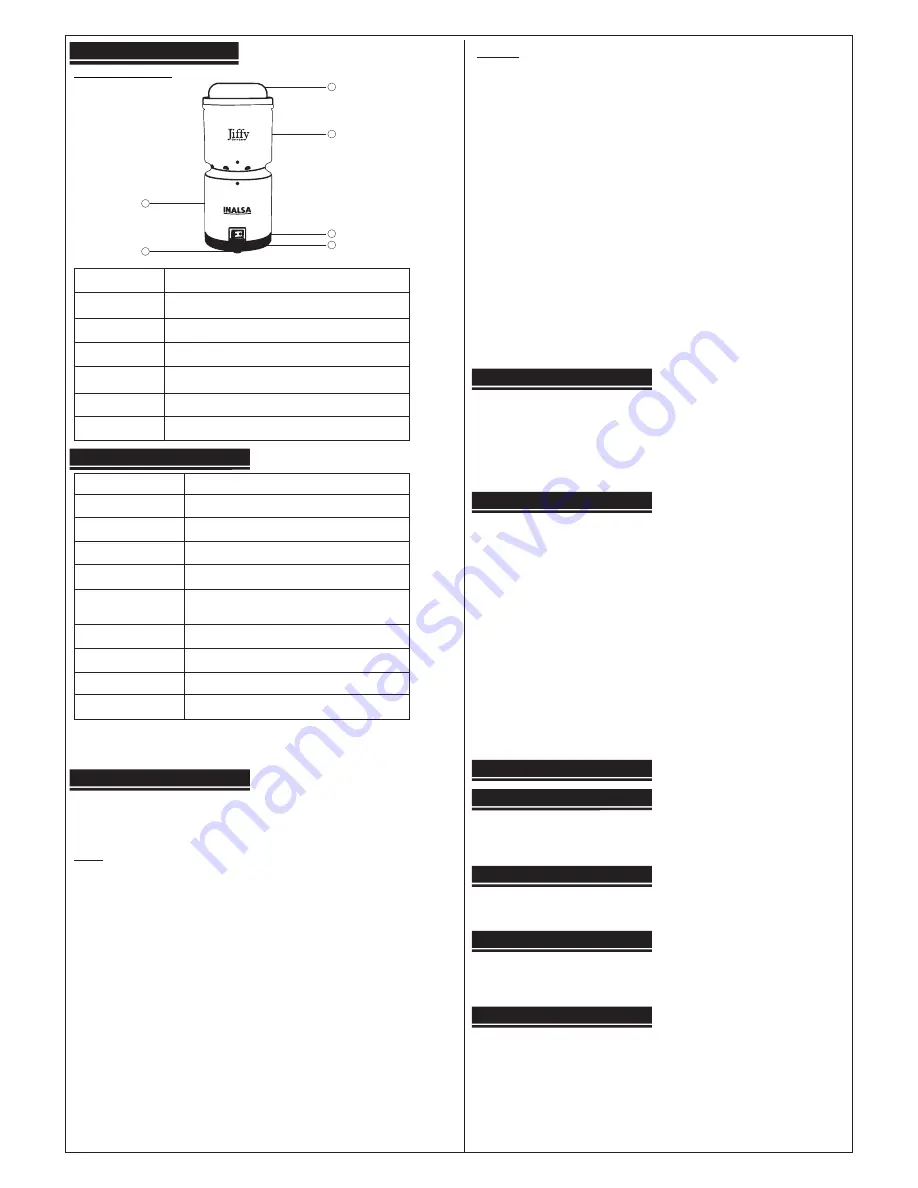
Part's Identifications
Parts Identification
Parts No.
Parts Name
1.
Motor housing
2.
Grinder cup
3.
Bottom
4.
ON/OFF switch
5.
Jar lid
6.
Bottom pads
Technical Specifications*
Important Instructions
Model
Grinder
Voltage
230V AC-50Hz.
Motor
Universal
Power Consumption
220 Watts
Rating
6 minutes continuous
Cord Plug
2-pin, 6A, 250V, PVC cord
1.75 M long (approx.)
Speed control
Single speed
Material of housing
ABS
Material of container
Stainless steel
Container capacity
200ml
* Due to continuous improvement in product, specifications are subject to
change without prior notice.
1. Please note that initial empty running of grinding cup will throw out some oil
impregnated in bushes. Therefore, it is advisable to thoroughly clean it
before actual use.
Do's
1. Thoroughly familiarize yourself with the functions of the grinder before
operation.
2. Before connecting the appliance make sure that the mains voltage must
comply with the voltage specified.
3. Place your grinder at a convenient height so that you can operate it easily.
You should be able to look down into the attachments to check the circulation
of the ingredients.
4. Clear out some space around the machine and keep grinder away from direct
heat and sun.
5. Remember MG operates at optimum efficiency at the specified voltage only.
Wide voltage fluctuations during operation might affect quality of grinding
even though motor will still be safe.
6. Operate in short cycles depending on the recipes.
7. Always clean the grinder cup so that sticky substances or particles do not
restrict the blade movement.
Don'ts
1. Do not run the motor without any load.
2. Your grinder cannot substitute for a storage shelf. So avoid storing food in
the grinder cup.
3. Do not operate grinder without the lid and grinder cup properly locked with
the motor housing part.
4. Do not touch the moving parts and blades in operation. These revolve at
extremely high speeds and may cause injury.
5. Do not overload the motor.
6. Do not allow the cord to hang over the edges of the table, or touch hot
surface.
7. Cleaning of the motor housing part under running water should be totally
avoided.
8. Keep the grinder away from the children.
9. Do not attempt to repair the grinder at home or allow any unauthorized
person to do it either. In the event of your grinder needing attention, take it
to your dealer or call him for help.
1. After unpacking the unit and before any use, make sure that all parts of the
unit and all its attachments are not damaged.
2. Wash the grinder cup, that will come into contact with the food material.
3. Carefully go through the instruction manual before starting the grinding
operation.
1. Place the grinder cup on the motor housing part and lock it in position.
2. Open the lid of the grinder cup by turning it in clockwise direction.
3. Put ingredients into the grinder cup and close the lid, turning anticlockwise
to lock it in position.
4. Connect the grinder to a power supply and switch ON the unit.
5. It is advisable to operate the machine in short bursts, as the ingredients
circulate, giving better end results. Make sure the lid is securely placed
over the cup while running.
6. When grinding is complete, detach the grinding cup from the base unit by
turning it in clockwise direction, so that you may pour out the ingredients
easily.
7. After washing and drying, the grinding cup may be fixed back on to the
base unit for storage.
The grinder can be used for grinding black pepper, roasted coffee seeds,
coriander, red chilies etc. The minimum quantity should be such that the
blades are not visible i.e. totally covered by the ingredients.
The grinder can be used for chutney grinding. Green chilies, Coriander,
Mint leaves & Coconut chutney can be made.
1. Hold down the jar lid lightly with hand while grinder is in operation.
2. Long runs heat up the contents and take away the flavour.
1. Pour a little soap and water into the cup, close the lid and run it on the main
unit. This dislodges the food particles lodged inside the cup.
2. Remove the jar and pour out the soap solution and rinse with tap water.
3. Wipe the area along the blades with a cloth and then store the unit after
drying.
Before First Use
How to Use
Functions
Dry Grinding
Wet Grinding
Practical Advice
Cleaning and Maintenance
1
2
3
4
5
6


