background image

13

OPERATING INSTRUCTIONS & MAINTENANCE

If you restart the compressor and the overload
cutout activates again, switch off the
compressor, remove the plug from the mains
and have your compressor checked by a
qualified service agent.

Draining the Reservoir
Caution!

It is important to drain the reservoir

before storage.

Switch the air compressor off, by pressing down
the red On/Off button, and remove the plug from
the mains supply.

Place a suitable container beneath the
compressor to catch any condensation.

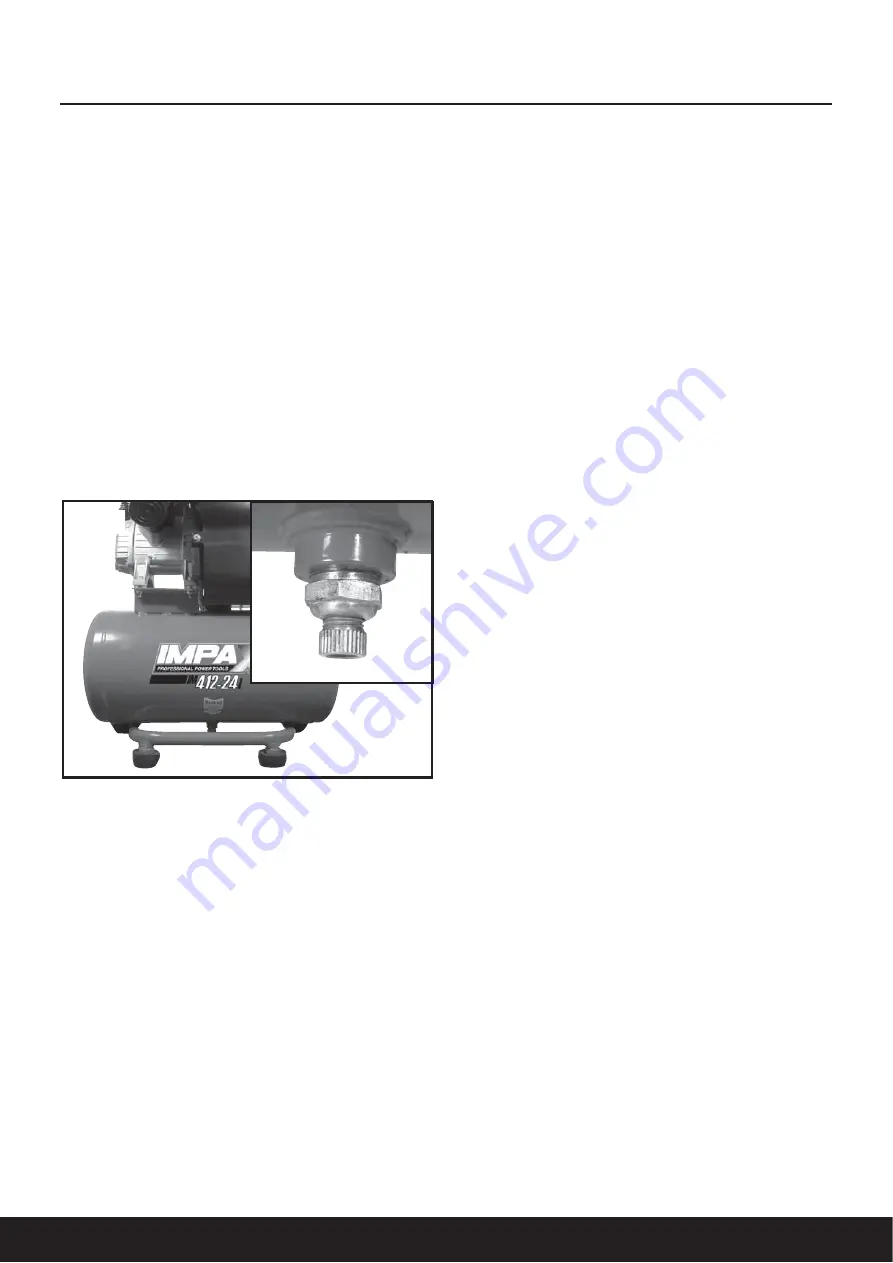
Carefully undo the drain valve anti-clockwise
until you hear a hissing noise, this is the
reservoir depressurising (Fig 17).

When the gauge indicates zero and the hissing
has stopped, tighten the drain outlet nut again.

Oil Changing

For changing the pump oil, be sure to do the
following:

1. Turn the unit off and unplug the power cord

from the receptacle.

2. Allow the compressor time to cool if it has

been in operation.

3. Open the drain valve to bleed all air from the

tank.

4. Close the drain valve.

5. Remove the oil fill cap on the pump.

6. Remove the sight glass with a box end

wrench or socket. Drain the oil into a suitable
container and dispose of properly. The
compressor may need to be tipped slightly
towards the drain hole to allow all of the oil
to drain.

7. Reattach the sight glass. When

re-assembling. Be sure the gasket is between
the sight glass and the pump crankcase.

8. Refill the compressor pump with an air

compressor oil such as SAE-30 non-
detergent (API CG/CD Heavy Duty) oil at
slow intervals until the oil reaches the center
of the red circle in the sight glass. Use a
SAE-10 during extreme winter conditions.

Maintenance
Important:

Before carrying out any

maintenance, always disconnect the
compressor from the mains supply, drain the air
receiver and, if necessary, allow the machine to
cool down before starting work.

1.The compressor must be drained completely
by loosening the water drain cock. Drain the air
receiver tank daily after use.

2. The air filter can be removed for either
cleaning or replacing. Clean the air filter element
after every 100 hours of use or if low pressure is
experienced. Replace the air filter after 200
hours of use. Note: Under no circumstances
should the compressor be operated with the air
filter removed.

3.Cleaning and maintaining the compressor
regularly will give a long and trouble free life.

Before long term storage it is advisable to give
the compressor a thorough clean. This should
include the removal of all fitted accessories. Do
not use any solvents as these can damage
plastic parts. Only use a clean cloth dampened
with warm soapy water. Any metal parts should
be given a wipe with a light machine oil to
prevent rusting.

Caution.

Water must never come into contact

with the compressor.

Fig 17

Summary of Contents for IM412-24L

Page 1: ...ND ADDRESS OF TECHNICAL DOCUMENTATION HOLDER 4HE TECHNICAL DOCUMENTATION REQUIRED TO DEMONSTRATE THAT THE PRODUCT MEETS THE REQUIREMENTS OF DIRECTIVE HAS BEEN COMPILED AND IS AVAILABLE FOR INSPECTION BY THE RELEVANT ENFORCEMENT AUTHORITIES 3IGNED 0RINT ARK 3HANNON 1UALITY IRECTOR 0 RANDS TD APIER OUSE 5NIT ORUNNA OURT 7ARWICK 5NITED INGDOM 6 1 ATE 4HE ACHINERY IRECTIVE OW 6OLTAGE QUIPMENT IRECTIVE...

Page 2: ...Always Read Instruction Manual Retain for Future Reference IM412 24L 24L HIGH FLOW AIR COMPRESSOR ...

Page 3: ... adequately packed to prevent transit damage and must be accompanied with a brief description of the fault and a copy of the receipt or other proof of purchase The manufacturer shall not be liable for any special exemplary direct indirect incidental or consequential loss or damage under this guarantee This guarantee is in addition to and does not affect any rights which the consumer may have by vi...

Page 4: ...d air can be potentially dangerous when not used correctly Do not exceed the maximum rated air pressure for the accessory Do not direct compressed air at yourself any other person or animals Do not direct any liquid or any other material that is being sprayed by yourself towards any other person or animals Only use hoses and connectors designed for use with compressed air The maximum working press...

Page 5: ...ny adapter plugs with earthed grounded power tools Unmodified plugs and matching outlets will reduce risk of electric shock b Avoid body contact with earthed or grounded surfaces such as pipes radiators ranges and refrigerators There is an increased risk of electric shock if your body is earthed or grounded c Do not expose power tools to rain or wet conditions Water entering a power tool will incr...

Page 6: ...asures reduce the risk of starting the power tool accidentally d Store idle power tools out of the reach of children and do not allow persons unfamiliar with the power tool or these instructions to operate the power tool Power tools are dangerous in the hands of untrained users e Maintain power tools Check for misalignment or binding of moving parts breakage of parts and any other condition that m...

Page 7: ...o the terminal marked Earth E Ensure that the outer insulation is gripped by the cord grip and that the wires are not trapped when replacing the plug cover The mains lead on this product is fitted with a 13 amp BS1363 A plug A 13 amp BS1362 fuse must be fitted in the plug If In Doubt Consult A Qualified Electrician There are no user serviceable parts inside except those referred to in the manual A...

Page 8: ...K RELEASE CONNECTOR REGULATED IR OUTLET PRESSURE GAUGE IR RECEIVER PRESSURE GAUGE 2ESET BUTTON IL FILL CAP 2UBBER FOOT IR RECEIVER TANK RAIN VALVE 0OWER LEAD 4ECHNICAL SPECIFICATION 6OLTAGE 6 Z 2ATED POWER 0 2ECEIVER CAPACITY 4YPE IL LUBRICATED REE AIR DELIVERY MIN IL TYPE AND CAPACITY 3 ML 7ORKING PRESSURE AR PSI O LOAD SPEED MIN 7EIGHT KG 3OUND POWER LEVEL D ...

Page 9: ... CARE WHEN LIFTING THE COMPRESSOR FROM THE PACKAGING AUTION O NOT LIFT THE COMPRESSOR BY THE PRESSURE REGULATOR ET ASSISTANCE IF NECESSARY 4HIS UNIT WEIGHS KG SSEMBLY ITTING THE 7HEELS NSERT A SPLIT PIN INTO THE INNER HOLE ON THE TRANSPORTATION FRAME AND THEN INSERT A WASHER IG NSERT THE WHEEL WITH THE AIR VALVE POINTING OUT FROM THE COMPRESSOR AND THEN LOCK INTO PLACE WITH A WASHER AND SPLIT PIN ...

Page 10: ...ressor oil such as SAE 30 non detergent API CG CD Heavy Duty oil at slow intervals until the oil reaches the center of the red circle in the sight glass Fig 6 Use SAE 10 during extreme winter conditions Locating the Air Compressor This compressor should be positioned on a stable flat surface or one with a maximum inclination of 15º Ensure that it is completely stable Do not cover or box in the com...

Page 11: ...f 8 5 Bar is exceeded should the pressure switch fail Overload Protection This compressor is fitted with an overload protection device In the event that the motor becomes too hot a thermal protection device will cut the mains supply to the motor When the motor temperature returns to normal the mains supply will be restored automatically Preparing For Use Before connecting your compressor to the ma...

Page 12: ...air receiver tank supply tube will become hot Connecting Hoses Accessories Warning Do not operate accessories at an air pressure greater than the maximum rated air pressure for the accessory Connect a hose to the compressor using the hose to compressor quick release connector Fig 11 When using the regulated air output first determine the working pressure of the accessory by referring to the access...

Page 13: ... and stop when the ring is released If the valve does not operate as described or if the valve is stuck it must be replaced by qualified service personnel before using the compressor Warning Do not remove or attempt to adjust the safety valve Reset Button This compressor is equipped with a thermal overload device which operates as a safety device to protect the motor When the motor overheats for a...

Page 14: ...the sight glass When re assembling Be sure the gasket is between the sight glass and the pump crankcase 8 Refill the compressor pump with an air compressor oil such as SAE 30 non detergent API CG CD Heavy Duty oil at slow intervals until the oil reaches the center of the red circle in the sight glass Use a SAE 10 during extreme winter conditions Maintenance Important Before carrying out any mainte...

Page 15: ...dicates that used and end of life electrical and electronic equipment should not be disposed of in household waste For the proper disposal treatment recovery and recycling please take these products to designated collection points where they will be accepted on a free of charge basis Alternatively in some countries you may be able to return your products to your retailer upon the purchase of an eq...

Page 16: ...requirements Waste electrical products should not be disposed of with household waste Please recycle where facilities exist Check with your Local Authority or retailer for recycling advice General warning Wear hearing protection Wear eye protection Wear respiratory protection CAUTION Hot surface Risk of electric shock The compressor must be disconnected from the mains supply before removing any co...

Reviews: