I3H08-12IBD
Specifications / Installation
__________________________________________________________________________________________________________________________________________________
5/12/2010
Page 4 of 5
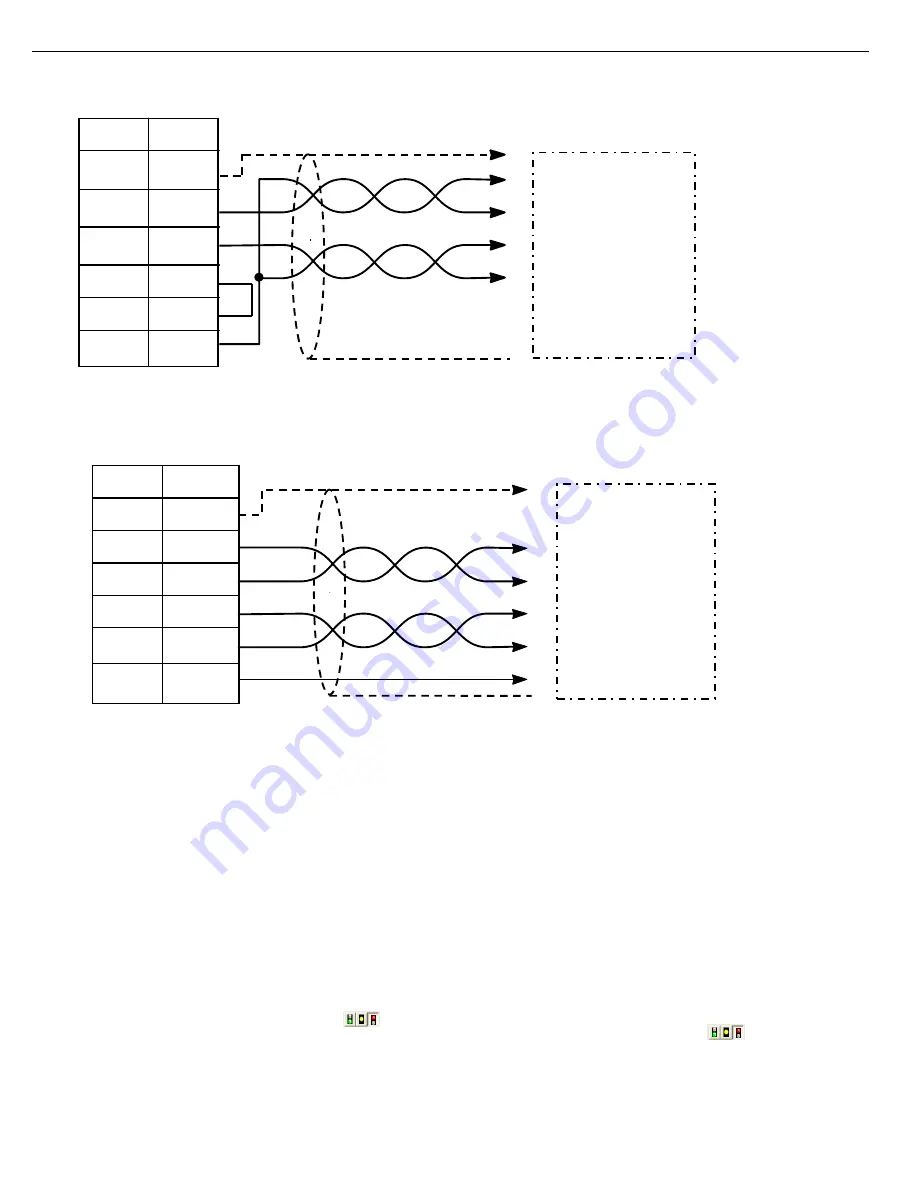
Figure 8 - Port 3 (CN1) RS-232 Port
Figure 9 – Port 3 (CN1) RS-485 Port
Shielded Cable
Receive Data
SG
SG
Send Data
To RS-232 Port
SG
7
CS
5
Port 3
RS
4
RD
3
SD
2
FG
1
Signal Pin No.
Shielded Cable
Send Data (-)
To RS-485 Port
SG
Send Data (+)
Receive Data (-)
Receive Data (+)
SG
7
-SD
13
Port 3
+SD
12
-RD
25
+RD
24
FG
1
Signal Pin No.
3.5
Quick Start Instructions
1.
Download i3 Configurator V9.0 (or better) from the IMO website and install, following on-screen instructions.
2.
Connect a suitable 24Vdc supply to the screw terminals as shown in Figure 5, and power up.
Serial Programming:
Requirements: i3-PC45 programming cable (optional part: PC501 - USB to
Serial Converter for PC’s without serial port), PC with Windows XP or better.
1.
Connect the RJ45 connector of the i3-PC45 cable to the i3H port
MJ1 and connect the 9-pin D-type connector to the PC and open
i3 Configurator.
2.
Select Tools->Application Settings->Communications-
>Configure->Com Port (or USB if convertor used). Input the
required com port number then press OK.
3.
If the connection is successful, then the status of the i3 should no
longer be grayed out and display as shown
.
4.
To get started with the programming download the i3 Basic
Tutorial from the IMO website.
Ethernet Programming:
Requirements: Ethernet cross-over patch cable, PC with Windows XP or better.
1.
Set up the PC to have a fixed IP and Subnet of 192.168.254.1/
255.255.255.0 (for in-depth instruction on how to do this please
download the i3 Ethernet tutorial.pdf).
2.
Connect the RJ45 connector of the patch cable to the i3H LAN port
and to the PC LAN port and open i3 Configurator.
3.
Select Tools->Application Settings->Communications->Configure-
>Ethernet. Then enter IP address 192.168.254.128, select mode
iNX/i3Ce then press OK.
4.
If the connection is successful, then the status of the i3 should no
longer be grayed out and display as shown
.
5.
To get started with the programming download the i3 Basic Tutorial
from the IMO website.


