background image

10

1-9

1-8

1-10

1-11

INS

TALLER

US

ER

 MAINTEN

AN

CE TECHNI

CI

AN

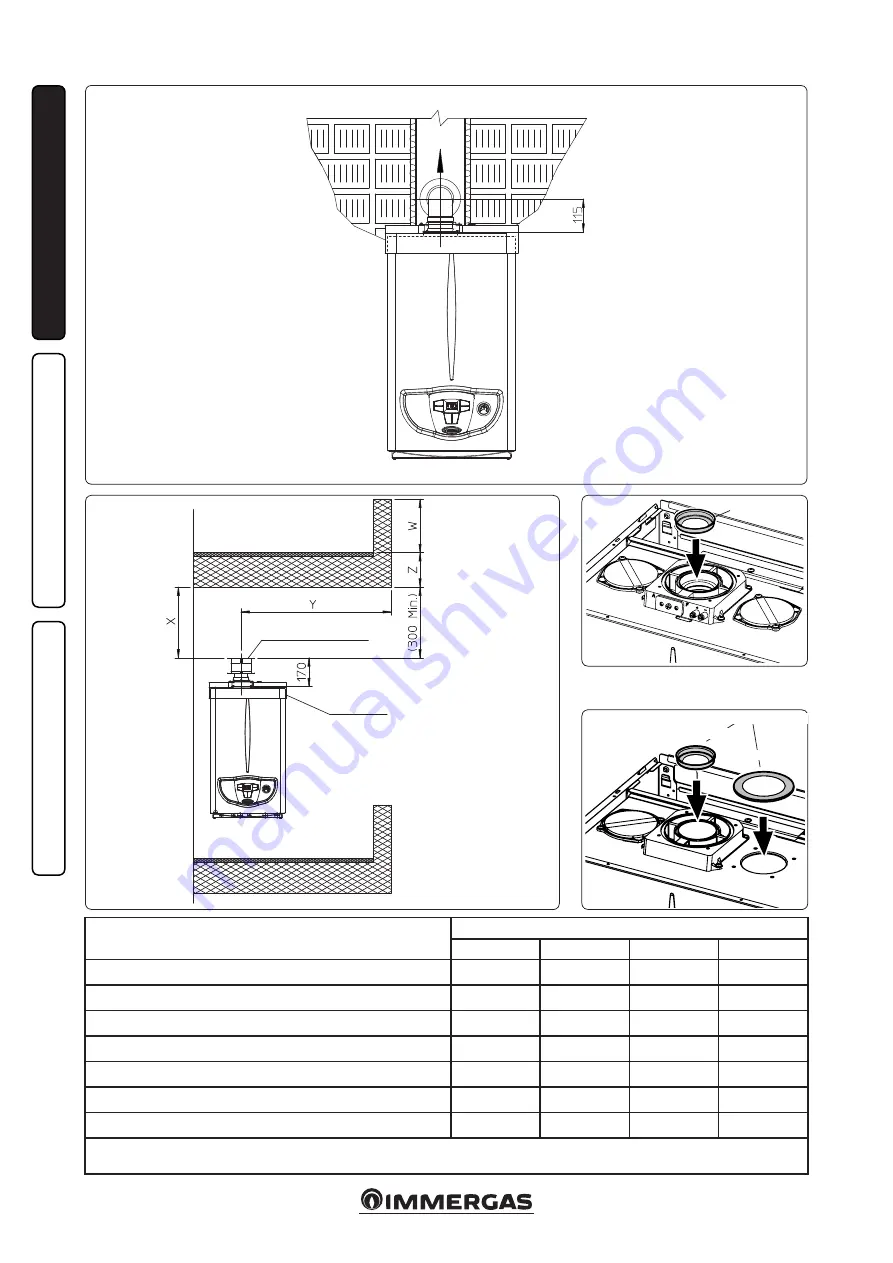
Type of installation

(duct length in metres)

Diaphragm

Ø 38

Ø 40

Ø 42,5

WITHOUT

Ø 60/100 horizontal concentric kit

From 0 to 0.5

From 0.5 to 1.5

-

From 1.5 to 3.0

Ø 60/100 vertical concentric kit

From 0 to 2.2

From 2.2 to 3.7

-

From 3.7 to 4.7

Ø 80/125 horizontal concentric kit

From 0 to 0.5

From 0.5 to 4.6

-

From 4.6 to 7.4

Ø 80/125 vertical concentric kit

From 0 to 5.4

From 5.4 to 9.5

-

From 9.5 to 12.2

Ø 80 vertical separator kit without bends

*From 0 to 20

*From 20 to 40

**From 0 to 22 ** From 22 to 33

Ø 80 horizontal separator kit with two bend

*From 0 to 16

*From 16 to 35

**From 0 to 17 ** From 17 to 28

Direct intake kit and Ø 80 drain in B

22

 configuration

From 0 to 0.5

-

From 0.5 to 15

-

These maximum extension values are considered intake with 1 metre drain pipe

** These maximum extension values are considered in draining with 1 metre intake pipe and Ø 47 diaphragm on the intake hole.

VERTICAL TERMINAL KIT 

FOR DIRECT DRAINING

INTAKE
COVER KIT

DIAPHRAGM

DIAPHRAGM

Exhaust

Intake

Summary of Contents for MINI EOLO 28 3E

Page 1: ...MINI EOLO 28 3E Instruction and warning booklet IE 1 038767ENG ...

Page 2: ......

Page 3: ...ly with the provisions specified in the current regulation and technical standards In compliance with legislation in force the systems must be designed by qualified professionals within the dimensional limits established by the Law Installation and maintenance must be performed in compliance with the regulations in force according to the manufacturer s instructions and by professionally qualified ...

Page 4: ...l panel 19 2 4 Using the boiler 20 2 5 Troubleshooting 20 2 6 Boiler shutdown 21 2 7 Restore central heating system pressure 21 2 8 System draining 21 2 9 Anti freeze protection 21 2 10 Case cleaning 21 2 11 Decommissioning 21 3 Boiler start up initial check 22 3 1 Hydraulic diagram 22 3 2 Wiring diagram 23 3 3 Troubleshooting 23 3 4 Information menu 24 3 5 Programming the p C B 24 3 6 Converting ...

Page 5: ... normal servicing therefore it is advisable to leave clearance of at least 3 cm between the boiler casing and the vertical sides of the cabinet Leave adequatespaceabovetheboilerforpossiblewater and flue removal connections Keep all flammable objects away from the ap pliance paper rags plastic polystyrene etc Do not place household appliances underneath the boiler as they could be damaged if the sa...

Page 6: ...lution potential of 2 EN 1717 2002 The materials that Immergas boilers are made from are resistant to ethylene and propylene glycol based anti freeze liquids If the mixtures have been prepared according to industry standards Forlifeandpossibledisposal followthesupplier s instructions 1 2 MAIN DIMENSIONS Key G Gas supply AC Domestic hot water outlet ACV Solar valve kit DHW inlet Optional AF Domesti...

Page 7: ...h special pickling or de scaling products to remove any deposits that could compromise correct boiler operation In compliance with Standards in force it is man datory to treat the water in the heating system chemically in order to protect the system and appliance from deposits of lime scale Hydraulic connections must be made in a rational way using the couplings on the boiler template The boiler s...

Page 8: ... subdivided into zones using the relevant kit the CARV2 must be used with its climate thermostat function disabled i e it must be set to On Off mode Comando Amico Remoto remote controlV2 or On Off timer thermostat electrical con nections Optional The operations described below must be performed after having removed the voltage from the appliance Any thermostat or On Off environment chronothermosta...

Page 9: ...h the boiler is installed and flue exhaust in individual flue or to the outside In this configuration the boiler is classified as type B22 With this configuration air intake takes place directly from the environ ment in which the boiler is installed and only functions in permanently ventilated rooms the flue exhaust must be connected to its own individual flue or channelled directly into the exter...

Page 10: ...rom 0 to 5 4 From 5 4 to 9 5 From 9 5 to 12 2 Ø 80 vertical separator kit without bends From 0 to 20 From 20 to 40 From 0 to 22 From 22 to 33 Ø 80 horizontal separator kit with two bend From 0 to 16 From 16 to 35 From 0 to 17 From 17 to 28 Direct intake kit and Ø 80 drain in B22 configuration From 0 to 0 5 From 0 5 to 15 These maximum extension values are considered intake with 1 metre drain pipe ...

Page 11: ...xhaust m 2 0 Terminal complete with concentric vertical intake exhaust Ø 80 125 Intake and Exhaust 33 m 2 0 m 5 5 Intake m 14 3 Exhaust m 11 0 Concentric vertical intake exhaust terminal Ø 80 125 Intake and Exhaust 26 5 m 1 6 m 4 4 Intake m 11 5 Exhaust m 8 8 Terminal complete with concentric horizon tal intake exhaust Ø 80 125 Intake and Exhaust 39 m 2 3 m 6 5 Intake m 16 9 Exhaust m 13 Concentri...

Page 12: ...ce fac tor of 100 In these cases the special extensions must be requested Connection with N 1 extension Fig 1 15 Max distance between vertical boiler axis and external wall is 1855 mm Connection with N 2 extensions Fig 1 16 Max distance between vertical boiler axis and external wall is 2805 mm Horizontal intake exhaust kit Ø 80 125 Kit assembly Fig 1 17 install the bend with flange 2 onto the cent...

Page 13: ...configuration can be extended up to a maximum of 12 200 mm vertical rectilinear withtheterminalincluded Fig 1 20 This configuration corresponds to a resistance factor of 100 In this case the special extensions must be requested The terminal Ø 60 100 can also be used for vertical exhaust in conjunction with concentric flange code 3 011141 sold separately The height between the terminal cap and half...

Page 14: ...pipes Ø 80 must not exceed the values statedinthefollowingtable If mixed accessories or components are used e g changing from a separator Ø 80 80 to a concentric pipe the maximum extension can be calculated by using a resistance factor for each component or the equivalent length The sum of these resistance factors must not exceed 100 Temperature loss in flue ducts To prevent problems of fume conde...

Page 15: ...startingwithan insulated elbow is possible by choosing either the intake or exhaust pipe When starting with the insulated intake bend it must be engaged on its flange until it is taken up to stop on the flue gas exhaust flange a situation that takes the two intake flue gas exhaust outlets to the same height Temperature loss in insulated flue ducting To prevent problems of fume condensate in the ex...

Page 16: ... proceed with sys tem filling via the filling valve Fig 2 2 Fillingisperformedatlowspeedtoensurerelease of air bubbles in the water via the boiler and heating system vents The boiler has a built in automatic venting valve on the pump Check if the cap is loose Open the radiator air vent valves Close radiator vent valves only when water escapes from them Closethefillingvalvewhentheboilermanometer in...

Page 17: ...er to be drained separately without having to empty the entire system Polyphosphate dispenser kit The polyphos phate dispenser reduces the formation of lime scale and preserves the original heat exchange and domestic hot water production conditions The boiler is prepared for application of the polyphosphate dispenser kit Cover kit For outdoor installations in partially protected areas and with dir...

Page 18: ...ressure point 10 Negative signal pressure point 11 Flue pressure switch 12 Delivery probe 13 Fumes hood 14 Safety thermostat 1 18 BOILER COMPONENTS 15 Primary heat exchanger 16 Ignition and detection electrodes 17 System expansion vessel 18 Burner 19 System pressure switch 20 Vent valve 21 Boiler pump 22 Plate heat exchanger 23 Three way valve motorised 24 System draining valve 25 By pass 26 3 bar...

Page 19: ...s ensure that a qualified technician checks efficiency of the ducting or other devices Never clean the appliance or connected parts with easily flammable substances Never leave containers or flammable substances in the same environment as the appliance Attention the use of components that employ electrical power requires some fundamental rules to be observed do not touch the appliance with wet or ...

Page 20: ...this does not occur within 10 seconds the boiler goes into ignition block code 01 To eliminate ignition block the Reset button 1 must be pressed On commissioning or after extended inactivity it may be necessary to eliminate the ignition block If this phe nomenon occurs frequently contact a qualified technician for assistance e g Immergas After Sales Technical Assistance Service Overtemperature the...

Page 21: ...E CENTRAL HEATING SYSTEM PRESSURE Periodically check the system water pressure The boiler pressure gauge should read a pressure between 1 and 1 2 bar If the pressure is below 1 bar with the circuit cool restore normal pressure via the cock located in the lower part of the boiler Fig 2 2 N B close the cock after the operation If pressure values reach around 3 bar the safety valve may be activated I...

Page 22: ...ated upstream from the boiler check that the intake and or exhaust terminals are not blocked check activation of the no air safety pressure switch ensure activation of all adjustment devices 3 1 HYDRAULIC DIAGRAM seal the gas flow rate regulation devices if set tings are modified check the production of domestic hot water check sealing efficiency of water circuits check ventilation and or aeration...

Page 23: ...ver Make sure 1 the intake exhaust duct is not too long over allowed length 2 the intake exhaust duct is not partially blocked on the exhaust or intake side 3 the diaphragm of the flue exhaust is adequate for the length of the intake exhaust duct 4 thatthesealedchamberiskeptingoodcondi tions 5 the fan power supply voltage is not less than 196 V Irregular combustion red or yellow flame This may be ...

Page 24: ...Standard setting 0 instant boiler 1 Boiler with storage tank 0 Display lighting Establishes the display light ing mode Display lighting P2 Range of values which can be set Standard setting 0 Off 1 Auto 2 On 1 Off the display is always lit with low intensity Auto the display lights up during use and lowers after 5 seconds of inactivity In the case of anomaly the display flashes On the display is al...

Page 25: ... type of gas the following operations are required remove the voltage from the appliance replace the main burner injectors making sure to insert the special seal rings supplied in the kit between the gas manifold and the injectors apply voltage to the appliance use the boiler push button control panel to select the gas parameter type G1 and select Ng in case of Methane supply or Lg in the case of ...

Page 26: ... activation is sig nalled by the indication of the flow temperature and the flashing and symbols This function allows the technician to check the combustion parameters Once the function is activated it is possible to select whether to perform the check in CH status regulating the parameters with buttons 5 and 6 or in DHW mode opening any DHW cock and always regu late the parameters with the button...

Page 27: ... the relative lower retainers 2 Remove the decorative frame a from the casing c 3 Loosen the 2 front screws b for fixing the casing 4 Loosen the 2 lower screws b for fixing the casing 5 Pull the case towards yourself c 6 Push the case c upwards at the same time to release it from the upper hooks Installation drawings key Unmistakeable component identification Sequential identification of the opera...

Page 28: ...28 3 5 4 4 5 6 6 d d c INSTALLER USER MAINTENANCE TECHNICIAN ...

Page 29: ...n the table repre sent the difference in existing pressures between the gas valve outlet and the combustion chamber The adjustments should therefore be carried out using a differential manometer small U shaped column or digital manometer with the probes inserted in the pressure test gas valve outlet and on the sealed chamber positive pres sure test The power data in the table has been obtained wit...

Page 30: ... loss at case with burner On Off 0 50 0 43 Heat loss at flue with burner On Off 5 10 0 04 Central heating circuit max operating pressure bar 3 Central heating circuit max operating temperature C 90 Adjustable central heating temperature C 35 85 System expansion vessel total volume l 7 4 Expansion vessel factory set pressure bar 1 Water content in generator l 2 8 Total head available with 1000 l h ...

Page 31: ...ber CHK Check Cod PIN PIN code Type Type of installation ref CEN TR 1749 Qnw min Minimum heating capacity domestic Qn min Minimum heating capacity heating Qnw max Maximum heating capacity domestic Qn max Maximum heating capacity heating Pn min Minimum heat output Pn max Maximum heat output PMS Maximum pressure system PMW Maximum pressure domestic D Specific flow rate TM Maximum working temperature...

Page 32: ...32 ...

Page 33: ...33 ...

Page 34: ...34 ...

Page 35: ...35 ...

Page 36: ...gas Italia immergas com Immergas S p A 42041 Brescello RE Italy Tel 0522 689011 Fax 0522 680617 Certified company ISO 9001 This instruction booklet is made of ecological paper Cod 1 038767ENG rev ST 002120 003 07 17 ...

Reviews: