background image

C12

1-13

4

5

6

1

2

3

8

9

10

7

10

IN

ST

ALLER

U

SER

MAINTE

NA

NCE TECHN

IC

IAN

1.8  INSTALLATION OF INTAKE / 

EXHAUST TERMINALS FOR


fan assisted.

Horizontal intake - exhaust terminal Ø60/100 

(supplied as standard). 

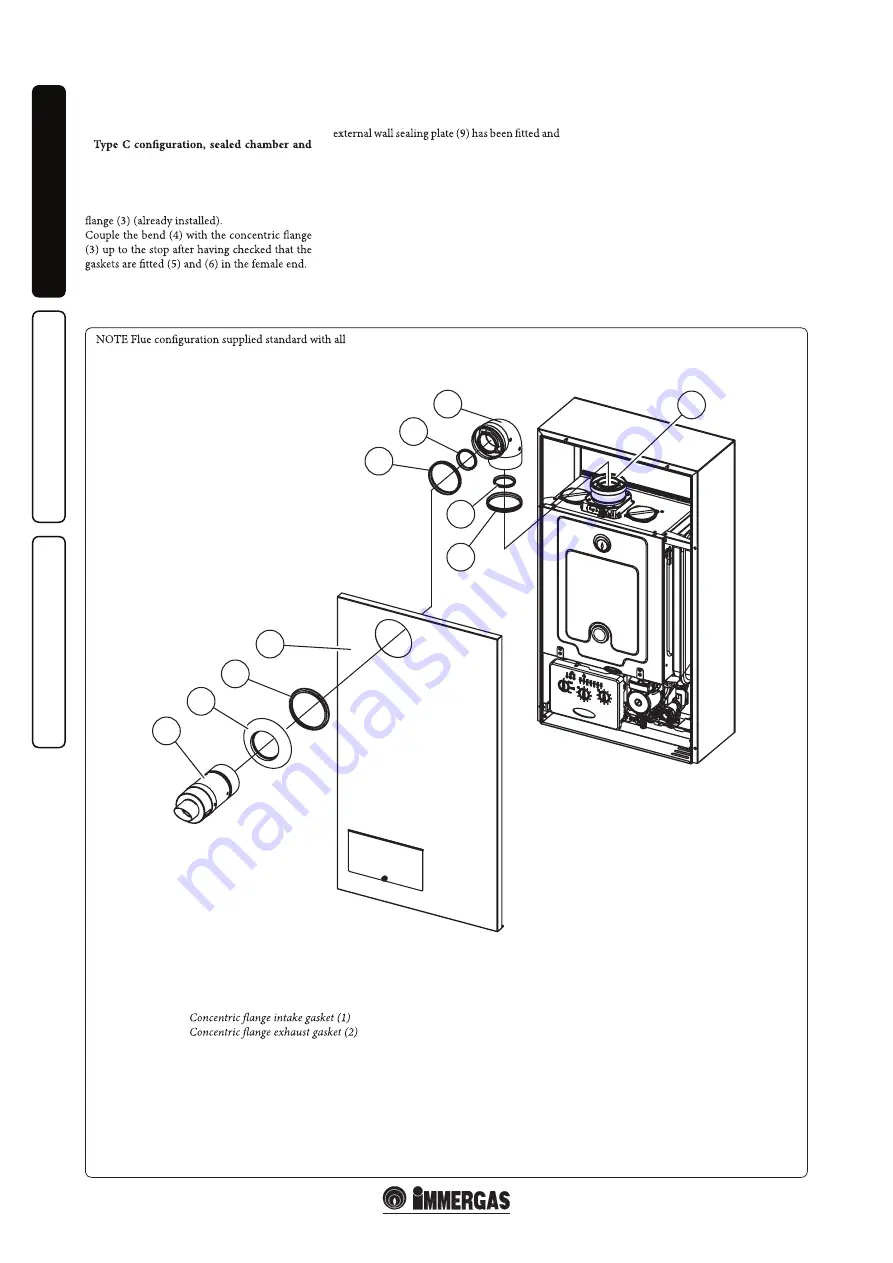
Assembly (Fig. 1-9): 

install the gaskets (1) and (2) in the concentric 

Mount the casing front (7) referring to  

Paragraph 3.14.

Couple the terminal pipe (10) with the male end 

(smooth) into the female end (with lip seals) of 

the bend (4) up to the stop, making sure that the 

checking it is on the casing front (7) and gasket 

(8); this will ensure proper sealing and joining 

of the elements.

Components:

 No. 1 - 

 No. 1 - 

 No. 1 -  90° concentric bend (4)

 No. 1 -  90° concentric bend exhaust gasket (5)

 No. 1 -  90° concentric bend intake gasket (6)

 No. 1 -  Gasket (8)

 No. 1 -  External wall sealing plate (9)

 No. 1 -  Concentric intake/exhaust terminal Ø 60/100 (10)

Flue kit complete 60/100 Australia code: 3.023633

HE external boilers.

HE 30 COMBI EXTERNAL

The Immergas boiler when exposed to 

extreme wind conditions will deactivate the 

gas and combustion operation. When 

conditions change the boiler will safely, and 

automatically resume normal operation and 

performance.

No lock out light will illuminate and no 

requirement for manual reset. A terminal kit 

is available if the appliance is to be installed in 

applications / areas that extreme wind 

conditions are common. Please refer to Hunt 

Heating Customer Service.

Summary of Contents for HE COMBI EXTERNAL

Page 1: ...HE COMBI INTERNAL EXTERNAL INSTRUCTION INSTALLATION USER MANUAL Wall Mounted Heating Only Boiler ...

Page 2: ...for installation use and maintenance stages sites environment protection injury prevention comply with the laws in force and technical standards hed by the Law Installation and maintenance must be performed in compliance with the regulations in force according to the manufacturer s instructions and Improper installation or assembly of Immergas appliance and or components accessories kit and device...

Page 3: ...n to another type of gas 16 3 6 Possible adjustments 16 3 7 Programming the P C B 16 3 8 Automatic slow ignition function with timed ramp delivery 18 3 9 Chimney sweep function 18 3 10 Pump anti block function 18 3 11 three way anti block system 18 3 12 Radiators anti freeze function 18 3 13 P C B periodical self check 18 3 14 Casing removal 19 3 15 Yearly control and maintenance of the appliance ...

Page 4: ...incorrect operation modify or repair the appliance alone Failuretocomply withtheaboveimpliespersonal responsibility and invalidates the warranty Installation Standards All installation must comply with AS 5601 Attention wall mounting of the boiler must generator they only ensure adequate support if inserted correctly according to technical standards in walls made of solid or semi hollow brick or b...

Page 5: ...mperature in the boiler falls below 4 C the boiler is correctly connected to gas and electricity power supply circuits the boiler is powered constantly the boiler is not in no ignition block Par 2 5 the boiler essential components are not faulty In these conditions the boiler is protected against freezing to an environmental temperature of 5 C Minimum temperature 15 C If the boiler is installed in...

Page 6: ...malies temperature to be adjusted to the actual needs of the room being heated in order to obtain the desired room temperature with extreme precision and therefore with evident saving in directly by the boiler by means of the same 2 wires used for the transmission of data between boiler and chrono thermostat Comando Amico Remoto remote control V2 CARV2 Optional the voltage from the appliance Any C...

Page 7: ...of pipe of the same diameter the so called equivalent length obtained from the ration between the relative Resistance Factors All boilers have an experimentally obtainable maximum Resistance Factor equal to 100 e maximum Resistance Factor allowed corresponds to the resistance encountered with the maximum allowed pipe length for each calculations to be made to verify the possibility Positioning of ...

Page 8: ...t 21 m 1 3 Intake m Exhaust m Concentric bend 45 Ø60 100 Intake and Exhaust 16 5 m 1 Intake m Exhaust m Terminal complete with concentric horizontal intake exhaust Ø60 100 Intake and Exhaust 46 m 2 8 Intake m Exhaust m Concentric horizontal intake exhaust terminal Ø60 100 Intake and Exhaust 32 m 1 9 Intake m Exhaust m Terminal complete with concentric vertical intake exhaust Ø60 100 Intake and Exh...

Page 9: ...oiler positioning the gasket 1 which does not require lubrication with the circular projections downwards in the screws present in the kit Imitation aluminium tile installation replace the tile with the aluminium sheet 4 shaping it to half shell 6 and insert the intake exhaust pipe 5 Fit the Ø60 100 3 concentric terminal pipe up to the stop making sure that the wall sealing and joining of the elem...

Page 10: ...nents No 1 No 1 No 1 90 concentric bend 4 No 1 90 concentric bend exhaust gasket 5 No 1 90 concentric bend intake gasket 6 No 1 Gasket 8 No 1 External wall sealing plate 9 No 1 Concentric intake exhaust terminal Ø 60 100 10 Flue kit complete 60 100 Australia code 3 023633 HE external boilers HE 30 COMBI EXTERNAL The Immergas boiler when exposed to extreme wind conditions will deactivate the gas an...

Page 11: ...e the concentric intake exhaust pipe 8 with the male end smooth into the female end sure that the external wall sealing plate 7 has on the casing front 2 this will ensure proper sealing and joining of the elements Fit the cover 9 on the casing front 10 using the gasket 11 Mount the casing front 10 referring to Paragr 3 14 Product code 3 023758 available only from Hunt Heating and can be extended t...

Page 12: ... device is engaged in the event of gas supply failure and check activation time check the intervention of the main switch located upstream from the boiler and in the boiler check that the concentric intake exhaust one of the checks should be negative N B the boiler preliminary check must be carried boiler warranty is valid as of the date of testing user 1 16 CIRCULATION PUMP are supplied with a bu...

Page 13: ...estic hot water probe 13 Gas valve 14 15 Manometer 16 17 Flow probe 18 Safety thermostat 19 Flue hood 20 Primary heat exchanger 21 Ignition and detection electrodes 22 Burner 23 Air vent valve 24 System expansion vessel 25 3 bar safety valve 26 DHW heat exchanger 27 3 way valve motorised 28 Condensate drain trap 29 By pass System draining valve GAS DHW COLD INLET RETURN FLOW N B Schematic shown he...

Page 14: ...act with Heating service technician 2 2 GENERAL WARNINGS Never expose the wall mounted boiler to direct vapours from a cooking surface Use of the boiler by unskilled persons or children is strictly prohibited For safety purposes check that the concentric air intake ue exhaust terminal if tted is not blocked If temporary shutdown of the boiler is required proceed as follows a drain the heating syst...

Page 15: ... second attempt fails eliminate the start up block it is necessary to turn the main switch 12 taking it temporarily to the Reset position or using the Reset key on the CARV2 in inhibited for at least one hour One attempt is gained every hour for a maximum of 5 attempts may be necessary to eliminate the ignition block Or in the event the heat exchanger or the trap are clogged and cannot drain the c...

Page 16: ...TORE HEATING SYSTEM PRESSURE Periodically check the system water pressure between 1 and 1 2 bar If the pressure falls below 1 bar with cool circuit restore normal pressure using the valve provided by the maintenance technician N B If pressure values reach around 3 bar the safety valve may be activated In this case contact a professional technician for assistance In the event of frequent pressure d...

Page 17: ...h ensure activation of all adjustment devices ensure production of domestic hot water check ventilation and or aeration of the installation room where provided result do not commission the system 3 1 HYDRAULIC DIAGRAM Key 1 2 Flow limiter 3 Domestic hot water probe 4 System pressure switch 5 Gas valve 6 Burner 7 Sealed chamber 8 Primary heat exchanger 9 Flue hood 10 Fan 11 Flue pressure switch 12 ...

Page 18: ...e no residues of material blocking the the trap being blocked Check by means of the condensate drain cap that there are no residues Noise due to air in the system Check opening of the hood of the special air vent valve Fig 1 18 Make sure the system pressure and expansion vessel pre charge values are within the expansion vessel must be 1 0 bar the value of system pressure must be between 1 and 1 2 ...

Page 19: ...AMMING THE P C B for possible programming of several operation parameters By modifying these parameters as described below the boiler can be adapted To access the programming phase proceed as follows position the main switch on Reset for a time between 15 and 20 seconds LED 1 will start At this point re position the general selector on When the programming phase has been to choose the parameter to...

Page 20: ...ing ramp timer continuous variation Flashing LED slow 65 seconds LED 2 130 seconds LED 3 195 seconds LED 4 260 seconds LED 5 325 seconds LED 6 390 seconds LED 7 455 seconds LED 8 520 seconds LED 9 585 seconds LED 10 650 seconds Standard setting LED 11 Heating switch on delay request from Room thermostat and Comando Amico Remoto remote controlV2 CARV2 case of particular systems e g area systems wit...

Page 21: ...least once every 3 hours for 2 5 minutes 3 11 Both in domestic hot water and in domestic hot water central heating phase the boiler is equipped with a function that starts the three in operation running it for a full cycle so as to reduce the risk of the three way group becoming blocked due to prolonged inactivity 3 12 FUNCTION If the system return water is below 4 C the boiler starts up until rea...

Page 22: ... from the lateral hooks 4 and upper ones 5 Det B Det A 3 16 VARIABLE HEAT POWER N B the pressures indicated in the tables between the gas valve outlet and the combustion remove the sides 6 by loosening the screws 7 and pulling towards yourself to free the side from the seat 8 Fig 3 5 carried out using a di erential manometer small U shaped column or digital manometer with the probes inserted in th...

Page 23: ...osen the two screws 2 remove the front 3 of the boiler by pushing it upwards and at the same time pull it towards yourself to release it from the upper pins 4 remove the lower protection plate 5 by loo sening the two screws 6 remove the upper right bracket 7 by loo sening the upper screw 8 and pushing it to remove it from the screw with stop 9 remove the casing side 10 by loosening the screws 11 a...

Page 24: ...ated in the tables between the gas valve outlet and the combustion carried out using a di erential manometer small U shaped column or digital manometer with the probes inserted in the pressure test gas valve outlet and on the sealed chamber positive Key 1 Modulating Coil 2 Minimum power adjustment nut 3 Maximum power adjustment nut 4 Gas valve outlet pressure point 5 Gas valve inlet pressure point...

Page 25: ...perature C 35 85 System expansion vessel total volume l 5 1 Expansion vessel factory set pressure bar 1 Pressure relief setting bar psi 3 44 Expansion vessel capacity L 10 Water content in generator l 4 0 Head available with 1000 l h flowrate kPa m H2 O 30 2 3 1 Internal pump head kPa Hot water productionheatoutput MJ h kW 126 34 9 Speci c ow rate t25o C l min 20 Domestichot watercircuit max worki...

Page 26: ...a plate Gas Type Natural Gas LPG Internal External Gas pressure Settings Central Heating Adjusted output setting Max kPa kW New Existing System FLUSHED before instal lation of boiler Yes Water treatment No Yes Product Qty Used Litres System Volume Litres Dilution rate Litres per 100 litres Installer Details Company Address City State Postcode Installer Name PIC Licence No Commissioning completed D...

Page 27: ...e system heats up 11 Check that heat is circulating to all radiators through the manual or thermostatic radiator valve 12 ture to a mid temperature point se the water temperature to the new setting 13 Check that all radiators are hot all the way up If the radiator is cold at the top then there is usually air in the radiator Bleed the radiator Balance the system so that all radiators are hot as acc...

Page 28: ...y Contact phone number Work Completed Note 6 SERVICE RECORDS Handover Instructions No Description when done 1 Fill in all the details on this Boiler manual 2 Instruct the owner users on the correct operation of this heating system this includes how to 3 4 ple fault resolution i e power on 5 How to check and remove air in the radiators Give them a bleed key 6 7 Recommend that the boiler should be s...

Page 29: ...Contact phone number Work Completed Note Service 6 year 5 Date Service technician Name PIC Licence No Service Company Contact phone number Work Completed Note Service 7 year 6 Date Service technician Name PIC Licence No Service Company Contact phone number Work Completed Note 31 ...

Page 30: ...Contact phone number Work Completed Note Service 6 year 8 Date Service technician Name PIC Licence No Service Company Contact phone number Work Completed Note Service 7 year 9 Date Service technician Name PIC Licence No Service Company Contact phone number Work Completed Note 32 ...

Page 31: ......

Page 32: ...Cod 1 034245 rev 15 038552 001 04 2013 AS 4552 Cert GAS40003 SAI Global Hunt Heating reserves the right to modify its products and ...

Reviews: