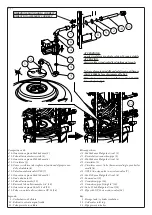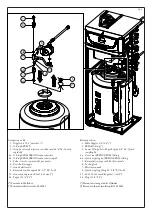
Hercules solar (Fig. 4).
Si suggerisce di lubrificare tutte le connessioni O-Ring tramite
comune sapone liquido diluito leggermente con acqua.
Eseguire le operazioni preliminari come indicato nel paragrafo
precedente "Installazione modello Hercules Solar 200 Conden-
sing".
- Eliminare il raccordo (1) e relativo O-Ring (2).
- Premontare l'O-Ring inferiore (4a) e l'O-Ring superiore (4b)
sul raccordo (3).
- Fissare il raccordo premontato (3+4a+4b) al coperchio del bol-
litore serrandolo con apposita chiave esagonale.
- Inserire il massello del nuovo tubo ricircolo (5), sul raccordo (3)
come indicato in Fig. 4, posizionando sul lato destro il tubo in
rame sagomato assicurandosi che le superfici in ottone siano
in battuta.
- Bloccare il raccordo (3+4a+4b) sul massello (5)inserendo la
forcella posteriormente (6) nei fori inferiori.
- Applicare materiali di tenuta quali teflon o simili sulla filettatura
dell'anodo (7).
- Premontare l'anodo (7) con teflon sul raccordo (8).
N.B.: Non forzare il serraggio del corpo in plastica su quello
in ottone assicurandosi comunque di ottenere la necessaria
tenuta.
- Posizionare l'O-Ring (4b) nell'apposita sede presente sul rac-
cordo (8).
- Inserire il gruppo premontato (7+8+4b) fino a battuta sul mas-
sello (5) e bloccarlo inserendo la forcella posteriormente (6)
nei fori superiori.
Per il montaggio del circolatore e dei tubi presenti nel "Kit Ri-
circolo" fare riferimento al paragrafo precedente "Installazione
modello Hercules Solar 200 Condensing" ricordandosi che il tubo
di allacciamento (3) di Fig. 2 non verrà utilizzato.
Per i collegamenti degli anodi fare riferimento al foglio istruzioni
dei kit cod. 3.030694 e cod. 3.029643.
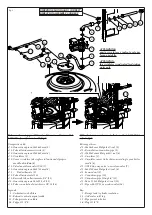
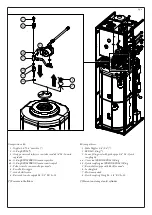
Hercules solar (Fig. 4).
It is recommended to lubricate the O-Ring connections with
common liquid soap slightly diluted with water.
Perform the preliminary operations as indicated in the previous
paragraph "Installation of Hercules Solar 200 Condensing model".
- Eliminate the fitting (1) and relative O-Ring (2).
- Pre-assemble the lower and upper O-Rings (4a) and (4b) on the
fitting (3).
- Fix the pre-assembled fitting (3+4a+4b) to the storage tank /
cylinder cover by tightening with appropriate hexagonal key.
- Insert the block of the new recirculation pipe (5) on the fitting
(3) as shown in Fig. 4, positioning the shaped copper pipe on
the right side, making sure that the brass surfaces are at the end
stop.
- Block the fitting (3+4a+4b) on the block (5) by inserting the
rear fork (6) in the lower holes.
- Apply the sealing materials such as the Teflon or similar on the
thread of the anode (7).
- Pre-assemble the anode (7) with teflon on the fitting (8).
N.B.: Do not force the plastic body on the brass body, making
sure to obtain the necessary seal.
- Position the O-Ring (4b) in the appropriate seat on the fitting
(8).
- Insert the pre-assembled unit (7+8+4b) to the end stop on the
block (5) and lock it by inserting the rear fork (6) in the upper
holes.
To assemble the pump / circulator and the pipes in the “Recircula-
tion Kit”, refer to the previous paragraph “Installation of Hercules
Solar 200 Condensing model”, remembering that the connection
pipe (3) of Fig. 2 will not be used.
For the anode connections, refer to the instruction manual of the
kits code 3.030694 and code 3.029643.


