Iluv i9300 Instruction Manual Download Page 14

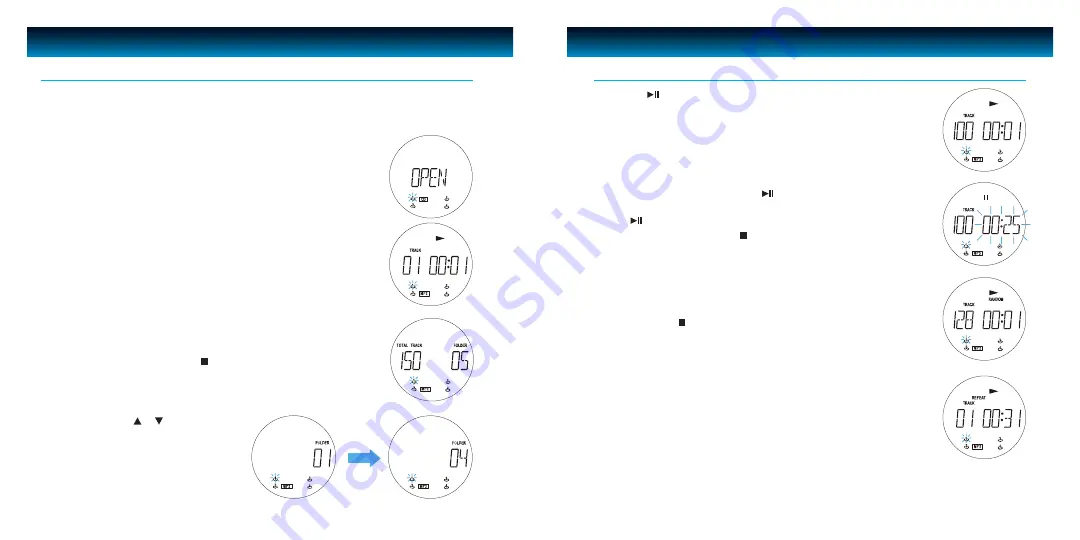
Inserting and ejecting an MP3 disc

The CD compartments (2)/(26) are opened for inserting or removing compact discs by pressing the 

OPEN / CLOSE

 (15)/(16) buttons.

1.  Insert the MP3 disc with the unlabelled side facing the unit. Press the center

    of the CD onto the black holder fitted with 3 retaining bearings.
2.


To remove the CD, hold it by the edges and remove it by gently pressing 

    on the black holder.
3.


Then close the disc compartment by pressing the 

OPEN/CLOSE

 button 

    (15) or (16).

After having closed the disc cover, the CD system begins immediately to scan 

the content of compact disc inserted. After that, CD will be start playback 

automatically if read disc properly.


Playing the entire MP3 CD

1.


Select the desired CD with the button 

CD SELECTION 1 - 4

 (5) or 


DISC 1 - 4

 (52) on the remote. Playback begins automatically.

2.


To stop the disc playing, press the   

STOP

 button (11)/(48). 

3.  Press the 

FOLDER

   or   button (24)/ (19) 

    or (49)/(47) to select  desired MP3 album.

MP3 Disc Operation 

OPERATIONAL INSTRUCTIONS

4.  Press the   

PLAY/PAUSE

 button to play the MP3 disc.


Pause / Stop

1.


To briefly pause playback, press the   

PLAY/PAUSE

 button (13)/(41)

    Display indicates:
2.


Press   

PLAY/PAUSE

 button again to restart play.

3.


To end the playback, press the   

STOP

 button (11)/(48).

Playback in random sequence

Press the 

RANDOM

 button (6)/(37) in stop condition to start random play. 

By pressing button   

STOP

 (11)/(48), the random playback is cancelled. 

This function can be switched off by pressing the 

RANDOM

 button again.

Repeat

1.


Press the 

REPEAT

 button during MP3 playback to have the title currently 

    being played repeat continuously.


OPERATIONAL INSTRUCTIONS

MP3 Disc Operation 

- continued


iLuv | 26

i9300 | V10M10_IM_EN_11112008

25 | iLuv

Summary of Contents for i9300

Page 1: ...Model i9300 i9300D Instruction Manual Mini Audio System for your iPod English...

Page 2: ...e digital clock Setting the timer Snooze function Setting the sleep timer TABLE OF CONTENTS 3 4 5 5 6 7 9 10 10 10 11 13 13 14 14 14 14 15 15 15 15 16 16 16 17 18 18 18 19 19 iLuv 2 i9300 V10M10_IM_EN...

Page 3: ...data or audio information required to represent audio yet to still reproduce audio as same as the original uncompressed audio for most listeners GETTING STARTED Thank you for purchasing i9300 i9300D...

Page 4: ...300 i9300D stand Use with other stands may result in instability causing possible injury 1 2 3 1 2 3 GETTING STARTED Secure the center unit and speakers on the wall Solid concrete wall or wooden wall...

Page 5: ...rch operation 13 CD PLAY PAUSE Button Initiates CD operation and starts CD playback pauses CD playback 14 INTRO Button Plays 10 seconds of each CD MP3 track GETTING STARTED Location of Controls Front...

Page 6: ...k 31 by pressing the RED lever and inserting the striped wire into the open hole Do the same with the LEFT speaker s non striped wire and the BLACK lever Repeat for the RIGHT channel SPEAKER block 33...

Page 7: ...BAND SLEEP MP3 MODE AUX 34 35 36 37 38 40 42 41 44 39 43 45 GETTING STARTED Location of Controls Remote Control continued DISC SELECT iPod 1 2 3 4 iPod SNOOZE DISPLAY MODE STOP FOLDER PLAY PAUSE 1 2 3...

Page 8: ...m Confirm voltage setting before powering on i9300D only Operating mode selection The different operating modes can be directly selected using the buttons PLAY PAUSE 13 41 for CD operation and TUNER B...

Page 9: ...CAUTION Listening at high volumes for an extended period of time may cause damage to the users hearing OPERATIONAL INSTRUCTIONS Amplifier and Radio Operation continued Stereo Mono Repeatedly pressing...

Page 10: ...J and the hour will begin to flash 2 Enter the hour by pressing the buttons TUNING SKIP SEARCH or TUNING SKIP SEARCH 3 Confirm the hour entry by pressing MEM CLK ADJ The minutes will then begin to fla...

Page 11: ...ch off 10 to 90 minutes later Press SLEEP button 55 as required until the desired delay time appears on the display The SLEEP timer can be set for 90 80 70 60 50 40 30 20 and 10 minute intervals The u...

Page 12: ...If playback of one CD has finished the playback of the next inserted CD will begin and this process will repeat itself Note If the CD player is in the stop position you can start the currently indica...

Page 13: ...d more than once within the program 1 Load the CDs 2 Press MEM CLK ADJ 22 53 in the stop mode to switch to programming mode OPERATIONAL INSTRUCTIONS Compact Disc Operation continued 3 Select a CD by p...

Page 14: ...LECTION 1 4 5 or DISC 1 4 52 on the remote Playback begins automatically 2 To stop the disc playing press the STOP button 11 48 3 Press the FOLDER or button 24 19 or 49 47 to select desired MP3 album...

Page 15: ...s 0 9 10 35 on the remote control device or by repeatedly pressing TUNING or TUNING 4 Press the MEM CLK ADJ 20 53 to save the title on the first program location In display unit 3 appears 5 Confirm se...

Page 16: ...etc to the disc label Clean the disc periodically with soft lint free dry cloth Never use detergents or adhesive cleaners to clean the disc If necessary use a CD cleaning kit If disc skips or gets stu...

Page 17: ...12 Use only with the cart stand tripod bracket or table specified by the manufacturer or sold with the apparatus When a cart is used use caution when moving the cart apparatus combination to avoid inj...

Page 18: ...of the FCC Rules These limits are designed to provide reasonable protection against harmful interference in a residential installation This equipment generates uses and can radiate radio frequency ene...

Page 19: ...ss B limits for radio noise emissions from digital apparatus as set out in the Radio Interference Regulations of Industry Canada These limits are designed to provide reasonable protection against harm...

Page 20: ...nit i AC 120V 60Hz US 220 230V 50Hz EU 110V 220V 50Hz 60Hz i9300D ii DC 1 x CR2032 for Remote Control b Subwoofer AC 100 240V 50 60Hz 2 Power consumption a Main unit 35 Watts b Subwoofer 70 Watts 3 Un...

Page 21: ...ifications are subject to change without prior notification 2009 jWIN Electronics Corp All rights reserved No portion of this printed material or product enclosed herewith including design shape and g...

Reviews: