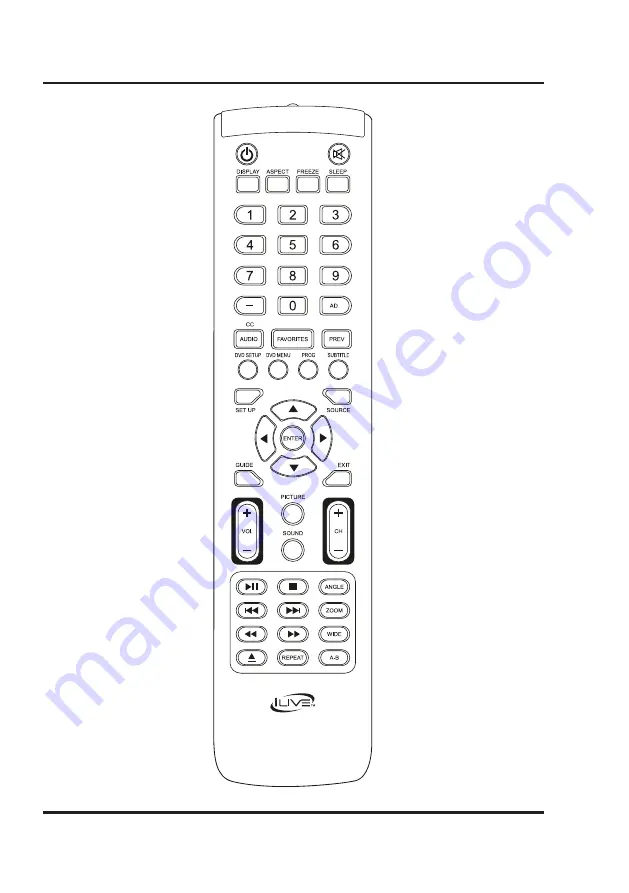
background image

7

Remote

Power

Press to power the television 

ON or OFF.

Display

Press to view the on-screen 

display.

Aspect

Press to adjust the aspect ratio 

between ZOOM, WIDE, CINEMA, 

and NORMAL.

Number Keypad

Use to enter channel or track 

numbers.

CC/Audio

For TV play, press to turn closed 

captioning ON or OFF. 

For DVD play, press to adjust 

audio settings for the DVD. 

DVD Setup

Change settings for a loaded 

DVD.

DVD Menu

Press to access a loaded DVD’s 

menu.
Setup

Press to view the television setup 

menu.
Guide 

In TV mode, press to view the 

on-screen television guide.

Volume ±

Press to adjust the audio level of 

the television.

Picture

Press to adjust picture settings. 

Play/Pause

Press to play or pause playback.

Stop 

Press to stop playback.

Skip Back/Forward

Press to skip between chapters 

or tracks.

Reverse/Fast Fwd

Press to search through a chapter 

or track.

Eject

Press to eject a loaded disc.

Repeat

Press to repeat the current 

selection or track.

Mute

Press to mute audio.
Freeze

Press to freeze or unfreeze the 

current frame in TV mode.
Sleep

Press to set the sleep timer. 

After the set time has expired 

the television will automatically 

power OFF.
Favorites

Press to access your saved 

channels.
Prev

In TV mode, press to switch to 

the previous channel.
AD

Press to enter the Audio 

Description and Text-to-Talk 

(TTS) settings menu (intended 

for hearing and visually impaired 

users). 
Prog

Press to program a loaded disc to 

play titles, chapters, or tracks in a 

specified order.
Subtitle

Press to turn subtitles ON or OFF. 
Source

Press and use the Arrow/Enter 

buttons to select the source.
Arrows/Enter

Press to make selections in the 

on screen menus.
Exit

Press to exit the current on-

screen menu.
Sound

Press to adjust the sound 

between STANDARD, MUSIC, 

USER, MOVIE, and SPORTS. The 

user mode can be customized 

by accessing Sound Settings in 

the menu.
Angle

Press to view alternate angles on 

supported DVDs.
Zoom

Press to zoom in or out on 

supported media files or discs.
Wide

Press to switch between 4:3 LB, 

4:3 PS, and 16:9.
A-B

Create a repeating loop on a CD, 

DVD, or media file.
Press to set A point (start), press 

again to set B point (end).
Press a third time to cancel.

Summary of Contents for ITDE2288

Page 1: ...21 5 LED HDTV DVD User s Guide for Model ITDE2288 v2108 01 For the most up to date version of this User s Guide go to www iliveelectronics com ...

Page 2: ...suring the televisions set is not overhanging the edge of the supporting furniture Not placing the televisions set on cloth or other materials that may be located between the televisions set and supporting furniture Educating children about the dangers of climbing on furniture to reach the televisions set or its controls If your television set is being retained and relocated the same consideration...

Page 3: ...uld be disconnected from the mains socket outlet completely CAUTION Use of controls or adjustments or performance of procedures other than those specified may result in hazardous radiation exposure WARNING Changes or modifications to this unit not expressly approved by the party responsible for compliance could void the user s authority to operate the equipment WARNING Use of this unit near fluore...

Page 4: ...io Connecting Composite Audio Video Connecting Optical Audio Connecting a Computer Connecting Audio Output DVD CD 14 Playing a DVD or CD Programming a DVD or CD DVD Setup Menu USB Memory Cards 15 Using a USB Thumb Drive Using a Memory Card Settings 16 Auto Scanning for Channels Parental Controls V Chip Setting Favorites Viewing Favorites Setting the Clock Mounting to a Wall 17 VESA Specifications ...

Page 5: ...eader supports JPEG image MP3 audio MPEG1 2 4 video files Includes Remote control and 2 AAA batteries Removable stand AC DC power adapter User s Guide Setup Remote Batteries Requires 2 AAA size batteries included Connecting the Stand When placing TV on flat surface be careful not to push scratch or otherwise damage the front of the TV and LCD screen Using a phillips head screwdriver tighten the sc...

Page 6: ...oes not negatively affect the performance or picture quality Orientation Optical Audio Output Stereo Audio Input Composite Video Input Y Component Video Input Y Pb Pr VGA PC Video Input PC Audio Input 3 5mm HDMI TV Antenna Cable Input Headphone Jack 3 5mm Audio Output Source Setup Channel Volume Eject Play Pause Power ON OFF CD DVD Player USB Port Memory Card Port ...

Page 7: ...ss to freeze or unfreeze the current frame in TV mode Sleep Press to set the sleep timer After the set time has expired the television will automatically power OFF Favorites Press to access your saved channels Prev In TV mode press to switch to the previous channel AD Press to enter the Audio Description and Text to Talk TTS settings menu intended for hearing and visually impaired users Prog Press...

Page 8: ... other connection types and is the easiest way to connect your media devices to the television Required a device that supports HDMI and a HDMI cable not included 1 Connect the device s HDMI output to an HDMI input on the television 2 Press the Source button to switch to the connected input HDMI Connecting Devices to Your TV Connecting Component YPbPr Video Audio Required component video green blue...

Page 9: ...9 HDMI Connecting Cable TV Antenna Rear View Connecting HDMI Rear View Connecting Component YPbPr Cables Rear View ...

Page 10: ... Connecting Devices to Your TV Connecting Composite Audio Video Required composite video yellow and RCA stereo red white cables not included 1 Connect the video output on your media device to the corresponding color coded video inputs on the television with a Composite Video cable 2 Connect the audio output on your media device to the corresponding color coded audio input on the television with st...

Page 11: ...11 Connecting Optical Audio Rear View Connecting Composite Audio Video Rear View Connecting a Computer Rear View ...

Page 12: ...st the external stereo systems source to the input used in step one 3 Audio played through the unit will now be heard through the connected stereo system IMPORTANT The Audio Output sends a fixed audio volume level to any connected audio device To adjust the volume you must change it from the connected device ADJUSTING THE VOLUME OF THE TV WILL HAVE NO EFFECT Connecting Devices to Your TV ...

Page 13: ...13 Connecting Audio Output Rear View ...

Page 14: ...VD mode press the DVD Setup button to access the DVD setup menu Press the DVD Setup button to exit the DVD setup menu Programming a DVD or CD 1 While a DVD or CD is playing press the Program button on the remote 2 Using the Number Keypad enter in the chapters or tracks in the order you want them to play 3 Highlight the on screen Start button using the Arrow buttons and press the Enter button 4 The...

Page 15: ... 3 Use the Arrow and Enter buttons to select and play content from the connected SD MMC or MS memory card Using a USB Thumb Drive 1 Load a USB thumb drive into the USB Port on the side of the television 2 Press the Source button to switch to USB mode 3 Use the Arrow and Enter buttons to select and play content from the connected USB thumb drive USB Memory Cards ...

Page 16: ...of your saved favorites Setting the Clock 1 Press the Setup button to access the setup menu 2 Press the Arrow buttons to highlight the Time icon and press the Enter button 3 Press the Arrow buttons to highlight Time Zone and press the Arrow buttons to select your current time zone 4 Press the Arrow buttons to highlight Auto Clock and press the Arrow buttons to turn auto clock on or off When the co...

Page 17: ...m x 100mm spacing wth x ht M4 bolt pattern and thread pitch A 10 to 15mm long bolt is recommended depending on the thickness of the wall bracket selected WE STRONGLY RECOMMEND HAVING THIS TELEVISION MOUNTED PROFESSIONALLY Mounting to a Wall ...

Page 18: ... obtenir des réponses à des questions fréquemment posées consultez la rubrique d assistance sur www iliveelectronics com Contact Information Website www iliveelectronics com Email Support prodinfo dpiinc com Email Parts partsinfo dpiinc com Phone Support 1 888 999 4215 Warranty For Warranty Information and the most up to date version of this User s Guide go to www iliveelectronics com Customer Sup...

Reviews: