CUSTOMER HELPLINE | 1-314-621-2881
iLive | IT319B
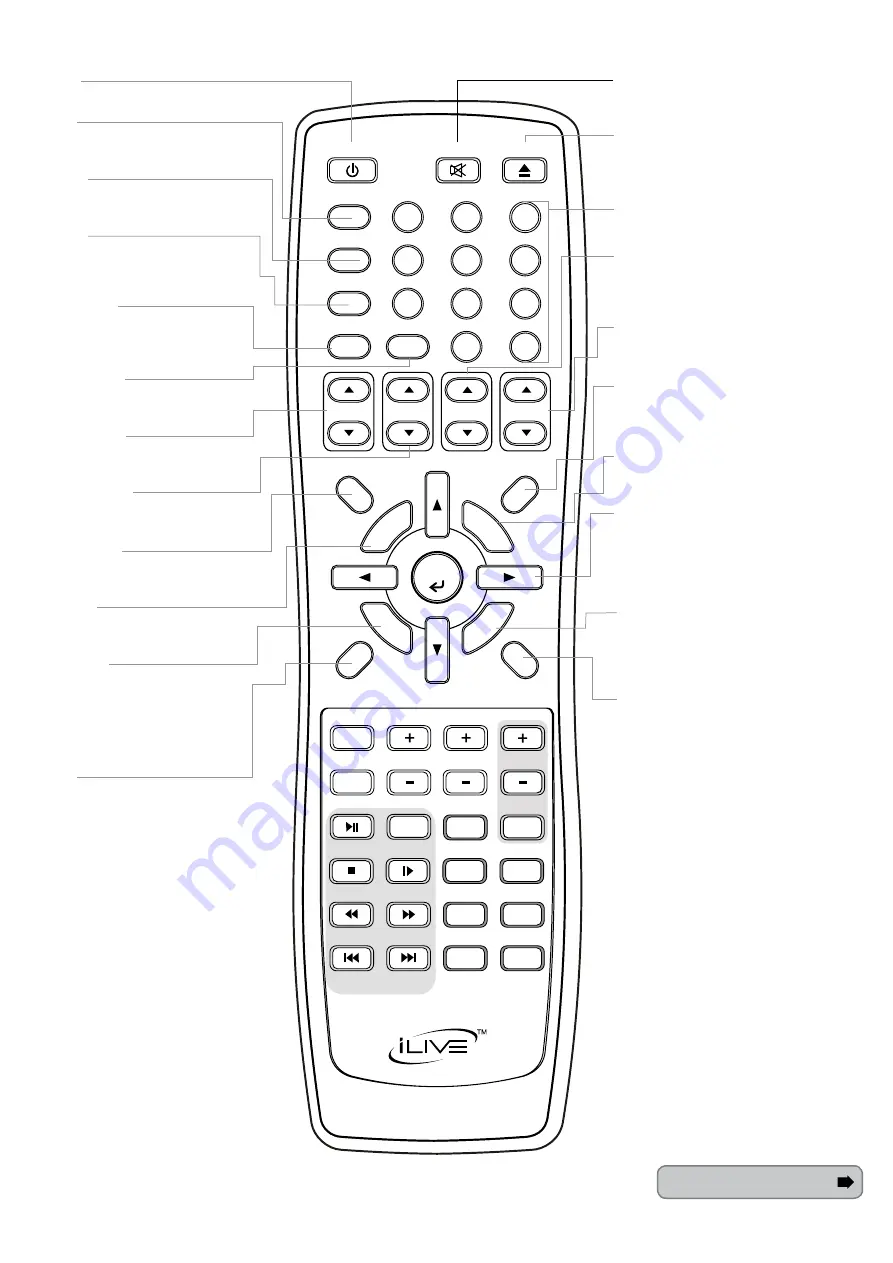
5
1
4
7
2
3
5
6
9
8
0
10+
ALBUM
CHAPTER
PLAYLIST
PRESET
TITLE
B
SU TITLE
LANGUAGE
ANGLE
ZOOM
SHUFFLE
STEP
PREVIOUS
NEXT
STOP
SLOW
REV
FWD
AUDIO
PR
OG
RE
PEAT
A-B
CLE
AR
SELECT
RETURN
TREBLE
BASS
WIDE
VIDEO
POWER
iPod DRAWER
MUTE
TIMER
SOURCE
GOTO
DISPLAY
SETUP
MEMORY
MENU
EQ
VOLUME
DVD
PLAY/PAUSE
SLEEP
HDMI
TUN
TUN
Power
Press to turn the unit off and on.
Mute Button
Press to mute the volume of the unit.
Eject Button
Press to eject a CD or DVD in DVD mode,
or the motorized iPod dock in iPod mode.
Number Keypad
Preset Buttons
Press to cycle through saved radio stations.
Playlist Button
Press to cycle through playlists on a docked
iPod.
Memory Button
Press to save the current radio station to the
unit’s memory.
Clear
Directional & Select Buttons
Press to move through a docked iPod’s
menus and tune the radio. Press the Select
Button to make selections on a docked
iPod.
Repeat Button
Press to repeat a song, album or playlist
from a docked iPod or a loaded CD or
DVD.
Return
Timer
Press to set the “on” and “off” timer for
the unit.
Sleep
Press repeatedly to set the sleep timer
between 1-90 minutes.
Source
Press to switch between DVD, iPod, AM
radio, FM radio, Aux, AV 1, and AV 2
mode.
Go To Button
Press and enter a specific time using the
Number Keypad to automatically skip to
that time on the loaded DVD.
Set Up Button
Press to enter the unit’s setup menu. (Must
be in DVD Mode.)
A-B Button
Press once to mark a starting point during
a DVD. Press the button a second time
to mark an ending point. After doing so
the DVD will loop that section of video.
Press the button a third time to cancel this
function.
Menu
Press to return to the loaded DVD’s
menu when in
DVD Mode
. Press to move
backwards through a docked iPod’s menus.
Program
Press to program a loaded CD or DVD to
play tracks or chapters in a specified order.
Album Buttons
Press to cycle through albums on a docked
iPod.
Chapter Buttons
Press to cycle through chapters on a docked
iPod.
Display Button
Press to view the time when in radio,
DVD, or Aux mode.
continued