background image

11

4.  Re-attach the knob using the hex key.
5.  Install your camera and check all controls. On the surface you 

may need to apply pressure to the control while rotating for proper 
operation.

6.  Store the extra washer with your spare parts. 

Re-Adjusting the Control for ZS80, TZ95

This procedure is reversible. To use ZS80 or TZ95 cameras, use the 
same procedure to re-install one washer underneath the control knob 
for the mode dial.

Setting Up Your Housing

Opening the Housing

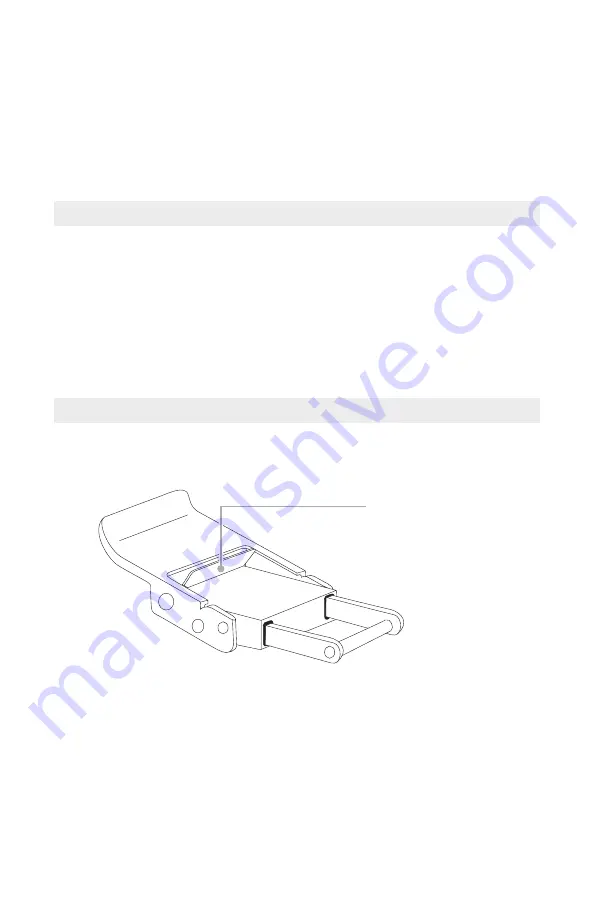
1.  Push the lid snap lock forward and lift the curved end away from 

the housing. 

Lock

2.  Lid snaps are designed to provide enough force to compress the 

o-ring for a proper seal. Keep firm pressure against the lid snap 
while lifting it away.

3.  Repeat with opposite lid snap.
4.  Remove the housing back.

Summary of Contents for 6170.70

Page 1: ...ion database is the quickest way for us to contact you in the event of a product update To register send a photo of the above registration label to us via ikelite ikelite com along with your name addr...

Page 2: ...is USA where we started in 1962 We are available if you have any questions or want photo advice Send us an email 24 hours a day to ikelite ikelite com We strive to reply within 1 business day An elect...

Page 3: ...d You may accidentally detach or damage the control spring Never leave a housing in a rinse tank even if it is the only system in the tank Accidental damage may occur when the user walks away from a h...

Page 4: ...ttings 9 Adjusting Your Housing for ZS70 TZ90 10 Control Requiring Adjustment 10 Adjusting the Control 10 Re Adjusting the Control for ZS80 TZ95 11 Setting Up Your Housing 11 Opening the Housing 11 In...

Page 5: ...Housing 17 Post Dive 17 Lens Port 17 Storage 18 Servicing Recommendations 18 Lubricating Controls 19 Lubricating Push Buttons 19 Troubleshooting 20 Spare Parts 22 Limited Warranty 22 Service and Repai...

Page 6: ...6 Getting to Know Your Housing Shutter Fiber optic ports Lid snap Tray mounts Lens port Motion picture Zoom Mode dial Control ring Accessory port...

Page 7: ...7 Fn2 DISP LVF 4K Control dial O ring Fn2 DISP LVF 4K Left Macro Playback Down Drive mode Lid hook Up Exposure compensation Right Flash Func Set 4K photo LVF Delete Fn2 Lanyard Display...

Page 8: ...he weight of the housing and should not be used as a carrying strap Carrying the housing by the lanyard may result in damage to the lanyard and or housing A different lanyard with a thin cord may be a...

Page 9: ...perly formatted memory card 3 Remove any attached lanyard or neck strap Camera Settings Set Eye Sensor AF to Off Set Eye Sensor LVF Monitor Switch to MON Set Touch Screen to Off Set Flash Mode to Forc...

Page 10: ...0 This housing is not compatible with any other Panasonic cameras except as mentioned above Control Requiring Adjustment Mode dial Adjusting the Control 1 The knob is attached by a set screw threaded...

Page 11: ...edure is reversible To use ZS80 or TZ95 cameras use the same procedure to re install one washer underneath the control knob for the mode dial Setting Up Your Housing Opening the Housing 1 Push the lid...

Page 12: ...nd the LCD screen for proper alignment 4 Line the mount screw up with the camera s tripod socket Use a flat screwdriver to tighten the mount plate to the camera Mount screw 1 4 20 tripod mount Camera...

Page 13: ...he o ring seal The o ring should form a uniform solid line visible through the back of the housing 7 Check control functions Setting Up An External Strobe We recommend attaching an external strobe for...

Page 14: ...rd 1 Check the end of the fiber optic cord to ensure that it is clean and smooth 2 Check that the fiber optic cord o ring is in place This o ring does not provide waterproofing but it does keep the fi...

Page 15: ...seals Entering the Water 1 Before entering the water turn the camera on and operate each of the housing controls to get a feel for using the camera in the housing 2 We recommend entering the water wit...

Page 16: ...issing color information which cannot be adjusted in a photo processing program A slightly underexposed image has color information that can be adjusted It is important to respect all living creatures...

Page 17: ...inse tank 3 Rinse off any residual residue from the rinse tank with clean running fresh water 4 Stow the housing in a shaded place where it is protected from impact and overheating If no shade is avai...

Page 18: ...s 5 Before using the housing check the tightness of the set screw in each control knob Check each control gland to make sure they are snug There is a slight chance that either could vibrate loose duri...

Page 19: ...ubricant to the exposed portion of the shafts and working them many times Use only Ikelite lubricant Other types of lubricant may cause swelling of o rings or cracking of plastic components Lubricant...

Page 20: ...he housing is submerged in fresh water If it is necessary to remove a housing push button NEVER re use the e clip Push button o ring kits include replacement e clips Push buttons look similar but vary...

Page 21: ...ere are some camera settings that will prevent an external flash from firing Check camera settings recommended for use with an external strobe in the beginning of this manual Check that the fiber opti...

Page 22: ...ght s to light up the subject only and not the water in between the camera and subject Avoid using strobes in extremely low visibility conditions Spare Parts Rear o ring 0109 Port cover 0200 08 Silico...

Page 23: ...o Ikelite Underwater Systems Attention Service Department 50 W 33rd St Indianapolis IN 46208 USA 1 317 923 4523 service ikelite com For detailed instructions on returning your product for service incl...

Reviews: