background image

S-17

6. Función FOCUS EZ (enfoque fácil)

6-1. Visualizaciones en pantalla

FOCUS EZ es una función para apoyar el ajuste del enfoque. El indicador 
de enfoque visualizado en la pantalla puede utilizarse para confirmar 
las condiciones de enfoque. En el caso de iris automático, es posible 
abrir a la fuerza la apertura del objetivo durante un período de tiempo 
establecido para realizar el ajuste del enfoque sin preocuparse por la 
profundidad de campo incluso en un entorno brillante durante el día. (La 
sensibilidad de la cámara se ajusta automáticamente, y no hay influencia 
en la imagen visualizada.)
Mantenga pulsado el botón U durante dos segundos para iniciar FOCUS 
EZ y pasar a la pantalla de ajuste de enfoque.

FOCUS EZ no puede iniciarse en el modo de configuración.

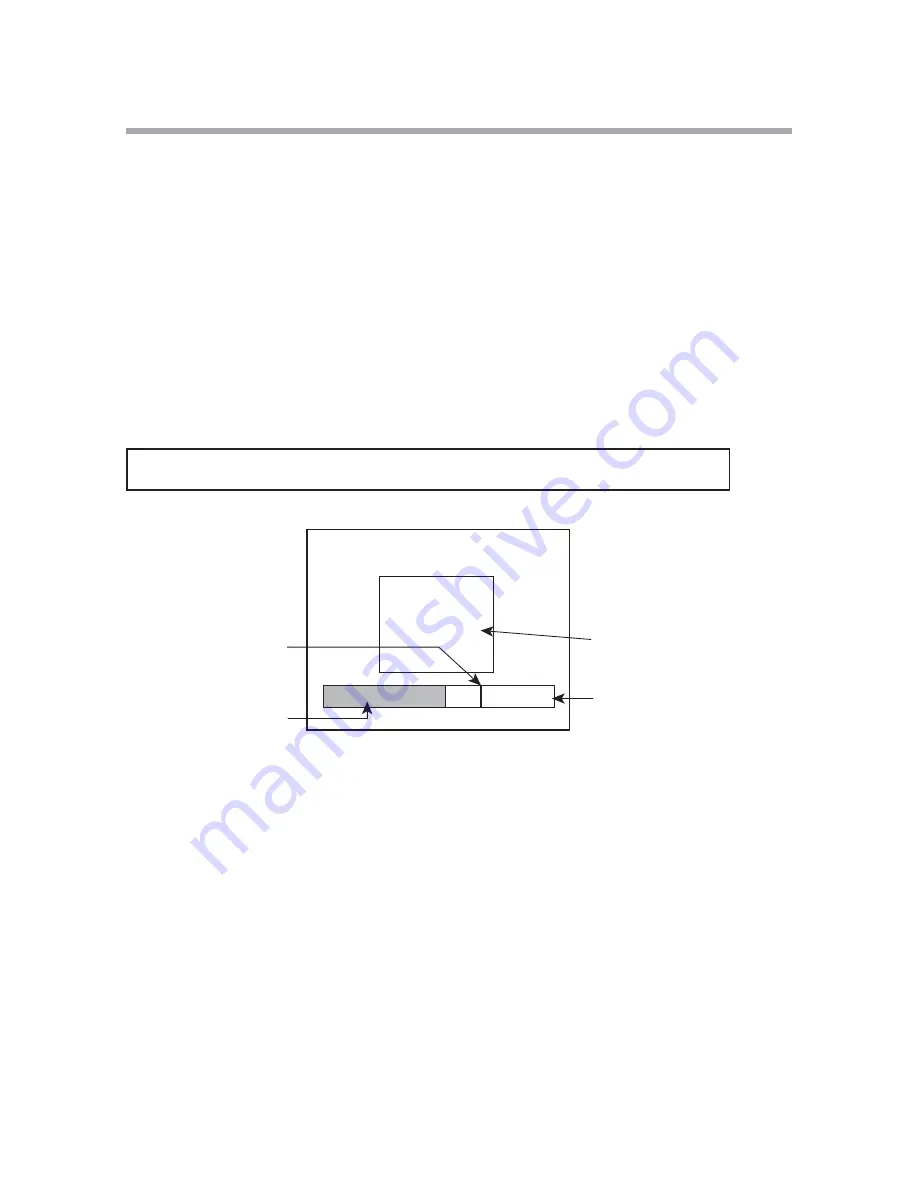
Pantalla de ajuste de enfoque

Punto de

enfoque ideal

Condición de

enfoque

FOCUS EZ

Indicador de 
enfoque

Área de medición 
de luz

El enfoque podrá ajustarse observando el indicador de enfoque de la 
pantalla de ajuste del enfoque. En el indicador de enfoque se visualizan 
el punto ideal de enfoque (negro) y la condición de enfoque actual (azul 
claro). Ajuste el enfoque de forma que la condición de enfoque alcance el 
punto ideal.
Si pulsa el botón D button una vez durante la operación de FOCUS EZ, la 
función FOCUS EZ se desactivará.

* El punto ideal de enfoque se mueve con el transcurso del tiempo.
* El punto ideal de enfoque puede sobrepasar el punto indicado en el 

indicador de enfoque. En tal caso, el punto ideal de enfoque vuelve al 
centro del indicador. Esto no indica un mal funcionamiento. 

Summary of Contents for ISD-A15

Page 1: ... d u c t s Color Camera OUTDOOR USE WARNING WARNING TO PREVENT FIRE OR ELECTRIC SHOCK DO NOT EXPOSE THIS APPLIANCE TO RAIN OR MOISTURE The apparatus shall not be exposed to dripping or splashing and that no objects filled with liquids such as vases shall be placed on the apparatus ...

Page 2: ...olution for energy conservation and environmental sustainability all the components used in this product are Non hazardous Toxic Free Non Lead and conform with Japan s Green Product regulation EU s RoHS directive and other Environmental and hazardous chemical substances related regulations and laws Contents Page 1 Handling precautions E 1 2 General E 1 3 Features E 2 4 Name of each section and its...

Page 3: ...ESSLY APPROVED BY THE PART RESPONSIBLE FOR COMPLIANCE COULD VOID THE USERS AUTHORITY TO OPERATE THE EQUIPMENT Instructions for Disposal of Electrical and Electronic Equipment in Private Households Disposal of used Electric and Electronic Equipment Applicable in the European Union and other European countries with separated waste disposal and collection methods This symbol on the product or in the ...

Page 4: ...ther A grounding type plug has two blades and a third grounding prong The wide blade or the third prong is provided for your safety When the provided plug does not fit into your outlet consult an electrician for replacement of the obsolete outlet 10 Protect the power cord from being walked on or pinched particularly at plugs convenience receptacles and the point where they exit from the apparatus 1...

Page 5: ...illed or objects have fallen into the apparatus the apparatus has been exposed to rain or moisture does not operate normally or has been dropped 15 CAUTION These servicing instructions are for use by qualified service personnel only To reduce the risk of electric shock do not perform any servicing other than that contained in the operating instructions unless you are qualified to do so ...

Page 6: ... SURE TO TURN OFF THE POWER BEFORE INSTALLING OR MAKING CONNECTIONS s E CAREFUL NOT TO DROP OR GIVE A STRONG SHOCK TO THE CAMERA WHILE transporting it s O NOT TOUCH THE IMAGE SENSOR s O NOT ORIENTATE THE CAMERA DIRECTLY TOWARDS THE SUN s ECAUSE OF THE DIGITAL IMAGE DEVICE CHARACTERISTICS IMAGES MAY LOOK unnatural at high temperatures this does not mean the camera is faulty 2 General This color cam...

Page 7: ... 690HTVL Effective is assured 4 Automatic white balance Thanks to the automatic follow up white balance control ATW the white balance adjusts itself no matter how great the subject s color temperature fluctuates 5 Automatic Sensitivity Control In conjunction with the wide dynamic control by the multi sampling system the camera incorporates the automatic sensitivity control function that always prov...

Page 8: ...E 3 4 Name of each section and its function LENS MAX40mA AC24V 50 60Hz 160mA DC12V 170mA VIDEO OUT SET UP E D POWER U R L 4 2 5 7 6 8 9 3 1 ...

Page 9: ...e tripods which have a quarter inch thread Note To use these holes to attach the camera on a tripod or other mount make sure you use suitable size mounting bolts as follows 1 4 20UNC they should not be longer than 5 5 mm to avoid an un stable installation Auto iris lens connector Specifically used to connect the auto iris lens Applicable connector E4 191J 100 or equivalent DC Iris System Connector ...

Page 10: ...apter 5 Operating Procedure 5 1 User Setup This dome camera is provided with user setup function for picture quality and camera ID The setup menu is a tree type on screen display When installing the camera it is possible to set up the various functions 5 2 Names and functions of the setup buttons U To select setup parameters D up and down R To change setup parameters L E To get in or get out to se...

Page 11: ...y environments Depending on the photography environment carry out adjustment of the picture quality without selecting SCENE When the Menu concerned with picture quality changes from the initial setting value unit goes to CUSTOM 3 DAY NIGHT Possible to switch between day and night AUTO Automatic switching is made high quality color images during the day and high sensitivity monochrome pictures at n...

Page 12: ...Press the E button and the screen at right shows up BACKLIGHT CMP The backlight compensation modes can be selected s ORMAL BACKLIGHT compensation mode is in effect s 30 4 3ELECT 30 4 AND PRESS the E button and the screen shown at right appears Highlight ADJUST ZONE and press the E button and the BLC compensation sensing area setting screen comes up Each time the E button is pressed the assigned ar...

Page 13: ...ent mode Select AGC and press the E button and maximum gain setting can be achieved To suppress the noise lower than at the HIGH initial setting select MID or LOW HYP AGC This mode is higher in sensitivity than AGC But images may look rugged at higher sensitivities LOW This fixed gain mode keeps the sensitivity low for brighter spots MID This fixed gain mode keeps the sensitivity middle between HIGH...

Page 14: ... manually Select MANUAL press the E button and the screen at left appears on screen R GAIN is used to adjust the reddish color B GAIN is used to adjust the bluish color 8 EXIT Used to save the settings and to quit the menu 9 CANCEL Used to return the settings to the previously saved ones 10 RESET Used to return the settings to the factory ones WHITE BALANCE R GAIN B GAIN RET ...

Page 15: ...reen 6 DNR Digital Noise Reduction The noise reduction function can be switched on or off When DNR is ON the SENS UP is set ON forcibly 7 CRR Possible to switch CRR color rolling restrain function on and off OFF CRR color rolling restrain function is OFF ON CRR color rolling restrain function in operation 8 EXIT Used to save the settings and to quit the menu 9 CANCEL Used to return the settings to...

Page 16: ...ress the E button to go through the code and place the cursor in the character to delete Press the L or R button to get the box blank s 2 IGHLIGHT THIS ITEM AND PRESS THE BUTTON 4HE code is cleared s 0 3 4 IGHLIGHT THIS ITEM AND PRESS THE OR 2 BUTTON N this way the ID code can be positioned up or down Note If the camera ID is displayed on the same line as the privacy mask the mask becomes transpar...

Page 17: ...e numbers set to ON Mask setting procedure Move the blue semitransparent cursor to the above left of the location you wish to mask and press the E button If other masks are ON the masks other than the one being set are displayed as grey semitransparent When the cursor changes to blue use the U D R L buttons to adjust the size Each button is for U Moves a mask bottom line to above Shrink height D M...

Page 18: ... among OFF 2 magnification 4 magnification and 8 magnification PAN Move the zoom range to the right or left Adjust to the desired position while viewing the screen TILT Move the zoom range up or down Adjust to the desired position while viewing the screen 6 RESOLUTION Set the resolution NORMAL This sets the camera to the normal resolution HIGH This sets the camera to the high resolution If HIGH is s...

Page 19: ...k mode are selected INT The internal sync mode is selected LL Power source synchronous mode Power frequency cannot be used in 50 Hz range Cannot be used with DC12V input 4 VIDEO STANDARD This changes video standard between NTSC and PAL After selecting this video standard and push E button then the following warning message will appear on a screen CANCEL goes back to the Setup Menu screen WARNING I...

Page 20: ...uttons to get the color displayed Press the E button again to go back to the Setup Menu screen 6 MENU LOCK The menu lock function protects saved settings against accidental modifications To Lock Get the saved settings locked with the L and R buttons to ON Operation When locked EXIT alone is effective and all the other actions are invalid Unlocking Press the button in the order U R D L U D E in the ...

Page 21: ... adjustment screen FOCUS EZ cannot be started in the setup mode Focus adjustment screen Focus ideal point Focus condition FOCUS EZ Focus indicator Light measuring area While viewing the focus indicator on the focus adjustment screen it is possible to adjust the focus Displayed on the focus indicator are the focus ideal point black and the present focus condition light blue Adjust the focus so that...

Page 22: ...overage L For repairs after the expiration of the warranty period consult your dealer or sales representative It will first be judged whether the fault is repairable or not Charged servicing will then be made upon request of the user L Before you ask for servicing please ensure you read the Instruction Manual If the unit still fails take note of the model number date of pur chase problem etc in det...

Page 23: ... p rms 9 Minimum object illumination 0 3Lx F1 4 S UP OFF VBS output 50 10 Wide Dynamic Range Built in and Variable 11 AGC ON AGC HYPER AGC OFF LOW MID HIGH 12 Electronic Sensitivity Built in On AUTO or Off Selectable Control Maximum 32 times 13 White Balance Control ATW ATWex AWC MANUAL Selectable 14 DETAILED correction Built in 15 Digital Noise Reduction Built in On or OFF Selectable DNR function...

Page 24: ...umption 2 2W 26 Outer dimensions 52 W 52 H 55 D mm no protrusion included 27 Weight Approx 350g 28 Input output connectors VIDEO OUT BNC LENS 4P E4 191J 100 or equivalent DC 12V AC 24V input 2 pin terminal block 29 Supplied accessories Instruction Manual Allen wrench for flange back adjustment Power input connector Specifications and design are subject to change for product improvements without noti...

Page 25: ...nservación de la energía y el medio ambiente Ninguno de los componentes utilizados en este producto es peligroso tóxico o contiene plomo y todos ellos cumplen con los reglamentos de Productos Ecológicos de Japón la directiva RoHS de la UE y otros reglamentos y leyes relacionados con el Medio Ambiente y Sustancias Químicas Peligrosas Índice Pàgina 1 Precauciones de manejo S 1 2 Generalidades S 1 3 ...

Page 26: ...l comercio donde adquirió el producto El signo de exclamación dentro de un triángulo equilátero tiene la finalidad de avisar al usuario de la presencia de instrucciones de funcionamiento y mantenimiento reparaciones importantes en los manuales que acompañan al aparato NOTA Este equipo ha sido probado y ha demostrado cumplir con los límites establecidos para los dispositivos digitales de la clase A...

Page 27: ...e tipo puesta a tierra posee dos cuchillas y tercer contacto de puesta a tierra La cuchilla ancha y el tercer contacto se utilizan para su seguridad Cuando el enchufe proporcionado no encaje en la toma de corriente de la pared solicite a un electricista que reemplace el enchufe obsoleto 10 Proteja el cable de alimentación para que no se pise ni dañe especialmente en el enchufe la toma de corriente...

Page 28: ...o objetos dentro del aparato cuando el aparato haya estado expuesto a la lluvia o la humedad cuando no funcione normalmente o cuando haya caído 15 PRECAUCIÓN Estas instrucciones de servicio son para que las utilice solamente personal de servicio cualificado Para reducir el riesgo de incendios o de descargas eléctricas no realice ningún tipo de servicio excepto el indicado en el manual de instrucci...

Page 29: ...STALAR O CONECTAR la cámara s 4ENGA CUIDADO PARA NO DEJAR CAER NI GOLPEAR CON FUERZA LA CÈMARA mientras la transporta s O TOQUE EL SENSOR DE IMAGEN s O ORIENTE DIRECTAMENTE LA CÈMARA HACIA EL SOL Debido a las características del dispositivo de imagen digital las imágenes pueden aparecer alteradas debido a las altas temperaturas Esto no significa que la cámara esté estropeada 2 Generalidades Esta cá...

Page 30: ...horizontales de TV queda por lo tanto asegurada 4 Balance automático del blanco Gracias al control del balance del blanco de seguimiento automático ATW el balance del blanco se ajusta automáticamente sin importar lo grande que sean las fluctuaciones en la temperatura del color del motivo 5 Control automático de sensibilidad Junto con el control dinámico amplio mediante el sistema de muestreo múltip...

Page 31: ...S 3 4 Nombre de cada sección y su función LENS MAX40mA AC24V 50 60Hz 160mA DC12V 170mA VIDEO OUT SET UP E D POWER U R L 4 2 5 7 6 8 9 3 1 ...

Page 32: ... cuarto de pulgada Nota La cámara no tiene interruptor de alimentación Enchufe simplemente el cable de alimentación y la cámara se encenderá Para apagar la cámara desenchufe simplemente el cable de alimentación La toma de corriente deberá estar cerca del equipo y deberá poder accederse a ella fácilmente Conector de objetivo de iris automático Se utiliza específicamente para conectar un objetivo de...

Page 33: ... GHO XVXDULR Esta cámara de domo está provista con una función de configuración del usuario para ajustar la calidad de la imagen puesta de la identificación de la cámara El menú de configuración es una visualización en pantalla en forma de árbol Cuando instale la cámara podrá configurar varias funciones 5 2 1RPEUHV IXQFLRQHV GHO ERWRQHV GH FRQ JXUDFLyQ U Para seleccionar parámetros de D configuración s...

Page 34: ...ara todos los entornos de fotografía Dependiendo del entorno de fotografía realice el ajuste de la calidad de la imagen sin seleccionar SCENE Cuando el menú relacionado con la calidad de la imagen cambie del valor de ajuste inicial a la unidad pasará a CUSTOM 3 DAY NIGHT Día noche Se puede cambiar entre día y noche AUTO Se hace el cambio automático imágenes en color de alta calidad durante el día ...

Page 35: ...objetivo de iris tipo DC se ajustan Seleccione LIGHT CONTROL en la pantalla del menú principal Pulse el botón E y se mostrará la pantalla de la derecha BACKLIGHT CMP Se podrán seleccionar los modos de compensación de luz de fondo s L MODO DE COMPENSACIØN DE luz de fondo está activado s 30 4 3ELECCIONE 30 4 PULSE el botón E y aparecerá la pantalla mostrada a la derecha Haga resaltar ADJUST ZONE pul...

Page 36: ...tilice s 3ELECCIONE CUANDO UTILICE UN OBJETIVO DE IRIS AUTOMÈTICO s MANUAL Seleccione cuando utilice un objetivo manual 6 GAIN Se pueden seleccionar los modos de control de ganancia AGC Éste es un modo de ajuste automático de sensibilidad Seleccione AGC y pulse el botón E Usted podrá lograr ahora el juste de ganancia máximo Para suprimir el ruido inferior al del ajuste HIGH inicial seleccione MID ...

Page 37: ...te es el llamado control automático del balance del blanco Filme un objeto blanco pulse el botón E y el balance del blanco se ajustará MANUAL Ajuste manualmente Seleccione MANUAL pulse el botón E y aparecerá la pantalla mostrada a la izquierda R GAIN se utiliza para ajustar el color rojizo y B GAIN se utiliza para ajustar el color azulado 8 EXIT Se utiliza para guardar la configuración y salir del ...

Page 38: ...función de reducción de ruido se puede activar o desactivar Cuando se active ON DNR se activará ON a la fuerza SENS UP 7 CRR Se puede activar y desactivar la función CRR supresión de desplazamiento de color OFF La función CRR supresión de desplazamiento de color se desactiva ON La función CRR supresión de desplazamiento de color se activa 8 EXIT Se utiliza para guardar la configuración y salir del ...

Page 39: ...ter avanzará al siguiente Para eliminar un carácter pulse el botón E para pasar por el código y ponga el cursor en el carácter que quiera eliminar Pulse el botón L o R para dejar la casilla en blanco s 2 AGA RESALTAR ESTE ELEMENTO Y PULSE EL BOTØN L código de identificación se cancela s 0 3 4 AGA RESALTAR ESTE ELEMENTO Y PULSE EL BOTØN O 2 De esta forma el código de identificación podrá ponerse arri...

Page 40: ... elegir el color deseado gris negro o blanco Mientras el enmascaramiento privado está activado al pulsar el botón E aparece una pantalla de configuración individual Con esta pantalla se pueden establecer ocho 8 enmascaramientos individuales diferentes E s p o s i b l e p u l s a r e l b o t ó n E y establecer la posición de la máscara y el tamaño para la máscara de los números ajustados a ON Método...

Page 41: ...selección cambiará en el orden siguiente las máscaras cuya visualización esté desactivada se omitirán Máscara 1 Azul celeste Máscara 1 Azul Máscara 2 Azul celeste Máscara 2 Azul Máscara 3 Azul celeste Máscara 3 Azul Máscara 4 Azul celeste y así sucesivamente Mantenga pulsado el botón E durante más de 2 segundos y la pantalla cambia a la configuración de máscara privada Este proceso deberá hacerse ...

Page 42: ...a exploración progresiva 8 EXIT Se utiliza para guardar la configuración y salir del menú 9 CANCEL Se utiliza para cambiar las configuraciones por otras que fueron guardadas previamente 10 RESET Se utiliza para volver a los ajustes de fábrica ...

Page 43: ...ñales de vídeo INT Se selecciona el modo de sincronización interna LL Modo de sincronización con la fuente de alimentación La frecuencia de la fuente de alimentación no puede utilizarse en la gama de 50 Hz No puede utilizarse con la entrada de 12 V CC 4 VIDEO STANDARD Esto cambia el sistema de vídeo entre NTSC y PAL Después de seleccionar este sistema de vídeo y pulsar el botón E en una pantalla a...

Page 44: ...la pantalla SETUP MENU 6 MENU LOCK La función de bloqueo de menú protege las configuraciones guardadas para evitar modificarlas por accidente Para bloquear Guarde la configuración guardada poniendo los botones L y R en ON Operación En el modo de bloqueo sólo sirve EXIT y todas las demás acciones quedan invalidadas Desbloqueo Pulse los botones en el orden de U R D L U D E en el modo de configuración S...

Page 45: ... la pantalla de ajuste de enfoque FOCUS EZ no puede iniciarse en el modo de configuración Pantalla de ajuste de enfoque Punto de enfoque ideal Condición de enfoque FOCUS EZ Indicador de enfoque Área de medición de luz El enfoque podrá ajustarse observando el indicador de enfoque de la pantalla de ajuste del enfoque En el indicador de enfoque se visualizan el punto ideal de enfoque negro y la condic...

Page 46: ...ra hacer reparaciones una vez que haya expirado el periodo de garantía consulte a su concesionario o representante de ventas Éste juzgará primero si el problema puede solucionarse o no Los servicios que acarreen gastos serán realizados una vez obtenido el consen timiento del usuario L Antes de solicitar el servicio de reparaciones lea primero el manual de instrucciones Si la unidad sigue fallando ...

Page 47: ...ambio de día noche ISD A15 Día noche digitales ISD A15TDN Día noche reales 7 Resolución Horizontal 520 líneas de TV modo de alta resolución efectiva de 690 TVL 8 Relación señal a ruido Más de 50dB p p rms 9 Iluminación mínima de objetos 0 3Lx F1 4 S UP desactivada salida de VBS 50 10 Gama dinámica amplia Incorporada y variable 11 AGC ON AGC HYPER AGC OFF LOW MID HIGH 12 Control de sensibilidad Inc...

Page 48: ...or de nivel del iris CC 23 Ajuste de la distancia entre la superficie de montaje del objetivo y el plano focal Incorporado 24 Alimentación 24 V CA 10 50 60Hz 12 V CC 10 5 V a 15 V 25 Consumo 2 2W 26 Dimensiones externas 52 An x 52 Al x 55 Prof mm sin incluir proyecciones 27 Weight Aproximadamente 350g 28 Conectores de entrada salida VIDEO OUT BNC LENS 4P E4 191J 100 o equivalente Entrada de 12V CC ...

Page 49: ...9 External Appearance 2 1 4 20UNC 16 14 52 55 LABEL 52 6 5 LENS MAX40mA AC24V 50 60Hz 160mA DC12V 170mA VIDEO OUT SET UP E D POWER U R L ...

Page 50: ...T IRIS LEVEL ADJUST SET 1SPOT SET RET SET SENS UP ON SLOW SHUTTER RET OFF X2 X4 X8 X16 X32 SET SET LIGHT CONTROL BACKLIGHT COMP OFF ON SET SET ADJUST ZONE SET RET SET RET SPOT ZONE SET 2SPOT SET ADJUST ZONE 1 SET ADJUST ZONE 2 SET RET SPOT ZONE SPOT ZONE GAIN HIGH LOW MID LOW MID HIGH AGC AGC MAX GAIN HYP AGC LENS IRIS SET SET ADJUST ADJUST SET RET WHITE BALANCE ATW ATW Ex AWC PUSH AUTO ADJUST MAN...

Page 51: ...SET SET SET RET SET EXIT SAVE AND EXIT SET CANCEL BACK TO PREVIOUS SETTING SET RESET BACK TO FACTORY SETTING SET SET SET VIDEO STANDARD COLOR BAR ADJUST VIDEO LEV 7 5 IRE 0 IRE PEDESTAL ON OFF DNR OFF ON CRR NORMAL HIGH RESOLUTION OFF ON PROGRES SCAN PRIVACY MASK PAINT ON OFF MASK1 MASK8 ON OFF GRAY BLACK WHITE PRIVACY MASK CRT LCD MONITOR VIDEO STANDARD NTSC PAL SIZE POSITION SET RET SET ZOOM PAN...

Page 52: ...01 569 1626 www Ikegami com or N Ikegami Electronics Europe GmbH Ikegami Strasse 1 D 41460 Neuss Germany Phone 02131 123 0 FAX 02131 102820 www Ikegami de N Ikegami Electronics U K Office Unit E1 Cologne Court Brooklands Close Windmill Road Sunbury on Thames Middlesex TW16 7EB U K Phone 01932 769700 FAX 01 92 769710 www Ikegami co uk ...

Reviews: