


5
Troubleshooting guide
NOTE!
Always disconnect the cable from the wall socket before maintenance!
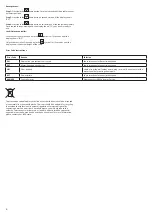
Symptom
Check
Try
The desk does not move.
Is the main power supply connected to the legs?
Try to connect a lamp or similar to the main power supply to
check that the supply voltage is OK.
Are all plugs mounted correctly between the legs and power
supply?
See assembly instructions. Check all connections.
Is there visible damage to the cables, controls or the legs?
Damaged parts must be exchanged - Contact IKEA Customer
Service.
The desk stops and can only
then move in the opposite
direction.
Is the desk in its fully raised or lowered position?
When the desk has reached its upper position it can only move
downwards.
Is there a lot of weight on the desk compared to when the
desk functioned normally?
Remove some of the load and try again.
The desk will only move
downwards even though the
desk is not overloaded.
Perform Basic settings.
The desk does not move up
to its fully raised position.
It always stops at the same
position.
The system has a new end stop position upwards. Perform Basic
settings to remove this stop.
The desk only moves a little bit
upwards and stops.
Have the correct screws been used when mounting the
frame to the legs?
Check if any screw used has the correct length (assembly
instruction). If the screw is too long it can damage the leg.
Are all connections correct?
Check all connections.
Does the desk have too much weight on it?
Reduce the weight load and try again. A Basic setting might be
needed before the desk will move upwards.
The USB doesn’t work.
Contact your nearest IKEA store or customer service.
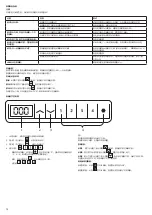
Basic Setting:
Push the arrow down button until the legs have reached the lowest position and
keep pressure on the button for 6 seconds more. Upon certain errors, this must
be done twice in succession. Now the desk is in initial position.
Initialisation instructions:
Step 1. Continuously press the
arrow down button for a few seconds until
the desk reaches its lowest position.
Step 2. Continuously press the
arrow down button a second time until the
display shows “RST”.
Step 3. Continuously press the
arrow down button a third time until the desk
moves slightly downwards.
When the desk stops moving and the display shows “72”, it is ready to use.
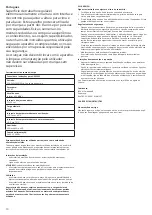
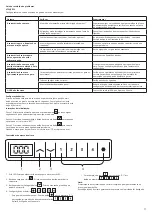
Height Adjustment Controller
1
2
3
4
1.
LED Display: Press any key once to wake up the LED display.
2. Up key
arrow up: Press and hold to raise the desk.
3. Down key
(Arrow down): Press and hold to lower the desk.
4. Memory setting:
+
,
,
,
:
•
To save this current height: Press the button
, the display will show
"S-", then press preferred memory button
,
,
,
. This will
bind the height to this number.
• For Example, if you press
, the display will show “S-1” etc…
• Memory button
,
,
,
.
Note:
The desk's movement can be stopped at any time by pressing any button.
Height settings will remain even if the desk’s power is cut.
Summary of Contents for UPPSPEL 394.301.55
Page 1: ...UPPSPEL Design Jon Karlsson...
Page 2: ......
Page 3: ...English 4 Portugues 10 13 16 19 22 Bahasa Indonesia 25 Bahasa Malaysia 28 31 34 Ti ng Vi t 37...
Page 14: ...14 USB 6 1 2 RST 3 72 1 2 3 4 1 LED LED 2 3 4 S 1 2 3 4 S 1 1 2 RST 3 72 10 LOC 10...
Page 15: ...15 E01 E07 H01 18 RST 888 000...
Page 17: ...17 IKEA USB IKEA 6 1 2 RST 3 72 1 2 3 4 1 LED LED 2 3 4 S 1 S 1 1 2 RST 3 72 10 LOC 10...
Page 18: ...18 E01 E07 H01 18 RST 888 000 IKEA...
Page 20: ...20 IKEA USB IKEA 6 1 2 RST 3 72 1 2 3 4 1 LED LED 2 3 4 S S 1 1 2 RST 3 72 LOC 10 10...
Page 21: ...21 E01 E07 H01 18 RST 888 000 IKEA X IKEA...
Page 23: ...23 USB 6 2 1 2 RST 3 3 72 1 2 3 4 1 LED LED 2 3 4 S S 1...
Page 24: ...24 1 2 RST 3 3 72 LOC 10 10 E01 E07 H01 18 RST 888 000...
Page 32: ...32 1 USB 6 1 RST 2 3 72 1 2 3 4 1 LED LED 2 3 4 S S 1...
Page 33: ...33 2 RST 3 72 LOC 10 10 E01 E07 18 H01 RST 888 000...


