background image

ENGLISH

12  BEFORE YOU OPERATE THE MONITOR


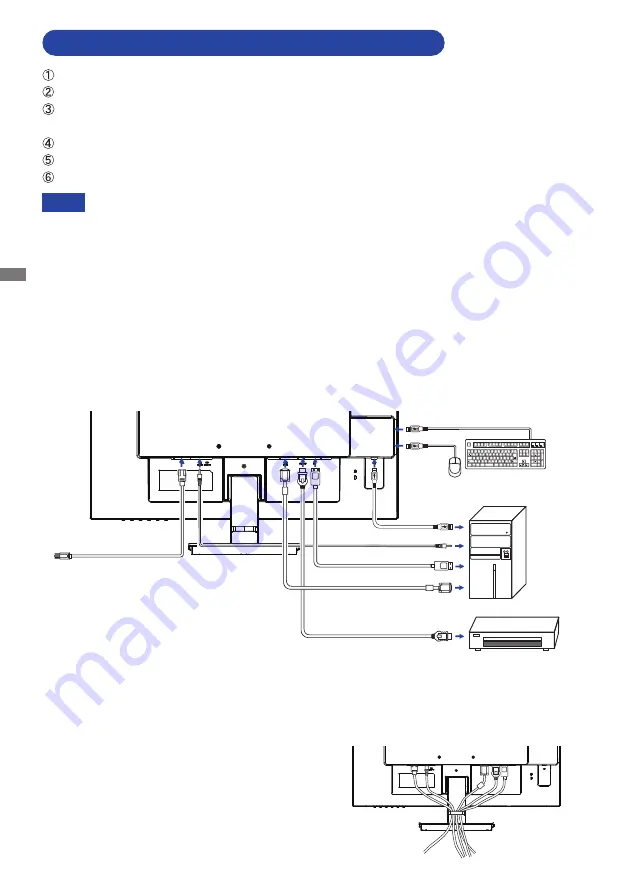
Ensure that both the computer and the monitor are switched off.

  Connect the computer to the monitor with the signal cable.
  Connect the monitor to the audio equipment with the Audio Cable for computer when using the 

audio features.

  Connect the computer to the monitor with the USB cable when using the USB features.

  Connect the Power Cable to the monitor first and then to the power source.

  Turn on your monitor and computer.

[Example of Connection]

<Back>

NOTE

 The signal cables used for connecting the computer and monitor may vary with the 

type of computer used. An incorrect connection may cause serious damage to both 
the monitor and the computer. The cable supplied with the monitor is for a standard 
connector. If a special cable is required please contact your local iiyama dealer or 

regional iiyama office.

 For connection to Macintosh computers, contact your local iiyama dealer or regional 

iiyama office for a suitable adaptor.

 Make sure you tighten the finger screws at each end of the signal cable.

 The Class I pluggable equipment Type A must be connected to protective earth.

 The socket-outlet shall be installed near the equipment and shall be easily accessible.

 Excessive sound pressure from ear-/headphones can cause hearing damage/hearing loss.

[ Collect Cables ]

Put the cables through the cable holder to bundle 
them.

* DVI dual-link cable is not supplied with the monitor. If you use low quality DVI dual-link cable, it 

may cause a result of electro-magnetic interference. Please contact the iiyama Support Centre in 
your country if you wish to connect the monitor via the DVI input.

CONNECTING YOUR MONITOR : ProLite XU2792UHSU

Computer

Power Cable (Accessory)

USB Cable (Accessory)

Audio Cable (Not included)

DVI-D Cable (Not included)

*

DisplayPort Cable (Accessory)

HDMI Cable (Accessory)

Mouse

Keyboard

AV Equipment etc.

Summary of Contents for ProLite XU2792UHSU

Page 1: ...ch for choosing the iiyama LCD monitor We recommend that you take a few minutes to read this comprehensive manual carefully before installing and switching on the monitor Please keep this manual in a...

Page 2: ...ENGLISH...

Page 3: ...ture Criteria in TCO Certified have a life cycle perspective and balance environmental and social responsibility Conformity is verified by independent and approved verifiers that specialize in IT prod...

Page 4: ...o the public low voltage power supply system IIYAMA CORPORATION Wijkermeerstraat 8 2131 HA Hoofddorp The Netherlands Model No PL2792UH We reserve the right to change specifications without notice All...

Page 5: ...ECTORS ProLite XU2792UHSU 10 CONNECTING YOUR MONITOR ProLite XUB2792UHSU 11 CONNECTING YOUR MONITOR ProLite XU2792UHSU 12 DISCONNECTING YOUR MONITOR 13 COMPUTER SETTING 13 ADJUSTING THE HEIGHT AND THE...

Page 6: ...e fire electric shock or damage INSTALL THE MONITOR ON A FLAT STABLE SURFACE The monitor may cause an injury if it falls or is dropped DO NOT USE THE MONITOR NEAR WATER Do not use where water may be s...

Page 7: ...be sure the signal cable is disconnected If you do not disconnect them it may cause fire or electric shock UNPLUG THE MONITOR If the monitor is not in use for a long period of time it is recommended t...

Page 8: ...or iiyama service center for advice or replacement packaging WARNING If you drop any materials or liquids such as water into the monitor when cleaning unplug the power cable immediately and contact y...

Page 9: ...wer cable not supplied by iiyama An approved power cable greater or equal to H05VVF 3G 0 75mm must be used 2 Accessory for ProLite XU2792UHSU Power Cable 1 HDMI Cable DisplayPort Cable USB Cable Stand...

Page 10: ...gth is 7mm to fasten the monitor Using the screw longer than this may cause electric shock or damage because it may contact with the electrical parts inside the monitor WARNING INSTALLATION WALL MOUNT...

Page 11: ...esigned to be compatible with both landscape and portrait modes Video card for portrait display will be required for rotating the image on the screen With Stand A A Portrait Available Power Indicator...

Page 12: ...beforehand to prevent the monitor from being scratched Lay the monitor flat on a table with front face down Loosen the thumb screw to remove the Stand Base from the monitor Installation Put a piece o...

Page 13: ...sen the thumb screw to remove the Stand Base from the monitor Loosen the screw to remove the Stand Neck Pull the hook of the Cable Holder outward to remove it Installation Put a piece of soft cloth on...

Page 14: ...wnstream Connector 5V 900mA USB Upstream Connector Keyhole for Security Lock You can fasten a security lock and cable to prevent the monitor from being removed without your permission DisplayPort Conn...

Page 15: ...USB Downstream Connector 5V 900mA USB Upstream Connector Keyhole for Security Lock You can fasten a security lock and cable to prevent the monitor from being removed without your permission DisplayPor...

Page 16: ...r regional iiyama office For connection to Macintosh computers contact your local iiyama dealer or regional iiyama office for a suitable adaptor Make sure you tighten the finger screws at each end of...

Page 17: ...regional iiyama office For connection to Macintosh computers contact your local iiyama dealer or regional iiyama office for a suitable adaptor Make sure you tighten the finger screws at each end of t...

Page 18: ...hange the height or the angle It may cause damage or break the LCD screen Careful attention is required not to pinch your fingers or hands into the moving part of the stand when you change the height...

Page 19: ...ure a healthy and relaxed body position when using the monitor at visual display workstations it is recommended that the adjusted tilt angle should not exceed 10 Adjust the monitor s angle to your own...

Page 20: ...Screen Display disappears when the setting time by timer control of OSD Time passes Also press the EXIT button to quickly turn off the On Screen Display Any changes are automatically saved in the memo...

Page 21: ...ove the gray level response time of the LCD panel A higher level results in a faster response time You can skip the Menu items and directly display an option settting screen by using the following but...

Page 22: ...OUS INPUT SELECT AUDIO SETTINGS COLOR TEMPERATURE ProLite XUB2792UHSU 9300K 7500K 6500K USER PRESET RED GREEN BLUE I STYLE COLOR CINEMA i Style Color 2 Standard For general windows environment and mon...

Page 23: ...OUS INPUT SELECT AUDIO SETTINGS ON SCREEN DISPLAY SETTINGS OSD HORIZONTAL POSITION OSD VERTICAL POSITION OSD TIME ProLite XUB2792UHSU Adjustment Item Problem Option Button to Press Language Language E...

Page 24: ...R 19 Adjustment Item Problem Option Button to Press Recall Recall Factory preset data is restored PICTURE ADJUST COLOR SETTINGS OSD LANGUAGE RECALL MISCELLANEOUS INPUT SELECT AUDIO SETTINGS ProLite XU...

Page 25: ...ELLANEOUS SHARP AND SOFT VIDEO MODE ADJUST FULL OFF OFF ON OPENING LOGO DISPLAY INFORMATION PIP TOP LEFT MIDDLE PIP PBP PIP POSITION PIP SIZE OFF USB BC Full screen display Full Aspect 1 Expansion dis...

Page 26: ...to the top left corner Move the sub screen to the bottom right corner Move the sub screen to the bottom left corner Swap Swap the main sub screens when PIP mode is active 2 PIP Picture In Picture With...

Page 27: ...nd select automatically Auto Select the Digital DVI input Select the Digital HDMI input DVI HDMI Select the Digital DisplayPort input DP PICTURE ADJUST COLOR SETTINGS OSD LANGUAGE RECALL MISCELLANEOUS...

Page 28: ...ressing the Buttons NOTE Select the Line In input LINE IN Select the HDMI input HDMI Audio Input For HDMI DisplayPort inputs only Direct You can skip the Menu items and directly display an adjustment...

Page 29: ...screen 3 The OSD lock will be deactivated by pressing the front ENTER Button again for about 10 seconds Power Switch The Power Switch can be locked to avoid an accidental power operation 1 Make sure...

Page 30: ...seconds when either the keyboard or the mouse are touched again The power management feature of this product complies with power saving requirement of VESA DPMS When activated it automatically reduce...

Page 31: ...center The screen is too bright or too dark The Power Cable is firmly seated in the socket The Power Switch is turned ON The AC socket is live Please check with another piece of equipment If the blan...

Page 32: ...e Volume is turned up The Mute is OFF The audio output level of the audio equipment is within the specification of the monitor The audio output level of the audio equipment is within the specification...

Page 33: ...lay VESA DDC2BTM Input Video Signal DVI Digital Visual Interface Standard Rev 1 0 compliance HDMI DisplayPort USB Standard USB3 0 DC5V 1 5A 1 USB3 0 DC5V 900mA 1 Number of USB Ports Connector shape 1...

Page 34: ...ay VESA DDC2BTM Input Video Signal DVI Digital Visual Interface Standard Rev 1 0 compliance HDMI DisplayPort USB Standard USB3 0 DC5V 1 5A 1 USB3 0 DC5V 900mA 1 Number of USB Ports Connector shape 1 U...

Page 35: ...3 5mm 23 8 370 5mm 16 4 340 5mm 13 4 230 0mm 9 1 300 0mm 11 8 54 0mm 2 1 412 0mm 16 2 542 0mm 21 3 DIMENSIONS ProLite XUB2792UHSU DIMENSIONS ProLite XU2792UHSU 613 5mm 24 2 603 5mm 23 8 370 5mm 16 4 3...

Page 36: ...Frequency Dot Clock 640 480 31 469kHz 59 940Hz 25 175MHz 800 600 37 879kHz 60 317Hz 40 000MHz 1024 768 48 363kHz 60 004Hz 65 000MHz 1280 1024 63 981kHz 60 020Hz 108 000MHz 1680 1050 65 290kHz 60 000H...

Reviews: