background image

ENGLISH

12  OPERATING THE MONITOR

OPERATING THE MONITOR

To create the best picture, your iiyama LCD monitor has been preset at the factory with the COMPLIANT 
TIMING shown on page 27. You are also able to adjust the picture by following the button operation 
shown below. For more detailed adjustments, see page 17 for SCREEN ADJUSTMENTS.

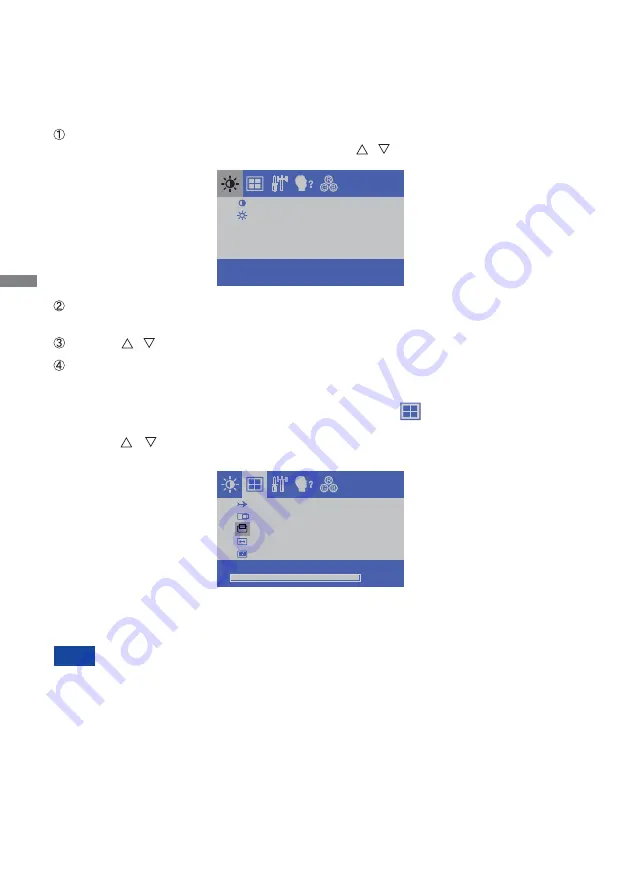
   Press the MENU Button to start the On Screen Display feature. There are additional 

Menu items which can be switched by using the   /   Buttons.  


Select the Menu item which contains the adjustment icon relating to the adjustment 
you want to make. Use the SELECT Button to highlight the desired adjustment icon. 


Use the   /   Buttons to make the appropriate adjustment or setting. 


Press the MENU Button to leave the menu, and the settings you just made would be  
automatically saved.



When button operations are aborted during adjustment, On-Screen Display disappears when the 
time set for the OSD TIMEOUT has passed. 

  MENU button can be used to return previous menu item. 



Any  changes  are  automatically  saved  in  the  memory  when  the  On  Screen  Display  disappears. 
Turning off  the power should be avoided while using the Menu.



Adjustments  for  H/V-POSITION,  H-SIZE  and  FINE  are  saved  for  each  signal  timing.  Except  for 
these adjustments, all other adjustments have only one setting which applies to all signal timings.

NOTE

For example, to correct for vertical position, select Menu item of        . Then, select  V-POSITION 
by using the SELECT Button. 
Use  the 

  / 

  Buttons  to  change  the  vertical  position  settings.  The  vertical  position  of  the 

overall display should be changing accordingly while you are doing this.

Press the MENU Button lastly, it ends, all changes are saved in the memory.

C O N T R A S T

B R I G H T N E S S

1 2 8 0 x 1 0 2 4

F H :   6 3 K H z           F V:   5 9 . 9 H z

A U TO   A D J U S T

H - P O S I T I O N

V- P O S I T I O N

H - S I Z E

F I N E

100

Summary of Contents for ProLite TF1534MC

Page 1: ...ing the iiyama LCD monitor We recommend that you take a few minutes to read this comprehensive manual carefully before installing and switching on the monitor Please keep this manual in a safe place f...

Page 2: ...ENGLISH...

Page 3: ...Y This LCD monitor complies with the requirements of the EC EU Directive 2014 30 EU EMC Directive 2014 35 EU Low Voltage Directive 2009 125 EC ErP Directive and 2011 65 EU RoHS Directive The electro m...

Page 4: ...ND CONNECTORS 6 SPECIAL NOTES 7 CONNECTING YOUR MONITOR 9 COMPUTER SETTING 11 OPERATING THE MONITOR 12 ADJUSTMENT MENU CONTENTS 13 SCREEN ADJUSTMENTS 17 POWER MANAGEMENT FEATURE 20 TROUBLE SHOOTING 21...

Page 5: ...Do not use where water may be splashed or spilt onto the monitor as it may cause re or electric shock OPERATE UNDER THE SPECIFIED POWER SUPPLY Be sure to operate the monitor only with the speci ed pow...

Page 6: ...CT THE CABLES WHEN YOU MOVE THE MONITOR When you move the monitor turn o the power switch unplug the monitor and be sure the signal cable is disconnected If you do not disconnect them it may cause re...

Page 7: ...discarded please contact your dealer or iiyama service center for advice or replacement packaging WARNING If you drop any materials or liquids such as water into the monitor when cleaning unplug the...

Page 8: ...Power Cable 1 AC Adapter 1 HDMI Cable DisplayPort Cable USB Cable Cable Cover Screw M3x6 1pcs L Bracket 2pairs Bracket Screw M4 8 8pcs Touch Panel Driver Disk CD ROM 2 Safety Guide Quick Start Guide M...

Page 9: ...th the electrical parts inside the monitor WALL MOUNTING WARNING Screw Chassis Mounting Stage L ROTATING THE DISPLAY It is designed to be compatible in landscape mode A A Not Available A A Landscape A...

Page 10: ...Select Button SELECT Power Switch Power Indicator Green Normal operation Orange Power Management USB Connector USB Remote Control Touch V01 Connector RJ11 VGA Connector VGA HDMI Connector HDMI Display...

Page 11: ...stallation instructions may damage the monitor As shown in gure below tighten Bracket A to B using the screws supplied 2pairs of 2 pcs Depending on the monitor orientation portrait or landscape you ch...

Page 12: ...t L Brackets and screws are necessary to install an open frame monitor For details regarding open frame monitor temperature and humidity operating conditions see the User Manual on IIYAMA website http...

Page 13: ...h the monitor and the computer The cable supplied with the monitor is for a standard connector If a special cable is required please contact your local iiyama dealer or regional iiyama o ce For connec...

Page 14: ...th on the table beforehand to prevent the monitor from being scratched Lay the monitor flat on a table with front face down Removal Remove the cable cover as shown in Step1 Fitting Connect the cables...

Page 15: ...For additional information on how to download the driver for your touch screen monitor please access the internet site noted above Monitor Drivers are not required in most cases for Macintosh or Unix...

Page 16: ...cally saved When button operations are aborted during adjustment On Screen Display disappears when the time set for the OSD TIMEOUT has passed MENU button can be used to return previous menu item Any...

Page 17: ...Pressing and holding of the MENU Button and the SELECT Button at the same time when the Menu is not displayed massage TOUCH DISABLE will appear on the top right corner OFF Pressing and holding of the...

Page 18: ...POSITION Too narrow Too wide To correct ickering text or lines AUTO ADJUST H POSITION V POSITION H SIZE FINE AUTO ADJUST 1 Adjust H V POSITION H SIZE and FINE automatically 1 For best results use the...

Page 19: ...ing is disabled Input source is xed not selected automatically when VGA HDMI and DisplayPort which are selected Select the analog input Select the digital HDMI input VGA HDMI NOTE Search for an availa...

Page 20: ...Yellowish white GREEN RED Too weak Too strong USER Reddish white Bluish white 9300 COLOR TEMP 5500 6500 7500 BLUE ENGLISH FRAN AIS DEUTSCH ITALIANO ESPA OL Adjustment Item Problem Option Button to Pr...

Page 21: ...depending on the resolution or signal timing The Auto Adjust may not work correctly when displaying the picture other than the screen adjustment pattern In this case manual adjustments are required Th...

Page 22: ...cture may icker during the H SIZE H V POSITION adjustment In case the picture frame is bigger or smaller than the data display area after the H SIZE adjustment repeat steps from 2 Stretch the right si...

Page 23: ...the refresh rate of computer to low 60Hz and repeat steps from again Adjust the H POSITION after the FINE adjustment if the horizontal position moves during the adjustment Adjust the Brightness and Co...

Page 24: ...r enters into Power Management Mode which reduces the power consumption to less than 2W The screen becomes dark From Power Management Mode the image reappears in several seconds when either the keyboa...

Page 25: ...puter is within the speci cation of the monitor The screen is too bright or too dark T h e s c r e e n i s shaking The video output level of the computer is within the speci cation of the monitor The...

Page 26: ...ENGLISH 22 RECYCLING INFORMATION For better environment protection please don t dispose your monitor Please visit our web site www iiyama com recycle for monitor recycling RECYCLING INFORMATION...

Page 27: ...Display Colors Approx 16 2M Sync Frequency Horizontal 31 4 60 0kHz Vertical 50 75Hz Maximum Resolution 1024 768 0 8 MegaPixels Input Connector VGA HDMI DisplayPort Plug Play VESA DDC2BTM Input Sync S...

Page 28: ...ncy Horizontal 31 4 80 0kHz Vertical 50 75Hz Maximum Resolution 1280 1024 1 3 MegaPixels Input Connector VGA HDMI DisplayPort Plug Play VESA DDC2BTM Input Sync Signal Separate sync TTL Positive or Neg...

Page 29: ...orizontal 31 4 80 0kHz Vertical 50 75Hz Maximum Resolution 1280 1024 1 3 MegaPixels Input Connector VGA HDMI DisplayPort Plug Play VESA DDC2BTM Input Sync Signal Separate sync TTL Positive or Negative...

Page 30: ...C DIMENSIONS ProLite TF1934MC 369 0mm 14 5 339 0mm 13 3 271 5mm 10 7 307 0mm 12 1 47 5mm 1 9 416 0mm 16 4 377 5mm 14 9 302 0mm 11 9 344 0mm 13 5 46 5mm 1 8 DIMENSIONS ProLite TF1534MC 337 5mm 13 3 305...

Page 31: ...MING Not compliant to ProLite TF1534MC NOTE Video Mode Horizontal Frequency Vertical Frequency Dot Clock VESA VGA 640 480 31 469kHz 59 940Hz 25 175MHz 37 500kHz 75 000Hz 31 500MHz 37 861kHz 72 809Hz 3...

Reviews: