background image

ENGLISH

  BEFORE YOU OPERATE THE MONITOR  21  

 

MULTI-TOUCH : 

  This monitor complies with DDC2B of VESA standard. (Plug&play compliant)

  The MULTI-TOUCH function runs on Windows7/8/8.1/10 by connecting the monitor to DDC2B 

compliant computer with the USB cable supplied.

 

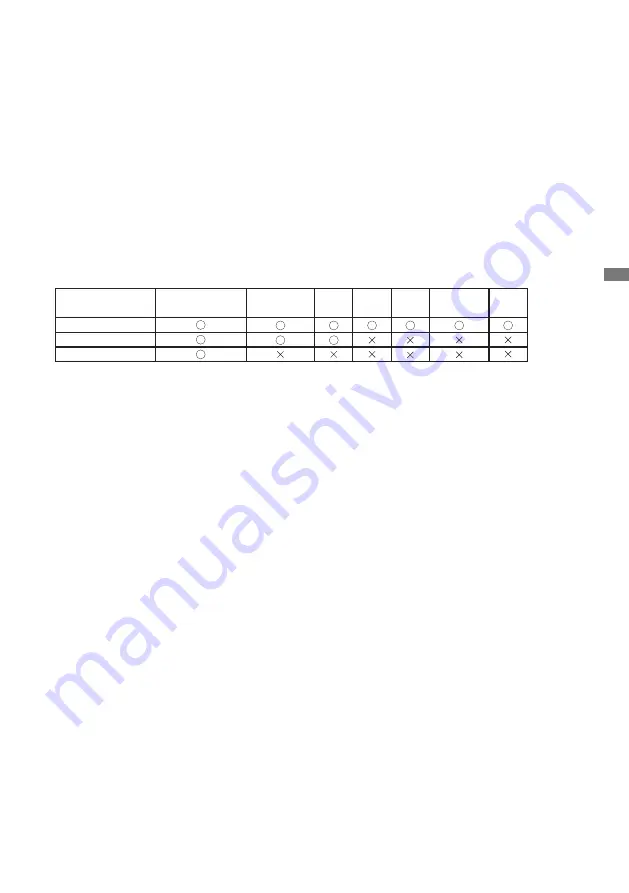
TOUCH support operation system : 

  Microsoft Windows 2000 (64 bit and 32 bit) 
  Microsoft Windows XP (64 bit and 32 bit)
  Microsoft Windows Vista (64 bit and 32 bit)
  Microsoft Windows 7 (64 bit and 32 bit)
  Microsoft Windows 8/8.1/10 (64 bit and 32 bit)

  Mac OS X   V10.6.4 & higher HID for single touch only
  Linux  3.0 & higher need patch for multi-touch
     

3.5 & higher HID for multi-touch

  Not support Windows earlier versions. 

Windows

7*

5

,8/8.1*

6

,10*

6,7,8

Windows7*

4

Vista

XP

2000

Mac OSX Linux

Default mouse*

1

Touch digitizer*

2

Windows gestures*

3

*

Default mouse (click, drag, double-click and right-click)

*

Touch digitizer (click, drag /selection, double-click, right-click, flick and visual feedback)

*

Digitizer with Windows7/8/8.1/10 multi-touch gestures

*

Windows 7 - Starter and Home Basic version

*

5

 Windows 7 - Home Premium, Professional, Enterprise and Ultimate versions

*

6

 Windows 8/8.1/10 need non-OEM version for multi-touch support

*

7

 Windows10 - Home, Pro, Enterprise, Education, IoT Core


Not supported for Mobile and Mobile Enterprise.

*

8

 Windows10 - Touch do no support for “touchpad gestures”. Touchpad gesture is for touchpad on    


notebook.

Summary of Contents for ProLite TE5503MIS

Page 1: ...ing the iiyama LCD monitor We recommend that you take a few minutes to read this comprehensive manual carefully before installing and switching on the monitor Please keep this manual in a safe place f...

Page 2: ...ENGLISH...

Page 3: ...yama com You can access the Web page of different countries from there CE MARKING DECLARATION OF CONFORMITY This LCD monitor complies with the requirements of the EC EU Directive 2014 30 EU EMC Direct...

Page 4: ...SPECIAL NOTES ON THE TOUCH PANEL 7 CONTROLS AND CONNECTORS MONITOR 8 INSTALLATION 10 CONTROLS REMOTE CONTROL 12 PREPARING THE REMOTE CONTROL 13 BASIC OPERATION 14 CONNECTING YOUR MONITOR 17 COMPUTER S...

Page 5: ...e fire electric shock or damage INSTALL THE MONITOR ON A FLAT STABLE SURFACE The monitor may cause an injury if it falls or is dropped DO NOT USE THE MONITOR NEAR WATER Do not use where water may be s...

Page 6: ...you move the monitor turn off the power switch unplug the monitor and be sure the signal cable is disconnected If you do not disconnect them it may cause fire or electric shock UNPLUG THE MONITOR If...

Page 7: ...ing on the desktop pattern you use Due to the nature of the LCD screen an afterimage of the previous screen may remain after switching the image when the same image is displayed for hours In this case...

Page 8: ...monitor when not in use to assist the prevention Other ways to reduce the risk of Image Persistence will be to utilise the FAN on function if available Low Backlight and Low Brightness settings FOR EX...

Page 9: ...o protect the LCD panel do not scratch or rub the screen with a hard object Never use any of the following strong solvents These will damage the cabinet and the LCD screen Touching the cabinet with an...

Page 10: ...by a power cable not supplied by iiyama An approved power cable greater or equal to H05VVF 3G 0 75mm2 must be used Power Cable HDMI Cable Touch USB Cable Remote Control Battery 2pcs Touch Pen 3mm 2pcs...

Page 11: ...ople If not it may drop and could result in a serious injury SPECIAL NOTES ON THE TOUCH PANEL Permanent damage can occur if Sharp Edged Pointed or Metal items are used to activate Touch This could inv...

Page 12: ...e power indicator light is lighting red the display is in Power Save Mode To turn the screen back on you can press the power button on the front or the remote control Red Blue flashing slow The Screen...

Page 13: ...WiFi module slot HDMI Connector HDMI IN 3 HDMI Touch USB Connector TOUCH 2 USB for HDMI3 VGA VGA Connector VGA VGA Audio Connector AUDIO IN Mini Jack SPDIF Connector SPDIF SPDIF Output RS232C Connecto...

Page 14: ...make sure the wall is strong enough to hold the necessary weight of the display and the mount WALL MOUNTING When using the wall mounting consideration of thickness of the mounting stage needs to be ta...

Page 15: ...nd performance Please install it with care as follows to ensure reliable touch performance Intense light Specular light Focus spotlight Wide spread light Direct sunlight Indirect sunlight from the win...

Page 16: ...ngs Up Button Down Button Left Button Right Button Enter Confirm your selection or save changes Quickly start Writing Software PgUp PgDn When select File The first Last When Internet browser Scroll Up...

Page 17: ...their plus and minus ports as indicated in the remote control After battery is installed close the back cover of battery components and make the following clip buckled to the bottom NOTE Refer to the...

Page 18: ...ess again to turn On the monitor NOTE Even when using the power management mode or turning OFF the Power Switch the monitor will consume a small amount of electricity Disconnect the Power Cable from t...

Page 19: ...ting or perform the adjustment by pressing the Button on the remote control while the menu page is displayed on the screen Move the cursor vertically Select adjustment by pressing the Button on the re...

Page 20: ...the VOL VOL Button on the remote control to adjust the volume of sound when the menu page is not displayed on the screen Switch the input signal The Input setting menu appears on the screen when you...

Page 21: ...h computers contact your local iiyama dealer or regional iiyama office for a suitable adaptor Make sure you tighten the finger screws at each end of the Signal Cable The touch function is ready for us...

Page 22: ...h the peripheral device CAUTION Turn off the power switch and unplug the monitor and peripherals before connection to avoid an electric shock or a damage NOTE Refer to the user manual of peripherals a...

Page 23: ...N MONITOR2 Example of Digital video connection HDMI IN MONITOR1 HDMI HDMI OUT HDMI IN MONITOR3 HDMI OUT HDMI IN MONITOR2 Connection conditions When 3 monitors are connected VGA input operating at 1920...

Page 24: ...nnecting the monitor to DDC2B compliant computer with the Signal Cable supplied For installation on Windows XP The monitor Information File for iiyama monitors may be necessary for your computer and o...

Page 25: ...ulti touch 3 5 higher HID for multi touch Not support Windows earlier versions Windows 7 5 8 8 1 6 10 6 7 8 Windows7 4 Vista XP 2000 Mac OSX Linux Default mouse 1 Touch digitizer 2 Windows gestures 3...

Page 26: ...touch pen Select the Menu item of the adjustment you want to make Use the Buttons on the remote control or with the touch pen to highlight the desired adjustment item Then press the Enter button on th...

Page 27: ...s not displayed Mute Function Press the Button when Menu is not displayed Repeat successively to On Off the function Kiosk Mode Function Disable touch functions buttons Menu etc Press the following bu...

Page 28: ...I1 Select the HDMI1 input HDMI2 Select the HDMI2 input HDMI3 Select the HDMI3 input Backlight Brightness of backlight is reduced Direct Direct Volume Too soft Too loud Direct The switching of the sign...

Page 29: ...ound Mode Class Sound quality suitable for the classroom Bass Too weak Too strong Balance Standard Custom Mute Return the sound volume to the previous level Turn off the sound Custom sound quality Sta...

Page 30: ...tem Problem Option Button to Press Screen setting 1 Point To Point to optimize touch performance when 3840 2160 input not available under Android or not 3840 2160 input timing 2 You can change the int...

Page 31: ...s when you are using the monitor in a dark room and feel the screen is too bright Standard Warm Bright Soft Custom Standard Cold Brightness Contrast Hue Sharpness Audio Screen Display Adjust Hue Purpl...

Page 32: ...ly Clock Too narrow Too wide Phase To correct flickering text or lines H Position Too far to the left Too far to the right Too low V Position Too high 1 Only VGA input 2 For best results use the Auto...

Page 33: ...art of the background and the Wallpaper and Widgets icon will be displayed Select Wallpaper For details see Settings Device Display Wallpaper It is possible to move the Widgets application to the desk...

Page 34: ...0Hz 3840x2160_60Hz 480p_60Hz 720p_60Hz 3840x2160_60Hz_REAL_COLOR Pixel Shift Interval Off 2 3 5 30 60 mins Storage To display the internal system and USB disk Apps View each application Language input...

Page 35: ...oolbar Slide Toolbar Floating Annotation Settings Other Settings Note Writing Setting Set the Note Writing Setting Single finger Multi finger Personal Settings Share SAMBA Service Device Display Sound...

Page 36: ...saved to the Cloud Drive users can select two options in the cloud storage overview Use the default account When checked all notes will be saved automatically to the default Cloud Drive Users will no...

Page 37: ...anges to the icon when touch once the screen And shortcut menu appears when touch the icon again In other input The icon appears when touch once the screen And the icon changes when touch the icon aga...

Page 38: ...of students to answer and click FINISH to finish 6 The answer statistics is displayed so the teacher selects the correct answer 7 When click EXPLAIN the statistical display becomes smaller and it bec...

Page 39: ...k the Responder and click the START to start the message 2 When the students click OK the teacher and the students can use the Message function 3 The teacher click the Message activates this function...

Page 40: ...ions in the cloud storage overview Use the default account When checked all notes will be saved automatically to the default Cloud Drive Users will not be able to select a cloud drive Use the default...

Page 41: ...e Note files screenshot Video 3g2 3gp avi flv f4v mkv mov mp4 VOB mpg MPEG ts Picture jpg jpeg png bmp gif Audio aac ape flac m4a mp3 ogg wav Search Return to the previous Sort menu Sorts Name Type Si...

Page 42: ...ge the way files are saved to the Cloud Drive users can select two options in the cloud storage overview Use the default account When checked all notes will be saved automatically to the default Cloud...

Page 43: ...Optimize Memory and Garbage clean Memory Clean Clean memory Garbage Clean Clean storage Cloud Drive Connect the network and the Cloud Drive Click with the touch pen ScreenLock Lock unlock touch menu...

Page 44: ...splaying the picture other than the screen adjustment pattern In this case manual adjustments are required There are two ways to adjust the screen One way is automatic adjustment for Position Clock Fr...

Page 45: ...icture may flicker during the Clock H V Position adjustment In case the picture frame is bigger or smaller than the data display area after the Clock adjustment repeat steps from 2 Stretch the right s...

Page 46: ...he refresh rate of computer to low 60Hz and repeat steps from again Adjust the H Position after the Phase adjustment if the horizontal position moves during the adjustment Adjust the Brightness and Co...

Page 47: ...ss than 0 5W The screen becomes dark and the power indicator turns to red From Power Management Mode the image reappears in several seconds when either the keyboard or the mouse are touched again The...

Page 48: ...vel of the computer is within the specification of the monitor The power voltage is within the specification of the monitor The signal timing of the computer is within the specification of the monitor...

Page 49: ...seated in the socket Touch screen driver software is installed The touch position does not deviate The calibration function set up correctly For better environment protection please don t dispose you...

Page 50: ...Horizontal 30 0 135 0kHz Vertical 24 30 55 75Hz Native Resolution 3840 2160 8 3 MegaPixels Supported max resolution VGA 1920 1080 60Hz HDMI1 2 3 3840 2160 60Hz YUV420 Input Connector VGA 1 HDMI 3 USB...

Page 51: ...59 0lbs Environmental Considerations Operating Storage Temperature Humidity Temperature Humidity 0 to 40 C 32 to 104 F 10 to 90 No condensation 20 to 60 C 4 to 140 F 10 to 90 No condensation Approvals...

Page 52: ...0x1050 65 3 60 0 146 250 FHD 1920x1080 67 5 60 0 148 500 4K 3840x2160 67 5 30 0 297 000 112 5 50 0 594 000 135 0 60 0 594 000 IBM 720x400 31 5 70 0 28 320 SD NTSC M 15 7 60 0 13 500 NTSC J 15 7 60 0 1...

Reviews: