background image

ENGLISH

22  OPERATING THE MONITOR 

SCREEN ADJUSTMENTS

 The screen adjustments described in this manual are designed to set image position and minimize 

flicker or blur for the particular computer in use. 

 The monitor is designed to provide the best performance at resolution of 1920 × 1080, but can not 

provide the best at resolutions of less than 1920 × 1080 because the picture is automatically stretched 

to fit the full screen. It is recommended to operate at resolution of 1920 × 1080 in normal use.

 Displayed text or lines will be blurred or irregular in thickness when the picture is stretched due to 

the screen enlargement process.

 It is preferable to adjust the image position and frequency with the monitor controls, rather than 

the computer software or utilities. 

 Perform adjustments after a warm-up period of at least thirty minutes.

 Additional adjustments may be required after the Auto Image Adjust depending on the resolution 

or signal timing.

 The Auto Image Adjust may not work correctly when displaying the picture other than the screen 

adjustment pattern. In this case, manual adjustments are required.

There are two ways to adjust the screen. One way is automatic adjustment for Position, Clock and 

Phase. The other way is performing each adjustment manually.

Perform the Auto Image Adjust first when the monitor is connected to a new computer, or resolution 

is changed. If the screen has a flicker or blur, or the picture does not fit in the display area after 

performing the Auto Image Adjust, manual adjustments are required. Both adjustments should be 

made by using the screen adjustment pattern (Test.bmp) obtained via the IIYAMA web site (http://

www.iiyama.com).

Adjust the image by following the procedure below to get the desired picture.

This manual explains adjustment under Windows

®

 OS.

  Display the picture at the optimum resolution.


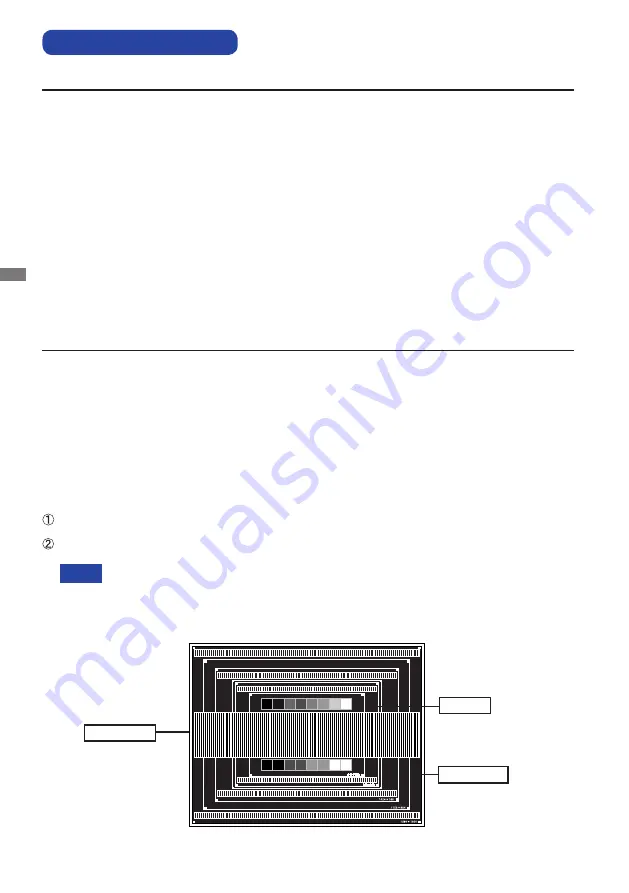
Enter the Test.bmp (screen adjustment pattern) to wallpaper. 


Adjust the image by following the procedure below to get the desired picture when selecting Analog input.      

NOTE

Zebra pattern

Color bar

Picture frame

[Adjustment pattern] 

 Consult the appropriate documentation for doing this.

 Test.bmp is made at resolution of 1280 × 1024. Set the display position to center in 

the wallpaper setting dialogue box. 

Summary of Contents for ProLite T2453MTS-B1

Page 1: ...ully through this brief but comprehensive manual before installing and switching on the monitor Please keep this manual in a safe place for your future reference Questo manuale d istruzione fornito da...

Page 2: ......

Page 3: ...CONFORMITY This LCD monitor complies with the requirements of the EC EU Directive 2014 30 EU EMC Directive 2014 35 EU Low Voltage Directive 2009 125 EC ErP Directive and 2011 65 EU RoHS Directive The...

Page 4: ...ECKING THE CONTENTS OF THE PACKAGE 5 WALL MOUNTING 6 FITTING AND REMOVAL OF BASE 7 CONTROLS AND CONNECTORS 8 CONNECTING YOUR MONITOR 9 COMPUTER SETTING 10 ADJUSTING THE VIEWING ANGLE 10 OPERATING THE...

Page 5: ...cause fire electric shock or damage INSTALL THE MONITOR ON A FLAT STABLE SURFACE The monitor may cause an injury if it falls or is dropped DO NOT USE THE MONITOR NEAR WATER Do not use where water may...

Page 6: ...ISCONNECT THE CABLES WHEN YOU MOVE THE MONITOR When you move the monitor turn off the power switch unplug the monitor and be sure the signal cable is disconnected If you do not disconnect them it may...

Page 7: ...iyama service center for advice or replacement packaging WARNING If you drop any materials or liquids such as water into the monitor when cleaning unplug the power cable immediately and contact your d...

Page 8: ...to the reflector Never use a hard materials hard clothes and tissue paper etc because will damage the reflector When the reflector is damaged the touch function is lost Wipe the Stain gently with a s...

Page 9: ...al Character Smoothing Automatic Set up Stereo Speakers 2 2 0W Stereo Speakers Plug Play VESA DDC2B Compliant Windows 7 8 1 10 Compliant Power Management VESA DPMS Compliant VESA Mounting Standard 100...

Page 10: ...Screw with washer which L length is 8mm to fasten the monitor Using the screw longer than this may cause electric shock or damage because it may contact with the electrical parts inside the monitor Pl...

Page 11: ...BASE Installation Put a piece of soft cloth on the table beforehand to prevent the monitor from being scratched Lay the monitor flat on a table with front face down Hold the monitor and push the Stan...

Page 12: ...T EXIT Speakers Headphone Connector HEADPHONE Audio Connector AUDIO IN VGA Connector VGA DVI D Connector DVI HDMI Connector HDMI AC Connector Alternating current AC POWER IN USB Upstream Connector USB...

Page 13: ...yama office For connection to Macintosh computers contact your local iiyama dealer or regional iiyama office for a suitable adaptor Make sure you tighten the finger screws at each end of the signal ca...

Page 14: ...that the adjusted tilt angle should not exceed 10 degrees Adjust the monitor s angle to your own preference Do not touch the LCD screen when you change the height or the angle It may cause damage or b...

Page 15: ...al position select Menu item of Geometry and then press the ENTER Button Then select Vertical Position by using the Buttons An adjustment page appears after you press the ENTER Button Then use the But...

Page 16: ...GE RECALL MISCELLANEOUS INPUT SELECT AUDIO SETTINGS CLICK ENTER AGAIN TO AUTO ADJUST AUTO ADJUST Only Analog Input For best results use the Auto Adjust in conjunction with the adjustment pattern See p...

Page 17: ...more than Mode1 Mode3 Brightness of back light is reduced more than Mode2 Mode2 Blue Light Reducer 3 Off Typical Mode1 Blue light is reduced Mode2 Blue light is reduced more than Mode1 Mode3 Blue ligh...

Page 18: ...NGUAGE RECALL MISCELLANEOUS INPUT SELECT AUDIO SETTINGS ProLite T2453MTS OSD HORIZONTAL POSITION GEOMETRY VERTICAL POSITION PIXEL CLOCK PHASE Phase Pixel Clock Too left Too right Too low Too high Hori...

Page 19: ...ction matrix 2 Functions other than i Style Color is disabled when i Style Color is activated Too weak Too strong User Preset 2 Bluish white Red Green 9300K Reddish white 7500K Greenish white 6500K Bl...

Page 20: ...ertical Position AUTO ADJUST PICTURE ADJUST GEOMETRY COLOR SETTINGS LANGUAGE RECALL MISCELLANEOUS INPUT SELECT AUDIO SETTINGS ProLite T2453MTS OSD ON SCREEN DISPLAY SETTINGS OSD HORIZONTAL POSITION OS...

Page 21: ...DEUTSCH ITALIANO POLSKI ESPA OL NEDERLANDS ESK ENGLISH Adjustment Item Problem Option Button to Press Recall Recall Factory preset data is restored AUTO ADJUST PICTURE ADJUST GEOMETRY COLOR SETTINGS...

Page 22: ...RECALL MISCELLANEOUS INPUT SELECT AUDIO SETTINGS ProLite T2453MTS OSD MISCELLANEOUS SHARP AND SOFT VIDEO MODE ADJUST OPENING LOGO DDC CI DISPLAY INFORMATION FULL OFF ON OFF ON Expansion display Full...

Page 23: ...by using the following button operations Input Select Press the INPUT EXIT button when the Menu is not displayed Direct Search for an available input source and select automatically Auto Select the An...

Page 24: ...D VOLUME OPTIONS MUTE AUDIO OFF ON AUDIO INPUT LINE IN HDMI Too soft Too loud Return the sound volume to the previous level Turn off the sound temporarily Off On You can skip the Menu items and displa...

Page 25: ...seconds Power Switch 1 The power switch lock will be activated by pressing the front buttons for about 5 seconds Then POWER LOCK will appear on the screen 2 The power switch lock will be deactivated...

Page 26: ...ure other than the screen adjustment pattern In this case manual adjustments are required There are two ways to adjust the screen One way is automatic adjustment for Position Clock and Phase The other...

Page 27: ...and V Position adjustment In case the picture frame is bigger or smaller than the data display area after the Clock adjustment repeat steps from 2 Stretch the right side of the picture frame to the ri...

Page 28: ...he refresh rate of computer to low 60Hz and repeat steps from again Adjust the H Position after the Phase adjustment if the horizontal position moves during the adjustment Adjust the Phase to correct...

Page 29: ...0 5W The screen becomes dark and the power indicator turns to orange From Power Management Mode the image reappears in several seconds when either the keyboard or the mouse are touched again The power...

Page 30: ...ive Please check with another piece of equipment If the blank screen saver is in active mode touch the keyboard or the mouse Increase the Contrast and or Brightness The computer is ON The Signal Cable...

Page 31: ...quipment is within the specification of the monitor The audio output level of the audio equipment is within the specification of the monitor The Audio Cable is properly connected The sound is too loud...

Page 32: ...0 80 0kHz Vertical 55 75Hz Native Resolution 1920 1080 2 1 MegaPixels Support max resolution VGA 1920 1080 60Hz DVI 1920 1080 60Hz HDMI 1920 1080 60Hz Input Connector VGA DVI D HDMI Plug Play VESA DD...

Page 33: ...600 37 879kHz 60 317Hz 40 000MHz 46 875kHz 75 000Hz 49 500MHz 1024 768 48 363kHz 60 004Hz 65 000MHz 60 023kHz 75 029Hz 78 750MHz 1280 1024 63 981kHz 60 020Hz 108 000MHz 79 976kHz 75 025Hz 135 000MHz 1...

Reviews: