background image

ENGLISH

20  OPERATING THE MONITOR

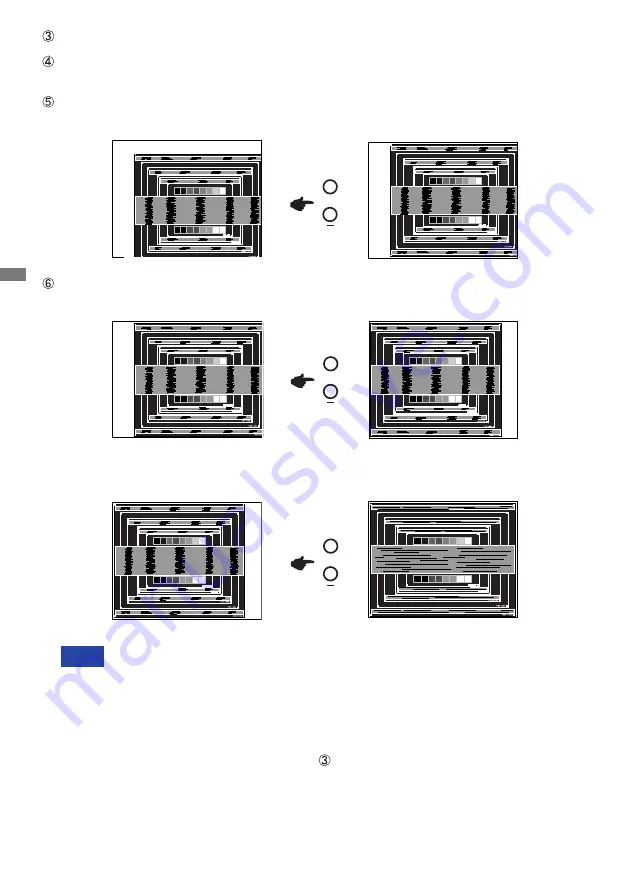
   1) Adjust the H. Position so that the left side of the picture frame will move to the left  

  edge of the display area.

 When the left side of the picture frame moves apart from the left edge of the display 

area during the Clock adjustment, adjust steps 1) and 2).

 Another way to make the Clock adjustment is to correct the vertical wavy lines in the 

zebra pattern.

 The picture may flicker during the Clock, H. / V. Position adjustment.

 In case the picture frame is bigger or smaller than the data display area after the 

Clock adjustment, repeat steps from  .

   2) Stretch the right side of the picture frame to the right edge of the display area by  

  adjusting the Clock.

   Keep  pressing the AUTO Button for 2-3 seconds. (Auto Configure) 


Adjust the image manually by following procedure below when the screen has a flicker or 

blur, or the picture does not fit in the display area after performing the Auto Configure.

  Adjust the V. Position so that the top and bottom of the picture frame will fit to the display 

area.

NOTE

+

+

+

Summary of Contents for PLT1633M

Page 1: ...sing the iiyama LCD monitor We recommend that you take a few minutes to read this comprehensive manual carefully before installing and switching on the monitor Please keep this manual in a safe place for your future reference USER MANUAL ...

Page 2: ...ENGLISH ...

Page 3: ...iiyama com You can access the Web page of different countries from there CE MARKING DECLARATION OF CONFORMITY This LCD monitor complies with the requirements of the EU Directive 2014 30 EU EMC Directive 2014 35 EU Low Voltage Directive and 2011 65 EU RoHS Directive Warning This is a class A product In a domestic environment this product may cause radio interference in which case the user may be re...

Page 4: ...OTES ON TOUCH PANEL 5 WALL MOUNTING 5 BUILT IN EQUIPMENT 5 FITTING AND REMOVAL OF BASE 6 CONTROLS AND CONNECTORS 7 CONNECTING YOUR MONITOR 8 ADJUSTING THE VIEWING ANGLE 9 COMPUTER SETTING 10 OPERATING THE MONITOR 12 ADJUSTMENT MENU CONTENTS 13 SCREEN ADJUSTMENTS 19 POWER MANAGEMENT FEATURE 22 TROUBLE SHOOTING 23 RECYCLING INFORMATION 24 APPENDIX 25 SPECIFICATIONS ProLite T1633MC B1 25 DIMENSIONS 2...

Page 5: ...WATER Do not use where water may be splashed or spilt onto the monitor as it may cause fire or electric shock OPERATE UNDER THE SPECIFIED POWER SUPPLY Be sure to operate the monitor only with the specified power supply Use of an incorrect voltage will cause malfunction and may cause fire or electric shock CORRECT USE OF THE AC ADAPTER Use only the AC Adapter provided by iiyama Any deviation from t...

Page 6: ...CT THE CABLES WHEN YOU MOVE THE MONITOR When you move the monitor turn off the Power Button unplug the monitor and be sure the signal cable is disconnected If you do not disconnect them it may cause fire or electric shock UNPLUG THE MONITOR If the monitor is not in use for a long period of time it is recommended that it is left unplugged to avoid accidents HOLD THE PLUG WHEN DISCONNECTING To disco...

Page 7: ...when cleaning unplug the power cable immediately and contact your dealer or iiyama service center To protect the Touch screen surface do not scratch or rub the screen with a hard object Never use any of the following strong solvents These will damage the cabinet and the Touch screen surface Abrasive cleaner Wax Acid or Alkaline solvent Touching the cabinet with any product made from rubber or plas...

Page 8: ...al to H05VVF 3G 0 75mm2 must be used AC Adapter Power Cable HDMI Cable DisplayPort Cable USB Cable Stand Base Screws for Stand Base 4pcs Cable Cover Screws for Cable Cover 2pcs Safety Guide Quick Start Guide BEFORE YOU OPERATE THE MONITOR CHECKING THE CONTENTS OF THE PACKAGE CAUTION FEATURES Supports Resolutions up to 1366 768 High Contrast 500 1 Typical Brightness 300cd m2 Typical 255cd m2 with T...

Page 9: ...crew Chassis Mounting Stage L WARNING Permanent damage can occur if Sharp Edged Pointed or Metal items are used to activate Touch This could invalidate any remaining warranty We recommend to use a plastic stylus tip R0 8 or over or finger SPECIAL NOTES ON TOUCH PANEL This product is not designed for the purpose of being used in high temperature environment If the product is placed in an external c...

Page 10: ...val Put a piece of soft cloth on the table beforehand to prevent the monitor from being scratched Lay the monitor flat on a table with front face down Remove the thumb screws to remove the Stand Base from the monitor Installation Put a piece of soft cloth on the table beforehand to prevent the monitor from being scratched Lay the monitor flat on a table with front face down Hold the monitor and in...

Page 11: ... monitor from being removed without your permission VGA Connector VGA HDMI Connector HDMI DisplayPort Connector DP Connector for AC Adapter Direct current DC IN Power Indicator Green Normal operation Orange Power Management Auto Input Select Button AUTO Eco Button Blue Light Reducer Button Menu Button MENU Power Button You can skip the Menu items and directly display an option setting screen Front...

Page 12: ...dard connector If a special cable is required please contact your local iiyama dealer or regional iiyama office For connection to Macintosh computers contact your local iiyama dealer or regional iiyama office for a suitable adaptor Make sure you tighten the finger screws at each end of the Signal Cable The Class I pluggable equipment Type A must be connected to protective earth The socket outlet s...

Page 13: ... cable cover and fix it firmly with the hand screws ADJUSTING THE VIEWING ANGLE For optimal viewing it is recommended to look at the full face of the monitor Hold the panel so that the monitor does not topple when you change the monitor s angle You are able to adjust the monitor s angle up to 90 degrees upward 5 degrees downward Do not touch the LCD screen when you change the angle It may cause da...

Page 14: ...llation on Windows XP The monitor Information File for iiyama monitors may be necessary for your computer and obtained via the Internet using the address http www iiyama com For additional information on how to download the driver for your touch screen monitor please access the internet site noted above Monitor Drivers are not required in most cases for Macintosh or Unix operating systems For furt...

Page 15: ...el version 4 4 3 18 3 0 3 14 3 0 4 4 Note Driver supports multi touch Driver supports multi touch for most 3 0 above kernal OS Version Mac OS Mac OS 10 9 Mavericks 10 10 Yosemite 10 11 El Capitan 10 12 Sierra 10 13 High Sierra Supported touches Single touch Note Similar to Apple Trackpad gesture 2 finger gesture zoom in out swipe 4 finger gesture show desktop Similar to Apple Trackpad gesture 2 fi...

Page 16: ...set for the OSD Timeout has passed Also the AUTO Button can be used to return previous menu and turn off the On Screen Display Any changes are automatically saved in the memory when the On Screen Display disappears Turning off the power should be avoided while using the Menu Adjustments for H V Position Clock and Phase are saved for each signal timing Except for these adjustments all other adjustm...

Page 17: ...Contrast Off OSD Exit Move Select AUTO MENU i Style Color 2 Standard For general windows environment and monitor default setting Text For text editing and viewing in a word processing environment Internet For internet environment Game For PC game environment Movie For movie and video environment Sports For sport environment Adv Contrast Increased Contrast Ratio On Off Typical Contrast Ratio Adv Co...

Page 18: ...low Too high H Position 2 V Position 2 Too narrow Too wide To correct flickering text or lines Image Setup Clock Phase Aspect Ratio H Position 50 86 Full V Position 50 50 OSD Exit Move Select AUTO MENU 1 See page 19 for SCREEN ADJUSTMENTS 2 Only for Analog Input Expanded display Full Aspect Expanded display by Aspect ratio Aspect Ratio ...

Page 19: ...AUTO MENU Color Temp Normal Warm Cool sRGB NOTE sRGB is an international standard which defines and unifies the difference of color appearance between equipment You can not adjust the Contrast Brightness i Style Color and Eco during sRGB mode because those settings are locked Too weak Too strong User Color Temp cannot be adjusted and selected while Blue Light Reducer is active ...

Page 20: ...SD OSD Setup H Position 95 V Position 5 Timeout Language 10 English Exit Move Select AUTO MENU Touch Wake Up Off OSD Polski Polish Русский Russian Nederlands Dutch Portuguese Italiano Italian Español Spanish Português Čeština Czech H Position V Position OSD is too left OSD is too right OSD is too low OSD is too high Touch and USB hub are still functional during the display stand by On Off Touch Wa...

Page 21: ...On On OSD Extra Input Select DDC CI Reset Information Resolution H Frequency V Frequency Off 1366 H x 768 V 47KHz 60Hz Exit Move Select AUTO MENU Auto No OSD Extra Opening logo LED Information Resolution H Frequency V Frequency On 1366 H x 768 V 47KHz 60Hz Exit Move Select AUTO MENU On iiyama Logo displayed when the monitor is turned on On Off iiyama Logo does not display when the monitor is turne...

Page 22: ... using the following button operations Eco Press the Button when the Menu is not displayed Off Normal Mode1 Brightness of back light is reduced Mode2 Brightness of back light is reduced more than 1 Mode3 Brightness of back light is reduced more than 2 Eco is disabled when i Style Color Adv Contrast or Color Temp sRGB is activated Blue Light Reducer Press the Button when the Menu is not displayed O...

Page 23: ...stment pattern In this case manual adjustments are required There are two ways to adjust the screen One way is automatic adjustment for H V Position Clock and Phase The other way is performing each adjustment manually Perform the Auto Adjust first when the monitor is connected to a new computer or resolution is changed If the screen has a flicker or blur or the picture does not fit in the display ...

Page 24: ...r during the Clock H V Position adjustment In case the picture frame is bigger or smaller than the data display area after the Clock adjustment repeat steps from 2 Stretch the right side of the picture frame to the right edge of the display area by adjusting the Clock Keep pressing the AUTO Button for 2 3 seconds Auto Configure Adjust the image manually by following procedure below when the screen...

Page 25: ...e refresh rate of computer to low 60Hz and repeat steps from again Adjust the H Position after the Phase adjustment if the horizontal position moves during the adjustment Adjust the Brightness and Color Temp to get the desired picture after you complete the Clock and Phase adjustments Put back your favorite wallpaper Adjust the Phase to correct horizontal wavy noise flicker or blur in the zebra pa...

Page 26: ...ss than 2W The screen becomes dark and the power indicator turns to orange From Power Management Mode the image reappears in several seconds when either the keyboard or the mouse are touched again The power management feature of this product complies with power saving requirement of VESA DPMS When activated it automatically reduces unnecessary power consumption of the monitor when your computer is...

Page 27: ...e signal timing of the computer is within the specification of the monitor The screen is too bright or too dark T h e s c r e e n i s shaking The video output level of the computer is within the specification of the monitor The power voltage is within the specification of the monitor The signal timing of the computer is within the specification of the monitor T h e t o u c h screen shows no respon...

Page 28: ...ENGLISH 24 RECYCLING INFORMATION For better environment protection please don t dispose your monitor Please visit our web site www iiyama com for monitor recycling RECYCLING INFORMATION ...

Page 29: ...ncy Horizontal 31 4 60 3kHz Vertical 56 75Hz Maximum Resolution 1366 768 1 0 MegaPixels Input Connector VGA HDMI DisplayPort Plug Play VESA DDC2BTM Input Sync Signal Separate sync TTL Positive or Negative Input Video Signal Analog 0 7Vp p Standard 75Ω Positive Digital HDMI DisplayPort Maximum Screen Size 344 2mm W 193 6mm H 13 6 W 7 6 H Power Source 12VDC 3 75A AC Adapter accessory Input 100 240VA...

Page 30: ...31 500MHz 800 600 35 156kHz 56 250Hz 36 000MHz 37 879kHz 60 317Hz 40 000MHz 46 875kHz 75 000Hz 49 500MHz 48 077kHz 72 188Hz 50 000MHz 1024 768 48 363kHz 60 004Hz 65 000MHz 56 476kHz 70 069Hz 75 000MHz 60 023kHz 75 029Hz 78 750MHz 1280 768 47 776kHz 59 870Hz 79 500MHz 1366 768 47 712kHz 59 790Hz 85 500MHz 384 0mm 15 1 389 0mm 15 3 246 5mm 9 7 241 5mm 9 5 240 0mm 9 5 254 0mm 10 0 312 5mm 12 3 53 5mm...

Reviews: