background image

ENGLISH

BEFORE YOU OPERATE THE MONITOR     10

BASIC OPERATION

n

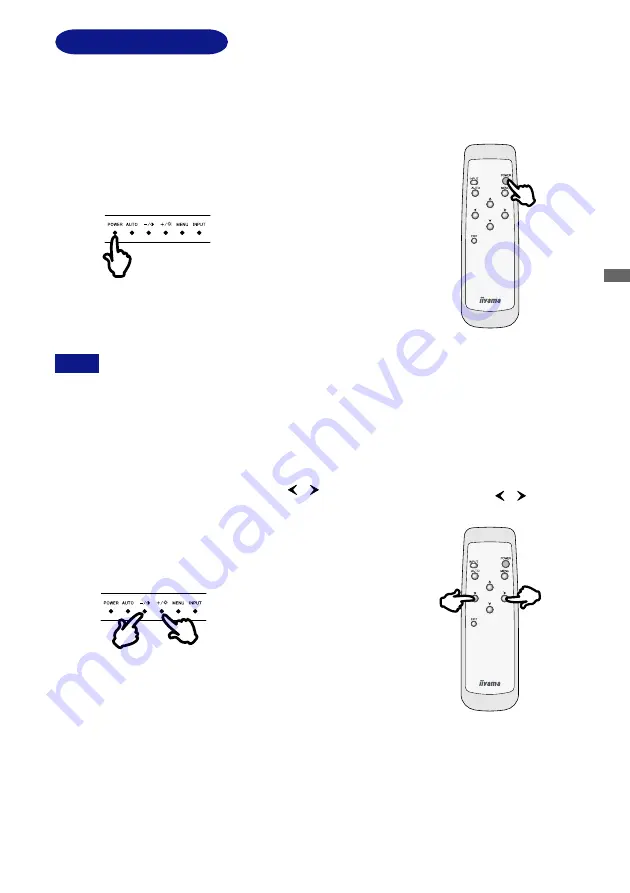
 Turn on the monitor

Press the Main Power Switch on the monitor. The

monitor is turned ON when you press the Power

Switch on the monitor or the Remote Control.

Press again to turn OFF the monitor.

[

 Monitor 

]

Press  the  Power  Switch.

[

 Remote Control 

]

Press  the  Power  Switch.

Even when using the power management mode, the monitor consumes electricity. Turn off
the Power Switch whenever the monitor is not in use, during the night and weekends, to
avoid  unnecessary  power  consumption.

NOTE

n

 Move the cursor horizontally

Select menu or setting, or perform the adjustment

by pressing the + / – on the monitor or the   / 

Button on the Remote Control when the menu page

is displayed on the screen.

[

 Monitor 

]

Press the  + / – Button.

[

 Remote Control 

]

Press  the 

 /   Button.

Summary of Contents for PLL320W

Page 1: ... monitor We recommend that you take a few minutes to read carefully through this brief but comprehensive manual before installing and switching on the monitor Please keep this manual in a safe place for your future reference DEUTSCH FRANCAIS NEDERLANDS SVENSKA ITALIANO ...

Page 2: ... Increase the separation between the device and receiver n Connect the device into an outlet on a circuit different from that to which the receiver is connected n Consult the dealer or an experienced radio or TV technician for help To meet the FCC requirements you should use a signal cable with ferrite core at both ends CAUTION Changes or modifications not expressly approved by iiyama could void t...

Page 3: ...4 INSTALLATION OF STAND 5 CONTROLSANDCONNECTORS 6 PREPARINGTHEREMOTECONTROL 7 CONNECTINGYOURMONITOR 8 COMPUTERSETTING 9 BASICOPERATION 10 OPERATINGTHEMONITOR 12 ADJUSTMENTMENUCONTENTS 13 SCREENADJUSTMENTS 21 POWERMANAGEMENTFEATURE 23 TROUBLESHOOTING 24 APPENDIXA 25 SPECIFICATIONS 25 DIMENSIONS 26 COMPLIANTTIMING 26 CONNECTORPINASSIGNMENT 27 RS 232CINTERFACE 28 APPENDIXB 28 TABLE OF CONTENTS ...

Page 4: ...HE MONITOR ON A FLAT STABLE SURFACE The monitor may cause an injury if it falls or is dropped DO NOT USE THE MONITOR NEAR WATER Do not use where water may be splashed or spilt onto the monitor as it may cause fire or electric shock OPERATE UNDER THE SPECIFIED POWER SUPPLY Be sure to operate the monitor only with the specified power supply Use of an incorrect voltage will cause malfunction and may ...

Page 5: ...other soft material may also cause damage DISCONNECT THE CABLES WHEN YOU MOVE THE MONITOR When you move the monitor turn off the power switch unplug the monitor and be sure the signal cable is disconnected If you do not disconnect them it may cause fire or electric shock It is recommended that two people are used when moving the monitor UNPLUG THE MONITOR If the monitor is not in use for a long pe...

Page 6: ...or replacement packaging If you drop any materials or liquids such as water into the monitor when cleaning unplug the power cable immediately and contact your dealer or iiyama service center For safety reasons turn off the power switch and unplug the monitor before you clean it To protect the LCD panel do not scratch or rub the screen with a hard object Never use any of the following strong solven...

Page 7: ...B37 n DVI D Signal Cable DV66 n RS 232C Cable SR51 n Stand 2 n Screw for Stand 4 n Remote Control n AA Dry Battery 2 n User Manual CAUTION The rating of the Power Cable enclosed in 120V area is 10A 125V If you are using a power supply higher than this rating then a power cable with a rating of 10A 250V must be used However All guarantees and warranties are void for any problems or damage caused by...

Page 8: ...nitor may cause injury or damage if it falls or is dropped n CAUTION n Unplug the monitor before installation to avoid electric shock or damage n The monitor is heavy Two person handling is recommended n ProLite L400W B1X ProLite L320W B Stand Screw 4 Stand Screw 4 Do not give a strong impact to the monitor It may cause damage 5 BEFORE YOU OPERATE THE MONITOR ...

Page 9: ...rast Button D Brightness Button E Menu Button MENU F Input Button INPUT G Remote Sensor H Power Indicator Blue Normal operation Orange Power Management The monitor enters into power management mode which reduces the power consumption to less than 5W when receiving no horizontal and or vertical sync signal I Optional Video Adapter Slot J DVI D 24pin Connector DVI K D SUB mini 15pin Connector D SUB ...

Page 10: ...MENTS nThe screen becomes dark for approximately five seconds during the adjustment C Zoom Button D Button Contrast Button E Exit Button EXIT F Power Switch POWER G Menu Button MENU H Button Brightness Button I Zoom Button NOTE To use the remote control insert the two dry batteries A Slide open the battery case lid on the reverse of the remote control as shown in the illustration B Take care not t...

Page 11: ...omputer n For connection to Macintosh computers contact your local iiyama dealer or regional iiyama office for a suitable adaptor n Make sure you tighten the finger screws at each end of the signal cable CONNECTING YOUR MONITOR A Ensure that both the computer and the monitor are switched off B Connect the computer to the monitor with the signal cable See page 27 for CONNECTOR PIN ASSIGNMENT C Conn...

Page 12: ...ter with the Signal Cable supplied Windows 95 98 2000 Me XP Monitor Information File for iiyama monitors may be necessary for your computer and obtained via the Internet using the address http www iiyama com U S A http www iiyama co uk U K NOTE n For additional information on how to download the driver for your monitor please access one of the internet sites noted above n Monitor Drivers are not r...

Page 13: ... Control Press the Power Switch Even when using the power management mode the monitor consumes electricity Turn off the Power Switch whenever the monitor is not in use during the night and weekends to avoid unnecessary power consumption NOTE n Move the cursor horizontally Select menu or setting or perform the adjustment by pressing the on the monitor or the Button on the Remote Control when the me...

Page 14: ...ontrol The menu page disappears when you press the Exit Button on the Remote Control Monitor Press the Menu Button Remote Control Press the Menu Button n Display the adjustment Zoom The Zoom item appears on the screen when you press the Zoom Button on the Remote Control Remote Control Press the Zoom Button 11 BEFORE YOU OPERATE THE MONITOR ...

Page 15: ...he appropriate adjustment or setting Adjustments for Clock Phase and Position are saved for each signal timing Except for these adjustments all other adjustments have only one setting which applies to all signal timings n For example to correct for vertical position select Menu page number 1 and then press the Menu Button Then select V Position by using the Buttons or the Buttons n Any changes are...

Page 16: ...emote Control l Auto Set up Press the Auto Button on the monitor or the Remote Control l Zoom Press the Zoom Button on the Remote Control when the menu is not displayed Direct SWITCHING BRIGHTNESS CONTRAST ADJUSTMENT To switch between Brightness and Contrast adjustments press the Menu Button within 5 seconds after pressing the Brightness Button or the Contrast Button during the direct adjustments ...

Page 17: ...ustment Item Problem Option Button to Press Menu 1 Analog Too dark Too bright Brightness 1 Contrast Too dull Too intense To correct flickering text or lines Clock 2 Phase 2 H Position Too far to the left Too far to the right V Position Too low Too high Return to Menu Highlight Menu 1 again To correct flickering text or lines Direct Direct Analog Input See page 13 for Direct Direct OPERATING THE MO...

Page 18: ...r Press the Button to change the picture quality in reverse numerical order 9300K Normal Normal Hi Cont High contrast Dark Gamma 6500K Dark Reddish white Approx 6500K Bluish white Approx 9300K Green Red Blue Too weak Too strong User Mode 1 Brightness of back light is reduced by Approx 10 Mode 2 Economy Mode OFF Normal Brightness of back light is reduced by Approx 50 or or 15 OPERATING THE MONITOR ...

Page 19: ...in reverse numerical order Menu 3 Analog Key Lock Mode All adjustment items are locked out ON You can set the OSD display time 3 to 60 seconds OSD Off Timer NOTE It can not be released when the Key Lock Mode is on In the case that release is necessary please contact your dealer OFF Return to Normal H Flipping The screen that reversed the right and left is displayed ON OFF Return to Normal or or OP...

Page 20: ...en display of 4 3 Expansion display of Aspect Full Expansion display To move the zoom point to the right To move the zoom point to the left To move the zoom point downward To move the zoom point upward The screen is expanded The screen is returned Zoom In Zoom Out H Position V Position Spanish Español Svenska English Deutsch English German Français Nederlands French Dutch Swedish Italiano Italian ...

Page 21: ...re quality from 1 to 5 soft to sharp Press the Button to change the picture quality in numerical order Press the Button to change the picture quality in reverse numerical order 9300K Normal Hi Cont Gamma 6500K Dark User Mode 1 Mode 2 Economy Mode OFF Normal High contrast Dark Reddish white Approx 6500K Bluish white Approx 9300K Green Red Blue Too weak Too strong Brightness of back light is reduced...

Page 22: ...n reverse numerical order Menu 2 Digital Key Lock Mode All adjustment items are locked out ON Return to Menu Highlight Menu 2 again You can set the OSD display time 3 to 60 seconds OSD Off Timer NOTE It can not be released when the Key Lock Mode is on In the case that release is necessary please contact your dealer OFF Return to Normal H Flipping The screen that reversed the right and left is disp...

Page 23: ...ay Reset NO YES Return to Menu Factory preset data is restored Language Zoom To move the zoom point to the right To move the zoom point to the left To move the zoom point downward To move the zoom point upward The screen is expanded The screen is returned Zoom In Zoom Out H Position V Position Spanish Español Svenska English Deutsch English German Français Nederlands French Dutch Swedish Italiano ...

Page 24: ...djustments are required There are two ways to adjust the screen One way is automatic adjustment for Clock Phase and Position The other way is performing each adjustment manually Perform the Auto Set up first when the monitor is connected to a new computer or resolution is changed If the screen has a flicker or blur or the picture does not fit in the display area after performing the Auto Set up ma...

Page 25: ... the picture frame will fit to the display area or or NOTE n When the left side of the picture frame moves apart from the left edge of the display area during the Clock adjustment adjust steps 1 and 2 n Another way to make the Clock adjustment is to correct the vertical wavy lines in the zebra pattern n The picture may flicker during the Clock H Position and V Position adjustment n In case the pic...

Page 26: ...for information on how this can be configured n 0 5W 100 POWER CONSUMPTION Blue Orange Power Indicator NORMAL MODE POWER MANAGEMENT MODE NOTE n In case the strong flicker or blurs remain on a part of the screen repeat steps F and G because the Clock may not be adjusted correctly If the flicker or blurs still remain set the refresh rate of computer to low 60Hz and repeat steps from C again n Adjust...

Page 27: ... If the monitor is in power management mode touch the keyboard or the mouse The screen is not synchronized o The Signal Cable is properly connected o The signal timing of the computer is within the specification of the monitor B o The signal timing of the computer is within the specification of the monitor o The video output level of the computer is within the specification of the monitor The scre...

Page 28: ...iving system Dimensions Net Weight 947 619 300mm 37 3 24 4 11 8 W H D 31kg 68 3lbs With Stand Input Video Connector D SUB mini 15pin ANALOG DVI D 24pin DIGITAL Right Left Up Down 85 degrees each Viewable angle Power Source Maximum Screen Size 220W maximum Power management mode 5W maximum Power Consumption Brightness Contrast ratio 500cd m2 Typical 600 1 Typical 100 230VAC 50 60Hz 2 3 1 0A Environm...

Page 29: ...75 000Hz 70 087Hz 66 667Hz 74 500Hz 74 720Hz VGA TEXT Video Mode VESA Macintosh SVGA VGA XGA 1024 768 640 480 800 600 720 400 640 480 832 624 1024 768 Horizontal Frequency 31 469kHz 37 861kHz 37 500kHz 37 879kHz 48 077kHz 46 875kHz 48 363kHz 56 476kHz 60 023kHz 44 409kHz 47 701kHz 60 150kHz 31 469kHz 35 000kHz 49 725kHz 60 150kHz DVI input is not compliant NOTE Dot Clock 25 175MHz 31 500MHz 31 500...

Page 30: ...r Ground 13 14 15 Input Signal NC 6 Pin Input Signal NC CONNECTOR PIN ASSIGNMENT 11 Input Signal Red video Green video Pin Blue video Green video ground Blue video ground 9 10 12 13 Ground Input Signal H Sync V Sync 15 14 Red video ground Data line SDA Clock line SCL Compliant to VESA DDC Ground 5V in 3 8 1 2 4 5 6 7 9 10 11 12 Pin DVI D 24pin Connector n 16 17 24 1 9 8 DVI D RS 232C D SUB 9pin Co...

Page 31: ...ton operations l Brightness Press the Brightness Button on the monitor or the Remote Control when the Menu is not displayed l Contrast Press the Contrast Button on the monitor or the Remote Control when the Menu is not displayed l Signal Select Press the Input Button on the monitor or the Remote Control l Zoom Press the Zoom Button on the Remote Control when the menu is not displayed l Picture Loc...

Page 32: ...olor Temp 9300K Normal Normal Hi Cont High contrast Dark Gamma 6500K Dark Reddish white Approx 6500K Bluish white Approx 9300K Green Red Blue Too weak Too strong User Color Hue Too weak Too strong Purplish Greenish or or or or or Adjust the Brightness and Contrast so that the picture is displayed naturally in Video Input mode Return to Menu Highlight Menu 1 again See page 28 for Direct Direct ...

Page 33: ... video equipment In this case select VTR The picture may not display normally when inputting the signal of television or damaged videotape 1 2 3 4 5 You can change the picture quality from 1 to 5 soft to clear Press the Button to change the picture quality in numerical order Press the Button to change the picture quality in reverse numerical order Too soft Too sharp or or NTSC H 1 5 7 K H z V 6 0 ...

Page 34: ...nu 3 Video You can set the OSD display time 3 to 60 seconds or or Adjustment Item OSD Position OSD Off Timer OFF Return to Menu All adjustment items are locked out ON It can not be released when the Key Lock Mode is on In the case that release is necessary please contact your dealer OFF Return to Normal The screen that reversed the right and left is displayed ON OFF Return to Menu Highlight Menu 3...

Page 35: ... force SECAM Switch the broadcast system to SECAM by force Reset NO YES Return to Menu Factory preset data is restored Language Zoom To move the zoom point to the right To move the zoom point to the left To move the zoom point downward To move the zoom point upward The screen is expanded The screen is returned Zoom In Zoom Out H Position V Position Spanish Español Svenska English Deutsch English G...

Page 36: ...ENGLISH Input Connector RCA pin jack S Video terminal Input Video Signal Video NTSC PAL SECAM Not all broadcast systems are supported NOTE Specifications for Optional Video Input 33 APPENDIX B ...

Reviews: