background image

ENGLISH

  OPERA

TING 

THE MONIT

OR   23 


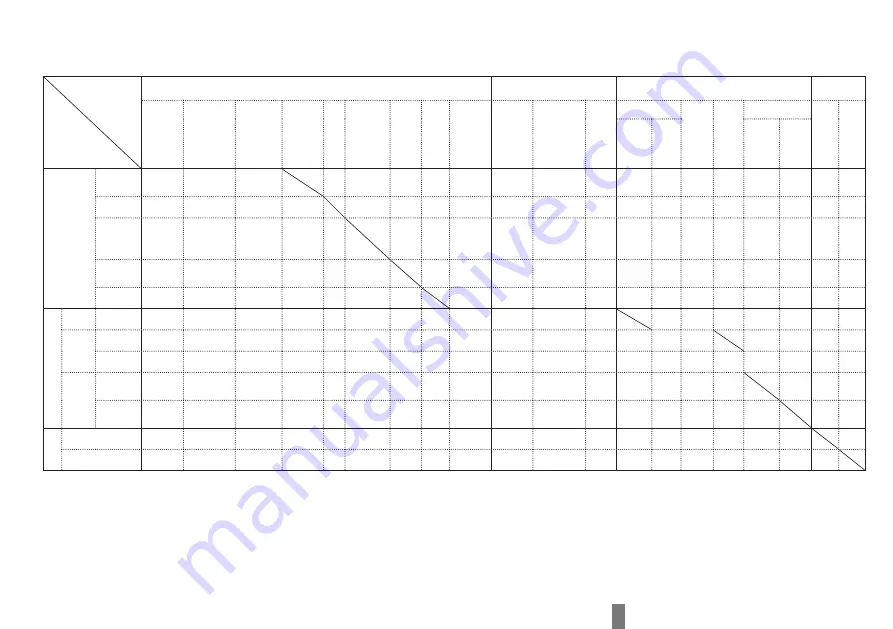
Function Correlation Matrix

Selected 

item

Active Item

Picture Adjust

Color

Image Adjust

Setup

Contrast Brightness Overdrive

Adv. 

Contrast

Eco

Blue 

Light 

Reducer

Black 

Tuner

MBR Gamma

Cool /

Normal /

Warm

Hue /

Saturation

R/G/B

i-Style Color

X-Res

Direct 

Drive

Video Mode 

HDR

Free 

Sync

Pre-

set

User 

mode

Full / 

Aspect

Dot by 

dot / 
Size

Picture adjust

Adv.

Contrast

Eco

Blue

Light 

Reducer

Black 

Tuner

MBR

Image adjust

i-Style

Pre-set

Direct 
Drive

On

Off

Video 
mode

Full / 

Aspect

Dot by 

dot /Size

 Setup

HDR

FreeSync

 

 : Available

    – 

: Not available

Summary of Contents for G-Master GB3467WQSU

Page 1: ...hoosing the iiyama LCD monitor We recommend that you take a few minutes to read carefully through this brief but comprehensive manual before installing and switching on the monitor Please keep this manual in a safe place for your future reference ...

Page 2: ......

Page 3: ...he buildings All places of operation are characterized by their connection to the public low voltage power supply system IIYAMA CORPORATION Wijkermeerstraat 8 2131 HA Hoofddorp The Netherlands Model No PL3467WQ We reserve the right to change specifications without notice All trademarks used in this user manual are the property of their respective owners Eprel registration number GB3467WQSU B1 9417...

Page 4: ...KING THE CONTENTS OF THE PACKAGE 4 INSTALLATION 5 FITTING AND REMOVAL OF BASE 6 CONTROLS AND CONNECTORS 7 CONNECTING YOUR MONITOR 8 COMPUTER SETTING 9 ADJUSTING THE HEIGHT AND THE VIEWING ANGLE 9 OPERATING THE MONITOR 10 ADJUSTMENT MENU CONTENTS 11 STANDBY FEATURE 24 TROUBLE SHOOTING 25 RECYCLING INFORMATION 26 APPENDIX 27 SPECIFICATIONS 27 DIMENSIONS 28 COMPLIANT TIMING 28 ...

Page 5: ...y cause fire electric shock or damage INSTALL THE MONITOR ON A FLAT STABLE SURFACE The monitor may cause an injury if it falls or is dropped DO NOT USE THE MONITOR NEAR WATER Do not use where water may be splashed or spilt onto the monitor as it may cause fire or electric shock OPERATE UNDER THE SPECIFIED POWER SUPPLY Be sure to operate the monitor only with the specified power supply Use of an in...

Page 6: ... the monitor and be sure the signal cable is disconnected If you do not disconnect them it may cause fire or electric shock UNPLUG THE MONITOR If the monitor is not in use for a long period of time it is recommended that it is left unplugged to avoid accidents HOLD THE PLUG WHEN DISCONNECTING To disconnect the power cable or signal cable always pull it by the plug Never pull on the cable itself as...

Page 7: ...iiyama service center for advice or replacement packaging WARNING If you drop any materials or liquids such as water into the monitor when cleaning unplug the power cable immediately and contact your dealer or iiyama service center CAUTION For safety reasons turn off the power switch and unplug the monitor before you clean it To protect the LCD panel do not scratch or rub the screen with a hard ob...

Page 8: ... FreeSync Premium Technology Supports HDR400 Flicker Free Blue Light Reducer Digital Character Smoothing 2 2W Stereo Speakers Standby Feature VESA Mounting Standard 100mm 100mm Compliant Keyhole for Security Lock The rating of the Power Cable enclosed in 120V area is 10A 125V If you are using a power supply higher than this rating then a power cable with a rating of 10A 250V must be used However a...

Page 9: ...may contact with the electrical parts inside the monitor WARNING Screw Chassis Mounting Stage L WALL MOUNTING ROTATING THE MONITOR Available Landscape Portrait Power Indicator Power Indicator Power Indicator Not Available A A A A This monitor can only be used in landscape Do not rotate or operate the monitor in any other orientation than landscape Before installation make sure the wall ceiling or ...

Page 10: ...ront cushion on a flat surface and place the monitor with face down on it Loosen the thumb screw to remove the Stand Base from the monitor Installation As shown below place all the contents taken out from the carton box on a flat surface with the monitor front face down Take off the rear cushion and turn the Stand Neck 90 degrees Install the Stand Base as shown on the below picture Tighten the thu...

Page 11: ...nstream Connector 5V 900mA USB 3 0 Downstream Connector 5V 900mA Headphone Connector DisplayPort Connector DP1 DisplayPort Connector DP2 HDMI Connector HDMI1 HDMI Connector HDMI2 Cable Hole AC Connector Alternating current Navigation Button Menu Scroll Up Scroll Down Left i Style Color Right Blue Light Reducer Input Select Button INPUT Volume Button VOL Volume Button VOL Power Switch You can skip ...

Page 12: ... incorrect connection may cause serious damage to both the monitor and the computer The cable supplied with the monitor is for a standard connector If a special cable is required please contact your local iiyama dealer or regional iiyama office The Class I pluggable equipment Type A must be connected to protective earth The socket outlet shall be installed near the equipment and shall be easily ac...

Page 13: ... the panel so that the monitor does not topple when you change the monitor s height or angle You are able to adjust the monitor s height up to 130mm 20 degrees upward and 3 degrees downward Do not touch the LCD screen when you change the height or the angle It may cause damage or break the LCD screen Careful attention is required not to pinch your fingers or hands into the moving part of the stand...

Page 14: ...y turn off the On Screen Display Any changes are automatically saved in the memory when the On Screen Display disappears Turning off the power should be avoided while using the Menu All adjustments have only one setting which applies to all signal timings NOTE For example to correct for OSD vertical position select Menu item of Setup Menu and then press the Menu Button Then select OSD Vertical Pos...

Page 15: ...duced more than Mode1 Mode2 Brightness of back light is reduced more than Mode2 Mode3 Direct Blue Light Reducer Off Typical Mode1 Blue light is reduced Mode2 Blue light is reduced more than Mode1 Mode3 Blue light is reduced more than Mode2 Black Tuner From 5 to 5 You can adjust Dark shades Gamma MBR 3 Off 1 7 Improve the moving picture response time of the LCD panel PICTURE ADJUST DISPLAY INFORMAT...

Page 16: ...t Reducer Press the Button when the Menu is not displayed Direct 1 The availability of each item depends on which item is activated See page 23 Function Correlation Matrix for more details 2 Adjust the Brightness when you are using the monitor in a dark room and feel the screen is too bright 3 MBR is available only when the refresh rate is higher than 75Hz ...

Page 17: ... the Menu is not displayed Direct Search for an available input source and select automatically Auto Select the Digital HDMI1 input HDMI1 Select the Digital HDMI2 input HDMI2 Manual PICTURE ADJUST DISPLAY INFORMATION IMAGE ADJUST COLOR SETTINGS LANGUAGE RESET STORE USER SETTING INPUT SELECT AUDIO ADJUST SETUP MENU G MASTER GB3467WQSU HDMI1 DP1 HDMI2 SELECT DP2 INPUT SOURCE MANUAL AUTO MANUAL SELEC...

Page 18: ...ched as follows by pressing the Buttons successively On Off NOTE Direct You can skip the Menu items and directly display an adjustment scale by using the following button operations Volume Press the VOL VOL Button when the Menu is not displayed Direct PICTURE ADJUST DISPLAY INFORMATION IMAGE ADJUST COLOR SETTINGS LANGUAGE RESET STORE USER SETTING INPUT SELECT AUDIO ADJUST SETUP MENU G MASTER GB346...

Page 19: ...djustment User Mode 2 You can memorize your customized monitor settings The following settings can be memorized Contrast Brightness Overdrive Adv Contrast Eco Black Tuner MBR Gamma Volume Mute Color Settings Sharp and Soft Video Mode Adjust PICTURE ADJUST DISPLAY INFORMATION IMAGE ADJUST COLOR SETTINGS LANGUAGE RESET STORE USER SETTING INPUT SELECT AUDIO ADJUST SETUP MENU G MASTER GB3467WQSU STORE...

Page 20: ...ormal Normal color Warm Blue Color Temperature PICTURE ADJUST DISPLAY INFORMATION IMAGE ADJUST COLOR SETTINGS LANGUAGE RESET STORE USER SETTING INPUT SELECT AUDIO ADJUST SETUP MENU G MASTER GB3467WQSU COLOR TEMPERATURE COOL NORMAL WARM USER PRESET RED GREEN BLUE 6 AXIS HUE SATURATION 6 Axis Hue Saturation Red Yellow Green Cyan Blue Magenta Red Yellow Green Cyan Blue Magenta Too weak Too strong Too...

Page 21: ...tings Applies customized monitor settings HDMI Range 2 Full Limited For full range color scale signal For limited color scale signal Off On Direct Drive Mode 3 Typical Reduce the input lag Changing Resolution and Refresh rate or turning Power Off On might disable the Direct Drive Mode function NOTE Enhance the picture edge Off Normal Soft Enhance the picture edge more than the Middle option Hard X...

Page 22: ...4 inch screen 16 9 27inch 4 Display the picture as 27 inch screen 16 9 PICTURE ADJUST DISPLAY INFORMATION IMAGE ADJUST COLOR SETTINGS LANGUAGE RESET STORE USER SETTING INPUT SELECT AUDIO ADJUST SETUP MENU G MASTER GB3467WQSU IMAGE ADJUST I STYLE COLOR SHARP AND SOFT HDMI RANGE VIDEO MODE ADJUST OFF FULL DIRECT DRIVE MODE ON OFF X RES TECHNOLOGY OFF FULL Aspect Expansion display of Aspect Dot by Do...

Page 23: ...ish Français French Russian Nederlands Dutch Polski Portuguese Português PICTURE ADJUST DISPLAY INFORMATION IMAGE ADJUST COLOR SETTINGS LANGUAGE RESET STORE USER SETTING INPUT SELECT AUDIO ADJUST SETUP MENU G MASTER GB3467WQSU Deutsch Español Français Italiano Nederlands Polski ENGLISH CHANGE LANGUAGE Ĉesky Рyccкий Português Japanese Ĉesky Рyccкий ...

Page 24: ... ON OFF LED AMD FreeSync Premium ON OFF ON OFF SETUP MENU OSD VERTICAL POSITION DDC CI ON OFF USB STANDBY MODE ON OFF Off G MASTER Logo is not displayed when the monitor is turned on G MASTER Logo is displayed when the monitor is turned on On HDR On Off For HDR High Dynamic Range signal For normal signal LED The Power Indicator is turned On Off The Power Indicator is turned Off On Turn Off the Pow...

Page 25: ...egarding the current input signal coming from the graphic card in your computer PICTURE ADJUST DISPLAY INFORMATION IMAGE ADJUST COLOR SETTINGS LANGUAGE RESET STORE USER SETTING INPUT SELECT AUDIO ADJUST SETUP MENU G MASTER GB3467WQSU 2560 x 1440 120Hz DP1 DISPLAY INFORMATION PICTURE ADJUST DISPLAY INFORMATION IMAGE ADJUST COLOR SETTINGS LANGUAGE RESET STORE USER SETTING INPUT SELECT AUDIO ADJUST S...

Page 26: ...olding down the MENU Button on the monitor while the monitor is off the OSD button operations will be locked unlocked Power OSD If you keep pressing the MENU Button on the monitor for 10 seconds when the Menu is not displayed the Power OSD button operations will be locked unlocked ...

Page 27: ...ue Light Reducer Black Tuner MBR Gamma Cool Normal Warm Hue Saturation R G B i Style Color X Res Direct Drive Video Mode HDR Free Sync Pre set User mode Full Aspect Dot by dot Size Picture adjust Adv Contrast Eco Blue Light Reducer Black Tuner MBR Image adjust i Style Pre set Direct Drive On Off Video mode Full Aspect Dot by dot Size Setup HDR FreeSync Available Not available ...

Page 28: ...r the mouse are touched again This product features the standby function When activated it automatically reduces unnecessary power consumption of the monitor when your computer is not in use There is a standby step the monitor takes as described below The standby function including any timer settings is configured by the operating system Check your operating system manual for information on how th...

Page 29: ...se Increase the Contrast and or Brightness The computer is ON The Signal Cable is properly connected The signal timing of the computer is within the specification of the monitor If the monitor is in standby mode touch the keyboard or the mouse The computer is ON The Signal Cable is properly connected The signal timing of the computer is within the specification of the monitor The Signal Cable is p...

Page 30: ...ENGLISH 26 RECYCLING INFORMATION For better environment protection please don t dispose your monitor Please visit our web site www iiyama com for monitor recycling RECYCLING INFORMATION ...

Page 31: ...x resolution HDMI 3440 1440 100Hz 1920 1080 120Hz DisplayPort 3440 1440 165Hz Input Connector HDMI 2 DisplayPort 2 Input Video Signal HDMI DisplayPort USB Standard USB3 0 DC5V 900mA 4 Number of USB Ports Connector shape 1 Upstream Series B 4 Downstream Series A Headphone Connector ø 3 5mm mini jack Stereo Speakers 2W 2 Stereo speakers Maximum Screen Size 797 22mm W 333 72mm H 31 4 W 13 1 H Power S...

Page 32: ...z 60 020Hz 108 000MHz 79 976kHz 75 025Hz 135 000MHz 1920 1080 67 500kHz 60 000Hz 148 500MHz 135 000kHz 120 000Hz 297 000MHz 3440 1440 88 860kHz 60 000Hz 319 896MHz 151 000kHz 100 000Hz 543 600MHz 1 244 370kHz 165 000Hz 879 714MHz 2 809 5mm 31 9 801 5mm 31 6 366 0mm 14 4 342 0mm 13 5 550 0mm 21 7 275 0mm 10 8 104 0mm 4 1 424 5mm 16 7 554 5mm 21 8 1 Only HDMI input 2 Only DisplayPort input Console 1...

Reviews: