background image

Misprints, errors and technical changes reserved

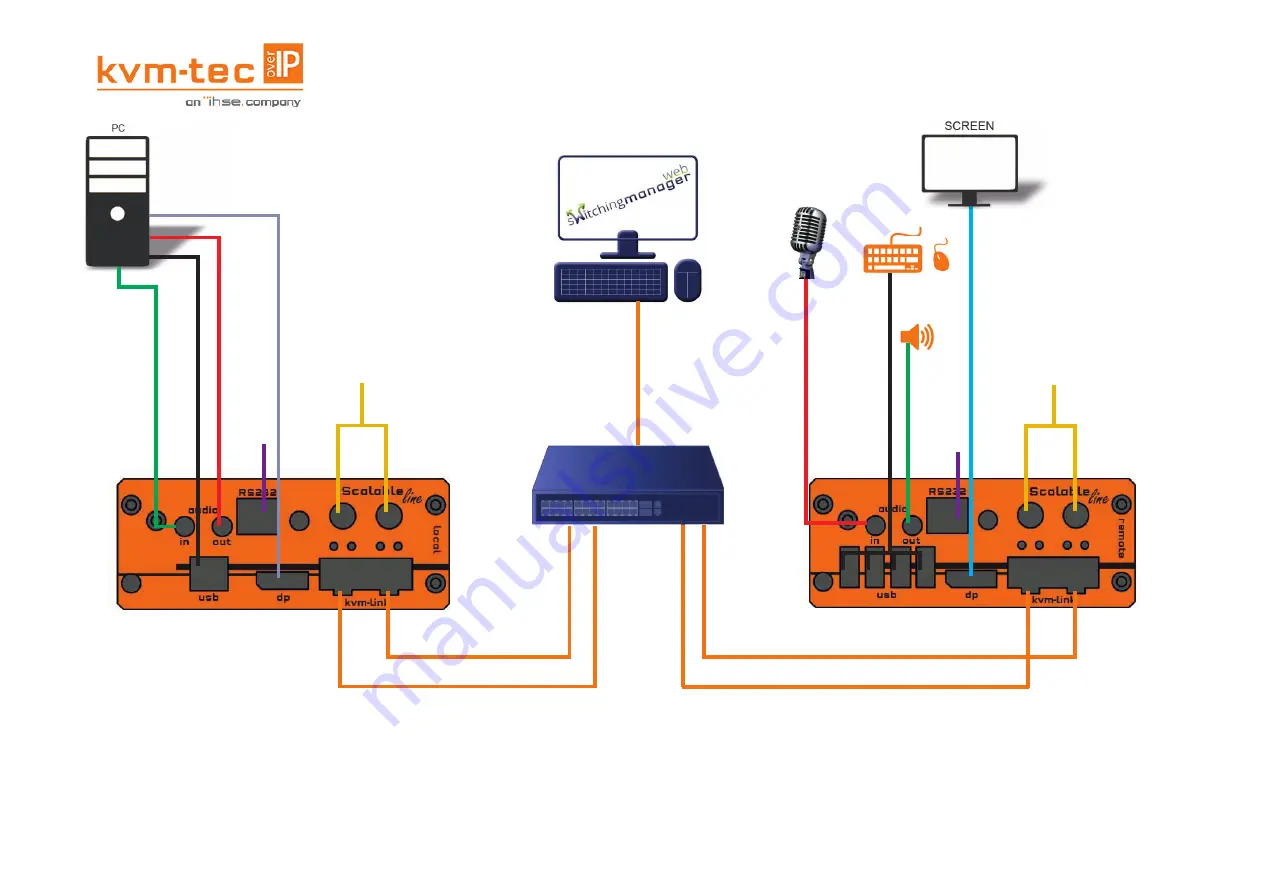
1. Connect the CON/Remote and the CPU/Local Unit with the supplied 12V 3A power supply.
2. Now connect the USB cable to a USB socket of your PC and connect the other end of the USB cable to the 
Local Unit. Connect the keyboard and mouse to the Remote Unit.

3. Connect the Local and the Remote Unit with a network fi ber cable.

4. Connect the DP cable to the DP socket of the PC to the DP socket DP/in of the Local device and connect 
the screen on the remote side with the DP cable. 
5. Connect the Audio cable from PC to Local Extender and connect the Audio cable from Remote Extender 
to Speaker
6. Connect the Audio Cable from Microphone to Remote Extender and connect the Audio cable from Local 
Extender to PC.

HAVE FUN - Your kvm-tec Extender is now in use for many years (MTBF approx. 10 years)!

DP out  zum Monitor

   USB von     Tastatur und Maus

Netzteil für 

12V 3A 

Duplex multimode 

OM4-Fiberkabel (LC) 

bis zu 300m main link 1

Audio out  zum Laut- sprecher

Netzteil 

für 12V 3A 

DP in vom PC

USB zum PC

Audio in  vom PC

Audio out  zum PC

Audio in  vom Mikrofon

RS232 

plug 

RS232 

plug 

Duplex multimode OM4-Fiberkabel (LC) 

bis zu 300m main link 1

Duplex multimode OM4-Fiberkabel (LC) 

bis zu 300m main link 2

Duplex multimode OM4-Fiberkabel (LC) 

bis zu 300m main link 2

10G Switch 

Is the Switching Manager confi gured correctly?

A test for the correct confi guration of the network switch (Layer3) 

is built into the Switching Manager.

You can fi nd this test under „General Settings

Summary of Contents for KVM-TEC ScalableLine 4K/5K

Page 1: ...cking the status LED Check if the DDC is set correctly in menu under point O Ist im im Switching Manager Frontend Video aktiv Video no Video Contact kvm tec support Check if all cables are plug ged in correctly Check if local and re mote Unit have the correct firmware Check if the DDC is set correctly in the menu under point o Check if the network switch is setup correctly and has enough bandwidth...

Page 2: ...t the Audio Cable from Microphone to Remote Extender and connect the Audio cable from Local Extender to PC HAVE FUN Your kvm tec Extender is now in use for many years MTBF approx 10 years DP out zum Monitor USB von Tastatur und Maus Netzteil für 12V 3A Duplex multimode OM4 Fiberkabel LC bis zu 300m main link 1 Audio out zum Laut sprecher Netzteil für 12V 3A DP in vom PC USB zum PC Audio in vom PC ...

Page 3: ...ttings by selecting the corresponding letters Press S System status menu system status current status F Features Menu activated features E Login login to use secure features G Settings extender settings SYSTEM STATUS By pressing the S key or by selecting the arrow keys you access the status menu where you will find information about hardware and software versions as well as the activated upgrades ...

Page 4: ... our KVM emulated cursor 2 Drag the corner of the window or move the mouse scroll wheel to resize it SCREEN Scaling a scalable window using our KVM emulated cursor EXITING WINDOW EDITING MODE Editing Mode is automatically exited when Ctrl Alt is released CONNECTING LOCALS TO WINDOWS WITHIN THE WINDOW EDIT MODE Connecting to locals is as easy as any other kvm tec extender How it works 1 Point with ...

Reviews: