Misprints, errors and technical changes reserved
Misprints, errors and technical changes reserved
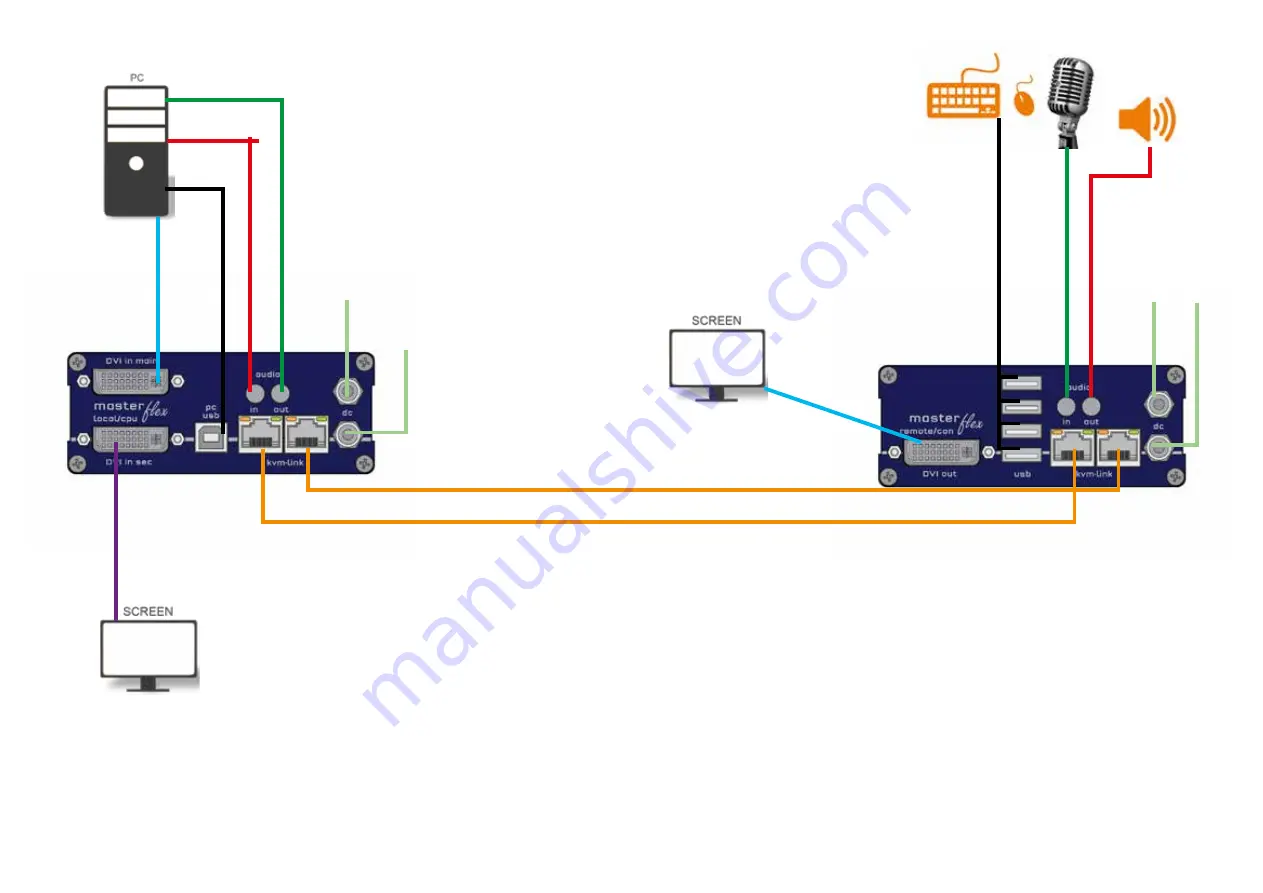
Power plug 12V 1A
Power plug 12V 1A
USB to PC
DVI in from PC
DVI to Monitor
USB from Keyboard and mouse
Quick Installation Masterflex Single
local / CPU – remote / CON
1. Connect the CON / Remote and the CPU / Local Unit to the included 12V 2A power supply.
2. Now connect the USB cable to a USB port on your PC and connect the other end of the USB cable to the CPU / Local Unit.
Connect keyboard and mouse to the CON / Remote Unit.
3. Connect the CPU / Local and the CON / Remote Unit with a network cable.
4. Now connect the DVI cable to the DVI socket of the PC and the other end to the DVI socket of the CPU Local Unit (PC-in).
5. Opt: Connect PC audio/out with the audio cable to local audio/in. Connect audio/out via the audio cable
6. Almost done! Opt: Connect the audio cable local audio/out to the PC audio/in and remote audio/out with audio cable to
the microphone
7. Using a switch: Connect all endpoints to the switch. Ensure that all connections have a bandwith of 1Gbit/sec. For video
sharing the network has to support IGMP snooping.
HAVE FUN - your kvm-tec Extender is now in use for many years (MTBF approx 10 years)
Network cable CAT5e/6/7/ up to 150m/492ft (redundant)
D
VI out
to Monitor
Network cable CAT5e/6/7/ up to 150m/492ft main link
Audio from PC
Audio to PC
Audio to speaker
Audio from microfone
Power plug
12V 1A (redundant)
Power plug 12V 1A
(redundant)
Delivery Content
Delivery Content
LOCAL/CPU Unit
LOCAL/CPU Unit
1 x MA1 local (CPU)
1 x MA1 local (CPU)
1 x wall power supplyl 12V 1A (INT or EU-plug)
1 x wall power supplyl 12V 1A (INT or EU-plug)
2 x DVI - DVI cable 1,8m/5.9ft
2 x DVI - DVI cable 1,8m/5.9ft
1 x USB canle 1,8m/5.9ft
1 x USB canle 1,8m/5.9ft
4 x rubber feet
4 x rubber feet
REMOTE/CON Unit
REMOTE/CON Unit
1 x MA1 remote (CON)
1 x MA1 remote (CON)
1 x wall power supplyl 12V 1A (INT orEU-plug)
1 x wall power supplyl 12V 1A (INT orEU-plug)
4 x rubber feet
4 x rubber feet
Open OSD menu
Open OSD menu
The OSD main menu is opened with the standard
The OSD main menu is opened with the standard
shortcut: 5 x ALT Gr
shortcut: 5 x ALT Gr
(Attention: the first 20 seconds 5 x Scroll always
(Attention: the first 20 seconds 5 x Scroll always
works, in case the shortcut was forgotten.)
works, in case the shortcut was forgotten.)
Switching list
Switching list
: CTRL+ALT+PRINT
: CTRL+ALT+PRINT
Changing the shortcuts
Changing the shortcuts
in the OSD menu
in the OSD menu
Go to the Remote Settings and then navigate to
Go to the Remote Settings and then navigate to
Keyboard Shortcut.
Keyboard Shortcut.


