background image

22

CARE AND MAINTENANCE

NOTE: 

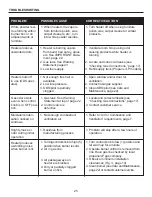
Before servicing you will need to remove the front panel of the 

heater.  There are 4 Philips head screws, 2 on the left side and 2 on the 

right, securing the front panel to the heater (See Fig. 30).  Always allow 

the unit to cool for at least thirty minutes before attempting to remove the 

front panel.

     WARNING:

 Turn off heater, unplug electrical cord and let cool 

     before servicing. 


CAUTION:

 You must keep control areas, burner, and circulating air 

     passageways of heater clean. Inspect these areas of heater before 

     each use. Have heater inspected yearly by a qualified service 

     person. Heater may need more frequent cleaning due to excessive 

     lint from carpeting, bedding material, pet hair, etc.

 WARNING:

 Failure to keep the primary air opening(s) of the burner(s) clean may result in sooting 

     and propery damage.

CLEANING ODS/PILOT AND BURNER

Use a vacuum cleaner, pressurized air, or a small, soft bristled brush to clean tile face, orifice and 

primary burner. Look into burner opening and ensure that it is clean.

CLEANING BURNER PILOT AIR INLET HOLE

We recommend that you clean the unit every three months or after 2,500 hours of operation. We also 

recommend that you keep the burner tube and pilot assembly clean and free of dust and dirt. To clean 

these parts we recommend using compressed air no greater than 30 PSI. You can use a vacuum 

cleaner in the blow position. If using compressed air in a can, please follow the directions on the can. 

If you don't follow directions on the can, you could damage the pilot assembly.

 CAUTION:

 Never use a wire, needle, or similar object to clean ODS/pilot. This can damage ODS/ pilot unit.

1. Shut off the unit, including the pilot. Allow the unit to cool for at least thirty minutes.

2. Remove 4 screws - 2 screws on each side of the front panel.

3. Pull front panel forward.

4. Blow air through the ports/slots and holes in the burner. Also clean the pilot assembly. A yellow 

    tip on the pilot flame indicates dust and dirt in the pilot assembly. There is a small pilot air inlet hole 

    about two inches from where the pilot flame comes out of the pilot assembly (see Fig. 26 & 27 on 

    page 20). With the unit off, lightly blow air through the air inlet hole. You may blow through a 

    drinking straw if air is not available.

5. Replace front panel when completed, using the screws removed.

CLEANING CABINET AIR PASSAGEWAYS

Use a vacuum cleaner or pressurized air to clean.

CLEANING FAN (SELECT MODELS)

Carefully use a vacuum cleaner or compressed air to keep fan compartment and blades free of dust 

and debris.

NOTE: 

The fan motor is pre-lubricated for extended bearing life and requires no further lubrication.

CLEANING EXTERIOR

Use a soft cloth dampened with a mild soap and water mixture.

Wipe the cabinet to remove dust.

Fig. 30 - Front Panel Removal

Summary of Contents for (C)(GC)IR6PMA series

Page 1: ...ch any electrical switch do not use any phone in your building Immediately call your gas supplier from a neighbor s phone Follow the gas supplier s instructions If you cannot reach your gas supplier c...

Page 2: ......

Page 3: ...Electronic Push Button Manifold Pressure 10 in W C 10 in W C Inlet Gas Pressure Maximum 14 in W C 14 in W C Minimum For purposes of input adjustment 11 in W C 11 in W C Dimensions in H x W x D Height...

Page 4: ...MA MAX BTU 6 000 12 000 Fuel Type Natural Gas Natural Gas Ignition Electronic Push Button Electronic Push Button Manifold Pressure 5 in W C 5 in W C Inlet Gas Pressure Maximum 14 in W C 14 in W C Mini...

Page 5: ...temperatures locate this appliance out of traffic and away from furniture and draperies This appliance is intended for supplemental heating CARBON MONOXIDE POISONING Early signs of carbon monoxide po...

Page 6: ...r shuts off do not relight until you have provided fresh outside air If heater keeps shutting off have it serviced 6 Do not run heater Where flammable liquids or vapors are used or stored Under dusty...

Page 7: ...n must be made by a licensed plumber or gas fitter in the Commonwealth of Massachusetts Sellers of unvented propane or natural gas fired supplemental room heaters shall provide to each purchaser a cop...

Page 8: ...ry 1 000 BTUs 3 Kw of gas input per hour An unvented room heater is intended as a supplemental heater rather than a primary heat source In most supplemental heat applications the water vapor does not...

Page 9: ...unconfined space This heater shall not be installed in a confined space or unusually tight construction unless provisions are provided for adequate combustion and ventilation air Adjoining rooms are...

Page 10: ...TU hr Example Gas heater logs __________BTU hr Gas water heater 30 000 BTU hr Other gas appliances ____BTU hr Vent free heater 26 000 BTU hr Total ____BTU hr Total 56 000 BTU hr Do not include direct...

Page 11: ...fresh air by using ventilation grills or duct You must provide two permanent openings one within 12 in of the ceiling and one within 12 in of the floor Connect these items directly to the outdoors or...

Page 12: ...stalling heater next to vinyl or cloth wall coverings or operating heater where impurities such as tobacco smoke candles cleaning fluids oil or kerosene lamps etc in the air exist may cause walls to d...

Page 13: ...d heater must be disconnected from gas supply and removed from wall before installing fan accessory Contact a qualified service person to do this 2 Remove fan access panel by removing 4 panel screws u...

Page 14: ...f heater extending outside the table edge 2 Fasten Legs to heater using Support Leg Screws Fig 13 Note If the heater is to be installed directly on carpet ing tile or other combustible material other...

Page 15: ...crew Locations 1 Tape mounting bracket to wall where heater will be located Make sure mounting bracket is level 2 Mark screw locations on wall See Fig 16 Note Mark only last hole on each end of mounti...

Page 16: ...ough bracket and into wall anchors 7 Tighten screws until mounting bracket is firmly fastened to wall 8 Check that the bracket is secure before mounting heater Attaching Wall Hanging Spacers to Heater...

Page 17: ...If gas line pressure is higher heater regulator damage could occur CAUTION Never connect heater directly to an LP supply This heater requires an external regulator not supplied Install the external re...

Page 18: ...3 5kPa The appliance and its appliance main gas valve must be disconnected from the gas supply piping system during any pressure testing of that system at test pressures in excess of psi 3 5 kPa Pres...

Page 19: ...call a qualified service technician to inspect the appliance and to replace any part of the control system and any gas control which has been under water LIGHTING INSTRUCTIONS MANUAL GAS CONTROL 1 ST...

Page 20: ...h 7 Wait 1 minute before attempting to light pilot again If after several tries the pilot still goes out turn the gas control knob clockwise to the OFF position and call your service technician or gas...

Page 21: ...service agency PILOT FLAME PATTERN Fig 26 shows a correct pilot flame pattern Fig 27 shows an incorrect pilot flame pattern The incor rect pilot flame is not touching the thermocouple This will cause...

Page 22: ...flame pattern with lifting and excessive flame height If burner flame is incorrect turn heater off see To Turn Off Gas to Appliance page 19 see Troubleshooting pages 23 through 26 Fig 28 Correct Flame...

Page 23: ...d using compressed air no greater than 30 PSI You can use a vacuum cleaner in the blow position If using compressed air in a can please follow the directions on the can If you don t follow directions...

Page 24: ...itioned wrong 2 Ignitor electrode is broken 3 Ignitor electrode is not connected to ignitor cable 4 Ignitor cable is pinched or wet 5 Damaged ignitor cable 6 Bad piezo ignitor or ignition module 7 Bad...

Page 25: ...r gas supplier Delayed ignition of burner s 1 Manifold pressure is too low 2 Burner orifice is clogged 1 Contact your gas supplier 2 Clean burner see Care and Mainte nance page 21 or contact customer...

Page 26: ...r 3 Clean ODS pilot see Care and Maintenance page 22 Gas odor exists even when control knob is in OFF posi tion 1 Gas leak See Warning Statement at top of page 22 2 Control valve is defective 1 Locate...

Page 27: ...s no power to the fan 2 Fan is set to AUTO 3 Fan motor is bad 1 Fan housing or blades are dirty 2 Fan rotation is blocked 3 Defective fan 1 See Cleaning Fan page 22 2 Verify wiring is not in fan path...

Page 28: ...e 1 AQ000112 AQ000112 AQ000112 AQ000112 7 Overheat Limit Switch 1 AQ000042 AQ000042 AQ000042 AQ000042 8 1 NG Regulator Assembly 1 AQ000073 AQ000073 AQ000073 AQ000073 8 2 LP Regulator Assembly 1 AQ0000...

Reviews: