background image

iBT15 EN-IB -

Size: 214mm x 336mm

Printing color: Black

Jan 09, 2015

100gsm2 WF (

書紙)

iBT15 EN-IB

Size: 214mm x 336mm

Printing color: Black

Jan 09, 2015

100gsm2 WF (

書紙)

What’s Included 

• iBT15 speaker
• micro USB charging cable
• carry strap

micro USB charging cable

iBT15 speaker

carry strap

2

3

4

5

iBT15

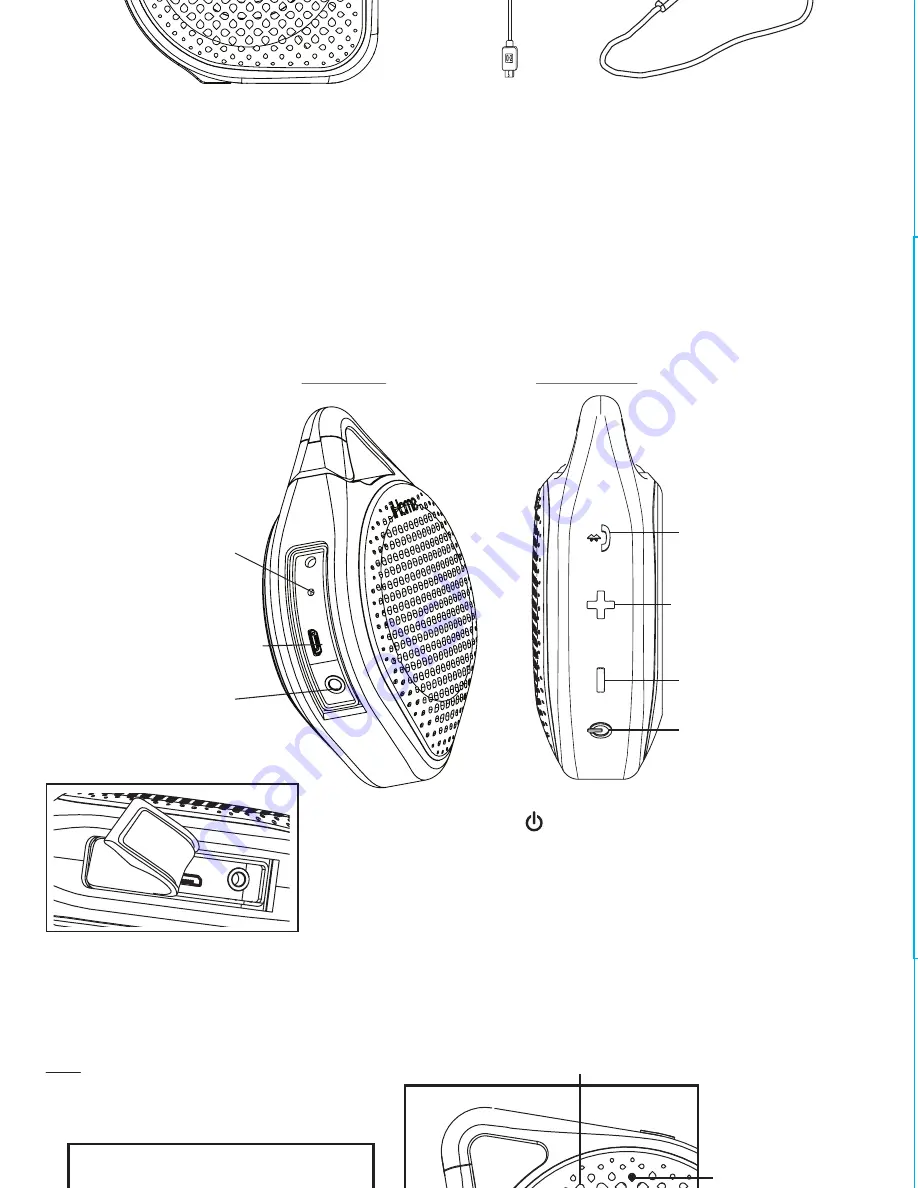
Meet Your iBT15

Aux-in Jack

Left Side

Splash-resistant Cover

Reset Button

(insert 

paperclip to 

reset unit)
USB Charging

Port

Right Side

Power/End Call 

Button

Talk/Bluetooth Pairing/

 Play/Pause Button

– Volume Button

+ Volume Button

iBT15

Microphone

Status indicator LED

Status indicator

Status

Solid red LED

Solid blue LED

Flashing red LED

Quickly flashing blue LED
Slowly flashing blue LED

Unit is charging
Unit needs charging
Active Bluetooth connection / Aux mode
Unit is attempting to pair with Bluetooth device
Unit is attempting to auto link to already 

paired Bluetooth device

Top

Getting Started: Carabiner & Carry Strap

The iBT15 has a built-in carbiner clip and comes with a carry strap for easy 

carrying or attaching to a backpack, shower head, etc. 
To attach the carry strap, form a small loop in one end of the strap. Insert this 

loop through the carabiner on top of the unit, then pull the loop back through 

the larger loop formed in the carry strap to tighten.

Getting Started: Charging the Unit

Charge unit before use. For first time charge, charge for at least 4 hours.


Pull back splash-proof seal and connect the included micro USB cable to the 

USB Charging Port on the left side of the unit and connect the other standard 

USB plug to a computer, USB AC adaptor (not included) or other USB power 

source. The status indicator glows solid red while charging and turns off once 

charged.

Using the 

iBT15

Computer USB port

Computer 

connected to 

working outlet

USB AC adaptor

(not included)

USB AC adaptor 

connected to

working outlet

OR

TIP: On some iOS (Apple) devices, you 

can view the iBT15 battery status on 

your device’s screen. When device is 

paired and connected, look for a 

vertical battery icon next to the 

Bluetooth icon on the 

upper right corner of the 

device’s screen.

Press


the       

Power/End Call

 Button


to turn ON or OFF.

The unit will respond in a moment.

Summary of Contents for iBT15

Page 1: ...ne instruction manual Model iBT15 CHARGE BEFORE USE iBT15 FCC Information FCC Radiation Exposure Statement This equipment complies with FCC RF radiation exposure limits set forth for an uncontrolled environment FCC ID EMO IBT15 IC 986B IBT15 Drop ...

Page 2: ...aling If for any reason the seal is not making a tight seal water may enter the unit DO NOT clean unit with oily soaps or use chemicals or solvents Clean with damp cloth Maintenance Place the unit on a level surface away from sources of direct sunlight or excessive heat Protect your furniture when placing your unit on a natural wood and lacquered finish A cloth or other protective material should ...

Page 3: ...4mm x 336mm Printing color Black Jan 09 2015 100gsm2 WF 書紙 What s Included iBT15 speaker micro USB charging cable carry strap micro USB charging cable iBT15 speaker carry strap 2 iBT15 Meet Your iBT15 Left Side Right Side ...

Page 4: ...t paperclip to reset unit USB Charging Port Right Side Power End Call Button Talk Bluetooth Pairing Play Pause Button Volume Button Volume Button iBT15 Microphone Status indicator LED Top TIP On some iOS Apple devices you can view the iBT15 battery status on Press the Power End Call Button to turn ON or OFF The unit will respond in a moment ...

Page 5: ...ry Strap The iBT15 has a built in carbiner clip and comes with a carry strap for easy carrying or attaching to a backpack shower head etc To attach the carry strap form a small loop in one end of the strap Insert this loop through the carabiner on top of the unit then pull the loop back through Using the iBT15 TIP On some iOS Apple devices you can view the iBT15 battery status on your device s scr...

Page 6: ...gh the carabiner on top of the unit then pull the loop back through the larger loop formed in the carry strap to tighten Getting Started Charging the Unit Charge unit before use For first time charge charge for at least 4 hours Pull back splash proof seal and connect the included micro USB cable to the USB Charging Port on the left side of the unit and connect the other standard USB plug to a comp...

Page 7: ... in your device s Bluetooth menu If Not Paired Not Connected or similar message appears select iHome iBT15 to connect it If prompted for a passcode enter 1234 on your device s keypad 6 5 Once pairing is successful a tone will sound and the Bluetooth indicator light will glow solid indicating the iBT15 is ready to play music There should also be an indication on your device If no device is successf...

Page 8: ... indicator will glow solid blue when a linked device is in range and detected You can then listen to audio streamed wirelessly from your paired iPad iPhone iPod or other Bluetooth device 2 Press the Talk Bluetooth Play Pause Button to play audio from your device Press again to pause play and once more to resume play When Bluetooth audio is active the status indicator will glow solid blue 3 Use men...

Page 9: ...to Aux in or you will hear Bluetooth instead of Aux in Pause the Bluetooth source and Aux in audio will be heard in a moment 7 8 Speakerphone Operation NOTE The unit must be powered and linked to a Bluetooth phone to receive a call 1 When a call is received playing music is muted to hear the ring tone Press the Talk Bluetooth Play Pause Button to answer the call or press the Power End Call Button ...

Page 10: ...u may wish to reset Bluetooth To do so press and hold the Power End Call Button for 10 seconds You will hear a long high tone You will need to re pair your paired devices Trouble pairing device computer with iBT15 Bluetooth implementation varies depending on your device s hardware and operating system Please see our website for updates on pairing Make sure you have the latest firmware for your dev...

Page 11: ...interfere with proper sealing If for any reason the seal is not making a tight seal water may enter the unit 2 Ventilation The unit should be situated so that its location or position does not interfere with its proper ventilation For example it should not be situated on a bed sofa rug or similar surface that may block ventilation openings 3 Heat The unit should be situated away from heat sources ...

Page 12: ...ervice personnel when A the power supply cable or plug has been damaged B objects have fallen into or liquid has been spilled into the enclosure C the unit has been exposed to rain D the unit has been dropped or the enclosure damaged E the unit exhibits a marked change in performance or does not operate normally 12 Periods of Nonuse If the unit is to be left unused for an extended period of time s...

Page 13: ...erning battery electronics disposal please dispose of the device in a waste bin for electronic devices Many electronics retailers now recycle batteries and other electronic components at no charge Check to see which ones in your area do so CAUTION The battery used in this device may present a risk of fire explosion or chemical burn if mistreated Never use or charge the battery if it appears to be ...

Page 14: ...er normal use and conditions for a period of one 1 year from the date of original purchase Should this product fail to function in a satisfactory manner it is best to first return it to the store where it was originally purchased Should this fail to resolve the matter and service still be required by reason of any defect or malfunction during the warranty period SDI will repair or at its discretio...

Page 15: ...ent NOTE This equipment has been tested and found to comply with the limits for a Class B digital device pursuant to Part 15 of the FCC Rules These limits are designed to provide reasonable protection against harmful interference in a residential installation This equipment generates uses and can radiate radio frequency energy and if not installed and used in accordance with the instructions may c...

Page 16: ...aration between the equipment and receiver Connect the equipment into an outlet on a circuit different from that to which the receiver is connected Consult the dealer or an experienced radio TV technician for help CAN ICES 3 B NMB 3 B IC Statement This device complies with Industry Canada RSS 210 Operation is subject to the following two conditions 1 this device may not cause interference and 2 th...

Reviews: