background image

HWL83QSG-020116-A


© 2016 HTI Industries, LLC. All rights reserved 

                            Printed in China

• Place the unit on a level surface away from sources of direct sunlight or 

excessive heat.

• Clean your unit with a soft, damp cloth. Strong cleaning agents, such as 

thinner or similar materials can damage the surface of the unit.

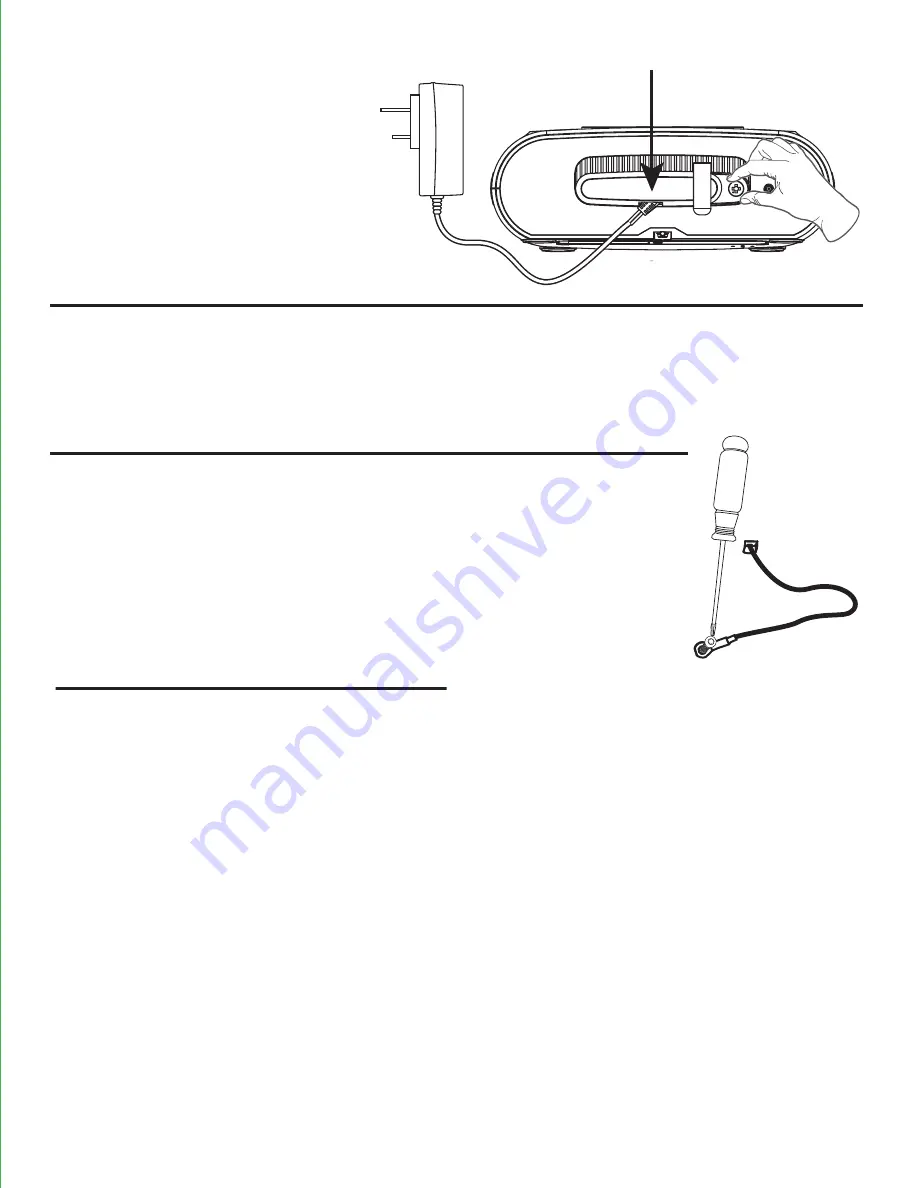
Once staff has completed 

setup, adjust cable on AC 

adapter to fit under the cable 

housing on the security cover 

on back of unit and tighten 

thumbscrew. 

Cable on AC adapter

This device complies with Part 15 of the 

FCC Rules. Operation is subject to the 

following two conditions: (1) this device may 

not cause harmful interference, and (2) this 

device must accept any interference 

received, including interference that may 

cause undesired operation.
CAN ICES-3 (B)/NMB-3(B)

Secure the attached Security Tether to a wall or other 

permanent surface.

CAUTION: DO NOT attach to an AC outlet or cause it to 

become entangled with anything that can create a 

hazardous situation.

Tips For Guests

• Using the wireless charger

Place compatible device with back side down in middle of marked charging target 

circle. Check the wireless charging indicator icon on the right of the display:

• 

Rapid blinking icon

 – Device is not charging. Reposition device.

• 

Slow blinking icon

 – Device is charging properly.

• 

Solid icon

 – Device is charged (some devices do not support this feature). 

• 

No icon

 – Not in charging mode (no device on unit)

•   Thick device cases can interfere with wireless charging. Removing such a case 

may improve wireless charging.

•  Wireless charging uses a magnetic field. Avoid placing personal items with 

magnetic stripes, such as credit cards, bank cards, key cards, etc., near the 

wireless charging area to prevent damage. 

Note: This unit is compatible with the Qi wireless charging standard. PMA wireless 

charging is not supported.

Summary of Contents for HWL83

Page 1: ...HWL83 Staff Quick Start Guide Included HWL83 system Universal AC adaptor...

Page 2: ...set button time zone button and DC jack Connect the universal voltage AC adapter to the wall outlet and the DC jack on the back panel of the unit Charging Devices Connect USB cable not includ ed to US...

Page 3: ...the default setting to match your time zone see Time Zone Setting below Once the correct time zone is set if the time displayed is not correct follow steps under Manual Clock Setting to set the correc...

Page 4: ...switch manually slide switch to 1 to add an hour or to 1 to subtract an hour time zone time set time zone dst 1 1 auto volume limit off on DC 9V 3A Volume Limiter The unit ships with the Volume Limit...

Page 5: ...ct AM or PM time Manual Clock Setting Press the time set button to confirm time The year will flash Press the or button to set the year Press and hold the time set button on the back of the unit to en...

Page 6: ...button 2 beeps will confirm Clock Setting is complete TIP Press the Alarm On Off Button when display is flashing during clock setting to toggle between 12 hour and 24 hour display modes time set time...

Page 7: ...emovebatteriesfromaproductifitwillnotbeused foramonthorlonger Useextremecautionhandlingleakingbatteries avoiddirectcontactwitheyesandskin If batteryleakagecomesincontactwitheyes IMMEDIATELYflushtheeye...

Page 8: ...a hazardous situation Tips For Guests Using the wireless charger Place compatible device with back side down in middle of marked charging target circle Check the wireless charging indicator icon on t...

Page 9: ...teriesfromproduct Donotattempttorechargenon rechargeablebatteries Donotopenbatteriesorheatthembeyondnormalambienttemperatures Topreventbatteryleakageordamageremovebatteriesfromaproductifitwillnotbeuse...

Page 10: ...s if applicable and pack the unit in a well padded heavy corrugated box 3 Send the unit by method agreed to with your representative to the Factory Service Center listed below Consumer Repair Departme...

Reviews: