background image

Chapter 4: iGuard Web Manager 

To add a new Timer Server the administrator must first make space by deleting 
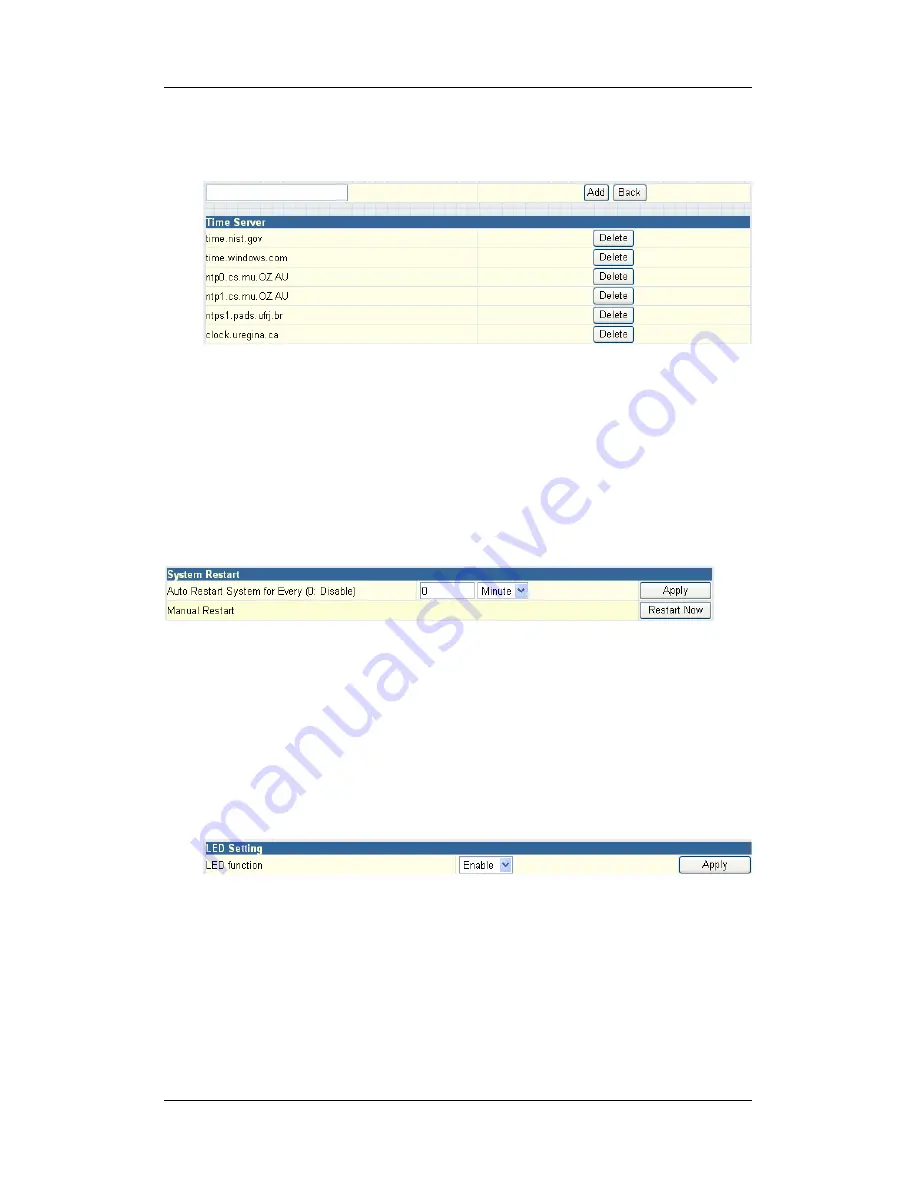
some Time Servers.    Once this is done, the add dialog box will appear as below.   
Click “Back” to return to the System Settings Page. 


Fig.34.  List of Time Server 


“Time Zone (Relative to GMT)” 

Select the appropriate time zone for your area. Click “Apply” to save. 


“System Time (yyyy/mm/dd hh:mm:ss)” 

This is to manually set iGuard System Time. The format is pre-determined 
to: yyyy/mm/dd hh:mm:ss.    Click “Manual Adjust” to save any manual changes. 


ii. System 

Restart 


Fig.35.  Auto Restart setting 

“Auto Restart System Every” 

The administrator can choose to restart iGuard at certain intervals (choose 
between minutes and hours only).  This will ensure that iGuard will work 
smoothly.    Click “Apply” to save changes. 


“Manual Restart” 

Click “Restart Now” to restart the system immediately. 


iii. LED 

Settings 


“LED function” 

The administrator can enable or disable the LED (except the Power LED) on 
iGuard here.    Click “Apply” to save settings. 


iv. SNMP 

Settings 


35 

Summary of Contents for IP-101S

Page 1: ...iGuard IP 101S USB Network Video Server User s Manual Version 2 5...

Page 2: ...i...

Page 3: ...__________________________________ 16 4 2 3 2 Network_____________________________________________ 18 4 2 3 3 Account Settings______________________________________ 21 4 2 4 Advanced Settings ________...

Page 4: ...___________________________________ 57 5 2 2 6 Camera Monitor ______________________________________ 58 5 2 2 7 View _______________________________________________ 61 5 2 2 8 System _________________...

Page 5: ...splay shows the IP address Subnet Mask and Gateway 32 Bit RISC CPU 1MB Flash Memory 8MB Dynamic Memory Support Up to 30 Remote Viewers for each camera Allow Up to 8 User Accounts and Passwords 5 3VDC...

Page 6: ...facility in China and if he or she likes also check on the branch office in Singapore at the same time Fig 1 iGuard Network Diagram 1 3 Package Contents Your iGuard package should contain the followin...

Page 7: ...d Orange Logon state On When there is user logon and receive the image Yellow USB data activity Flash when there is data transmit receive on the USB Fig 3 iGuard Status LED Indicator Light indicators...

Page 8: ...ware and software The following is a flow chart on the installation procedure 1 Connect USB Camera network cable and power Adapter To iGuard module 2 Connect Network cable to ROUTER DSL or Cable modem...

Page 9: ...iGuard IP 101S The first camera that plugs into the unit will be designated as Camera A Step 2 Plug the included Ethernet cable to the network port on the iGuard IP 101S the other end to a modem or a...

Page 10: ...k Make a note of the IP address of the iGuard You will use this IP address to login into the iGuard to configure and monitor the camera The icon on the LCD shows that a USB camera is connected Warning...

Page 11: ...ed which will be displayed on the LCD screen one group at a time 1 Start the Web Brower Netscape or Internet Explore 2 Enter the iGuard IP Address shown on iGuard 101 s LCD display e g 192 168 0 30 an...

Page 12: ...7 iGuard Web Manager Main Menu When using iGuard for the first time you must set the following to ensure that iGuard works properly a Set the necessary parameters in the Configuration menu In particul...

Page 13: ...to view the video feed Sun Java also allows users who are not using Windows based Operating System to view the video feed Once you click on Camera A the following image will appear Make sure to adjus...

Page 14: ...Pan Right by 5 deg Tilt Up by 5 deg Tilt Up by 1 deg Tilt Down by 1 deg Tilt Down by 5 deg 4 2 2 Information 4 2 2 1 System Status This displays all the information relating to iGuard i System Inform...

Page 15: ...currently viewing either Camera A or Camera B It also lists the login time and total bytes received The user has an option to block the IP or even disable the account of any errant viewer The administ...

Page 16: ...nt Connections 4 2 2 3 Event Log This will keep a record of all events that occurred in iGuard The user can Refresh Clear or Save the log file There is also an option to sort the logs according to Lev...

Page 17: ...Chapter 4 iGuard Web Manager Fig 10 iGuard Event Log 4 2 3 Basic Settings 4 2 3 1 Camera Settings Use this to set up the USB camera i Setting up Camera A Similar with Camera B 16...

Page 18: ...quency the image will flicker or lines will appear on the images Maximum Number of Connections 1 30 Use this to limit the number of users that can connect to this camera Location Enter a suitable loca...

Page 19: ...is placed upside down Tilt Choose between Normal for regular placement or Reverse when the camera is placed upside down Click Apply to save changes Otherwise all changes will be lost 4 2 3 2 Network...

Page 20: ...iGuard IP DNS Server IP Primary DNS Server IP This item sets iGuard primary DNS Server IP address Secondary DNS Server IP This item sets iGuard secondary DNS Server IP address iGuard will use the sec...

Page 21: ...racks iGuard s IP address if it was changed for any reason Before you use this function you will have to register on www iguard com Your can also track your IP address by subscribe to other DDNS servi...

Page 22: ...dministrator account BEFORE setting either Operator Viewer or No Access Failure to do so will result in you being locked out of iGuard Web Manager You will have to refresh your firmware to be able to...

Page 23: ...And make the user account disable IP Filter Visitor can only login from the IP address specified here for security consideration You can restrict a user access only from 192 168 1 0 24 by setting up...

Page 24: ...tings 4 2 4 1 Event Notification This determines the type of event an email is sent by iGuard iGuard can send notifications to up to 8 email recipients Note You must have Administrator privilege to ed...

Page 25: ...Email Address Book There must be at least one valid email address in the address book The default email is just a sample If you wish to add or delete entries in your address book click Edit Recipient...

Page 26: ...ly to save your settings iGuard will send you the following email notification depending on which event you have selected Note The image recording and motion detection notification function here will...

Page 27: ...Chapter 4 iGuard Web Manager Fig 22 iGuard Event Start Up Fig 23 iGuard Event User Login Details Date Time Camera IP Fig 24 iGuard Event PPPoE Connect Successful 26...

Page 28: ...ion Sensitivity This will determines level of change before motion capture is triggered Send image every Select a value between 1 to 5 seconds Stop sending emails after email s or image idle for secon...

Page 29: ...ed a FTP server the above will be left empty To setup the FTP server click Edit to go to the Email FTP Page Once you have entered the FTP server login name and password click Apply and then Click on M...

Page 30: ...its Click for an example Send Email To send an email notification of Motion Detection with image choose Yes otherwise choose No Fig 27 iGuard Motion Detect Email Notification Email Server The administ...

Page 31: ...to either their email account or to a FTP server The images will be sent over a predetermined interval and a certain period Fig 28 iGuard Image Recording Page i Camera A or Camera B Begin End hh mm T...

Page 32: ...for details Fig 29 iGuard Email of Image Recorded 4 2 4 4 E mail FTP This sets up the necessary Email and FTP server information The administrator will have to enter a valid Account Name and Password...

Page 33: ...ess here Account Name Enter the FTP account name here Password Enter the corresponding password Click Apply to save the above settings ii Email Settings E mail Server The administrator will have to en...

Page 34: ...word for the above account name Click Apply to save the above changes iii Sending Test Mail Fig 31 iGuard test mail function You must have the Email Setting configured to proceed with Test Mail Once t...

Page 35: ...ss just press Delete 4 2 4 5 System Settings This page allows the administrator to set iGuard SNMP settings so it can be used by a NMS Network Management System like iGuardView i System Time Fig 33 Sy...

Page 36: ...et iGuard System Time The format is pre determined to yyyy mm dd hh mm ss Click Manual Adjust to save any manual changes ii System Restart Fig 35 Auto Restart setting Auto Restart System Every The adm...

Page 37: ...ses To manage iGuard from any IP addresses leave it as Community This is to set a Community name for NMS The community name has to be the same as that set in NMS Permission This is to set the administ...

Page 38: ...o save the current settings and configuration to your PC The text file will have a default format of YYYY_MMDD_ cfg The administrator can change this if necessary Restore previous configuration This f...

Page 39: ...ect the current configuration and take the user through the necessary network setup a Click the iGuard Utility button to start installation b After the step by step installation is completed the iGuar...

Page 40: ...left The Serial Number current Firmware and IP Address of every iGuard connected to the LAN will be displayed on the table to the right If Devise Password is enabled IP Address hidden Fig 37 iGuard Ut...

Page 41: ...ter the CD key to enter Setup Wizard or Launch iGuard or IP Configuration WARNING Do not lose this password If the password is lost you can not access the device to make changes If you lose this passw...

Page 42: ...Once you have entered the necessary information for Input Device Password and Administrator authentication iGuard Setup Wizard will initiate to take you through the installation 4 Enter the necessary...

Page 43: ...Bootp Allow iGuard to obtain an IP address using Bootp protocol 6 Click Next to proceed to xDSL Cable modem setup This section has to be configured to allow iGuard to access the Internet through an xD...

Page 44: ...d click Next WARNING Do not lose the administrator account and password Once set you will not be able to configure iGuard without the administrator account and password To reset the iGuard account pas...

Page 45: ...unch it Click either one to Launch iGuard You will be bring to the iGuard Web Manager Key in the account name and password entered earlier if you did not configure one then revert to the default name...

Page 46: ...k IP Configuration This will bring up the IP Address Configuration window There are two tabs IP Address Advanced for port setting configuration When using iGuard for the first time it is advisable to...

Page 47: ...P Address into a standard browser Obtain an IP address by DHCP or BOOTP The IP address Subnet Mask and Gateway is acquired directly and assigned automatically by the system This Advanced section sets...

Page 48: ...word which is the CD key iGuard Utility will request for the Input Device Password when you click either Setup Wizard Launch iGuard or IP Configuration WARNING Do not lose this password If the passwor...

Page 49: ...the Website For example If a value of 61 is set as the HTTP port number then http 192 168 0 177 61 must be entered as the web address in order to access iGuard website Uncheck to disable this functio...

Page 50: ...l flash alternately to indicate that firmware upgrading is in progress Once completed iGuard will reboot NOTE If the downloading upgrade process is interrupted or the data is corrupted iGuard will kee...

Page 51: ...and monitor multiple iGuard module located either in a LAN or on a WAN You can launch the iGuardView program by clicking on start Program iGuard iGuardView The following Login window will be displayed...

Page 52: ...subnet and list them in the main window Once detected the following will show in the main window This shows that the camera is online and active This shows that the camera is off line Manually adds t...

Page 53: ...Appendix A Router Configuration Highlight the iGuard to be deleted from iGuardView s list Click Yes to confirm deletion of selected iGuard Use this function to change iGuard Address Port Number 52...

Page 54: ...d here Otherwise access will be denied Password Enter the above account password Image Zoom Resize the window to between 25 and 200 Camera Rotation Use this function to keep the camera up right Mirror...

Page 55: ...cted Choose from 0 to 100 very sensitive Automatically displays camera window on top of all other windows applications once motion is detected Mark Motion Detected object in RED Choose this option to...

Page 56: ...here the file will be recorded to By default it is recorded to C Program Files iGuard iGuardView Click Browse to change the file location Recorded files are save using the following file extension avi...

Page 57: ...ill need to configure the Message Sender Information in order for iGuard to send emails Server Authentication Click settings Enter your Account Name and Account Password if your Server Requires Authen...

Page 58: ...HTTP Port Enter the HTTP port assigned for iCAMView Location Provide a location for SNMP manager to track device Manager Enter a manager s name for identification Using SNMP to update network ports Ch...

Page 59: ...the edges of the picture and it will turn into an arrow Click and hold to pan tilt the camera if the camera supports this function Click this button to record the current image on screen A window will...

Page 60: ...ideo Click the left side of the viewing window to bring out more control features Click on this icon to active two functions a Custom window zoom use this to zoom to your chosen window size On the vid...

Page 61: ...ller window will be updated while those outside are frozen Click the depressed button to go back to the original window size Or use the horizontal zoom bar see below Click and drag the green knob alon...

Page 62: ...d and the camera will tilt increasingly faster upwards Click once to tilt the camera down by 1 deg Click and hold and the camera will tilt increasingly faster downwards Auto Pan if camera which suppor...

Page 63: ...Appendix A Router Configuration Set the SNMP Parameter 5 2 2 9 Help Help Display iGuardView version Copyright information and product service contact 62...

Page 64: ...scribe to a DDNS service which keeps track of your IP address iGuard is compatible with the DDNS service offered by Web Surveillance LLC www websurveillance com b Port Forwarding If you place the iGua...

Page 65: ...s BEFSR41 EtherFast Cable DSL Router BEFSX41 Instant Broadband EtherFast Cable DSL Firewall Router with 4 Port Switch VPN EndPoint BEFW11S4 Wireless Access Point Router with 4 Port Switch Version 2 Mi...

Page 66: ...4 Click New on the right side of the page to open the Virtual Server Settings dialog box 5 Type in the camera s IP address in the Server IP address text box Look on the iGuard IP address LCD display f...

Page 67: ...the iGuard IP Address LCD display for the last 3 digits of the camera s IP address Private Port 9001 Type UDP Public Port 9001 4 Click Enter to save the settings The iGuard should now be configured t...

Page 68: ...to 9001 Type UDP Private IP address Type in the camera s IP address Look on the iGuard Address LCD display for the last 3 digits of the camera s IP address Private Port 9001 to 9001 5 Click Apply Chan...

Page 69: ...P Private Port 80 Public Port 80 Schedule Always 5 Click Apply to save the settings 6 Enter the following information on the page Enable Disable Enabled Name iGuard Webpage Private IP Type in the came...

Page 70: ...rvice select All and then click Submit to save your settings iGuard should now be configured to work with your router and be accessible from the internet DI 714P 1 Log into your router using your rout...

Page 71: ...Check the Enable box 5 Enter the desired name or description in the Service Name field such as iGuard Web 6 In the Incoming Ports field specify port 80 in both boxes 7 In the Destination IP Address fi...

Page 72: ...of the page 3 On the next page click on Forwarding 4 Enter the following information on the page Line 1 Customized Applications iGuard Webpage Ext Port 80 to 80 Protocol TCP IP Address Type in the cam...

Page 73: ...Inbound port boxes type in 80 80 i e from Port 80 to Port 80 7 In the Type box select the protocol as TCP 8 In the Private IP address box type in the IP Address of the iGuard network camera For examp...

Page 74: ...y to save the settings 6 Enter the following information on the page Service Name iGuard Cam Starting Port 9001 Ending Port 9001 Server IP Address Type in the camera s IP address for example 192 168 0...

Page 75: ...ere is a bug in the NETGEAR FVS318 1 4 firmware that does not record any entry that uses port 80 If you intend to use port 80 you will initially need to enter 81 for the Start and Finish port and then...

Page 76: ...Click Apply 12 Click Add again A For Service name select iGuard Cam B Action ALLOW always C Local Server Address Enter the IP address of the camera D WAN Users Address Any E Click Apply 13 Exit the r...

Page 77: ...he following information on the page Global Port 80 Local Address Type in the camera s IP address for example 192 168 0 5 Local Port 80 Type TCP 7 Click Save to save the settings 8 Click New on the ri...

Page 78: ...ddress for example 192 168 0 5 Look at iGuard s IP Address LCD display for the last 3 digits of the camera s IP address Private Port 9001 Type UDP Public Port 9001 4 Click Enter to save the settings i...

Page 79: ...iGuard Cam 11 Under PC Server select your camera or the camera s IP address from the list If the camera is not listed select the link titled My PC is not listed 12 Leave Protocol as TCP 13 Under Inte...

Page 80: ...IP address Private Port 80 Type TCP Public Port 80 Line 2 Private IP Type in the camera s IP address for example 192 168 0 5 Look at iGuard s IP Address LCD display for the last 3 digits of the camera...

Page 81: ...camera s IP address for example 192 168 0 5 Look at iGuard s IP Address LCD display for the last 3 digits of the camera s IP address Enable Checked in 4 Click Save to save the settings iGuard should...

Page 82: ...ies the logical network to which a particular device belongs The host ID identifies the particular device within the logical network IP addresses distinguish devices on an Internet from one another so...

Page 83: ...nsmission of IP packets among your sub networks The value 255 is assigned to octets that belong to the network ID and the value 0 is assigned to octets that belong to the host ID For the example above...

Page 84: ...ing in a TCP IP network The IP address consists of network and host portions It is assigned to an interconnection of a host to a physical network MAC Medium Access Control The network layer between th...

Reviews: