– 1 –
Q u i c k S t a r t G u i d e
1. Unpack the AP
◆
Spark AC Wave2 Mini, SP-W2M-AC1200
◆
Universal AC/DC power adapter
◆
USB cable — Micro to Type A
◆
2 Command™ strips
◆
Quick Start Guide
(this document)
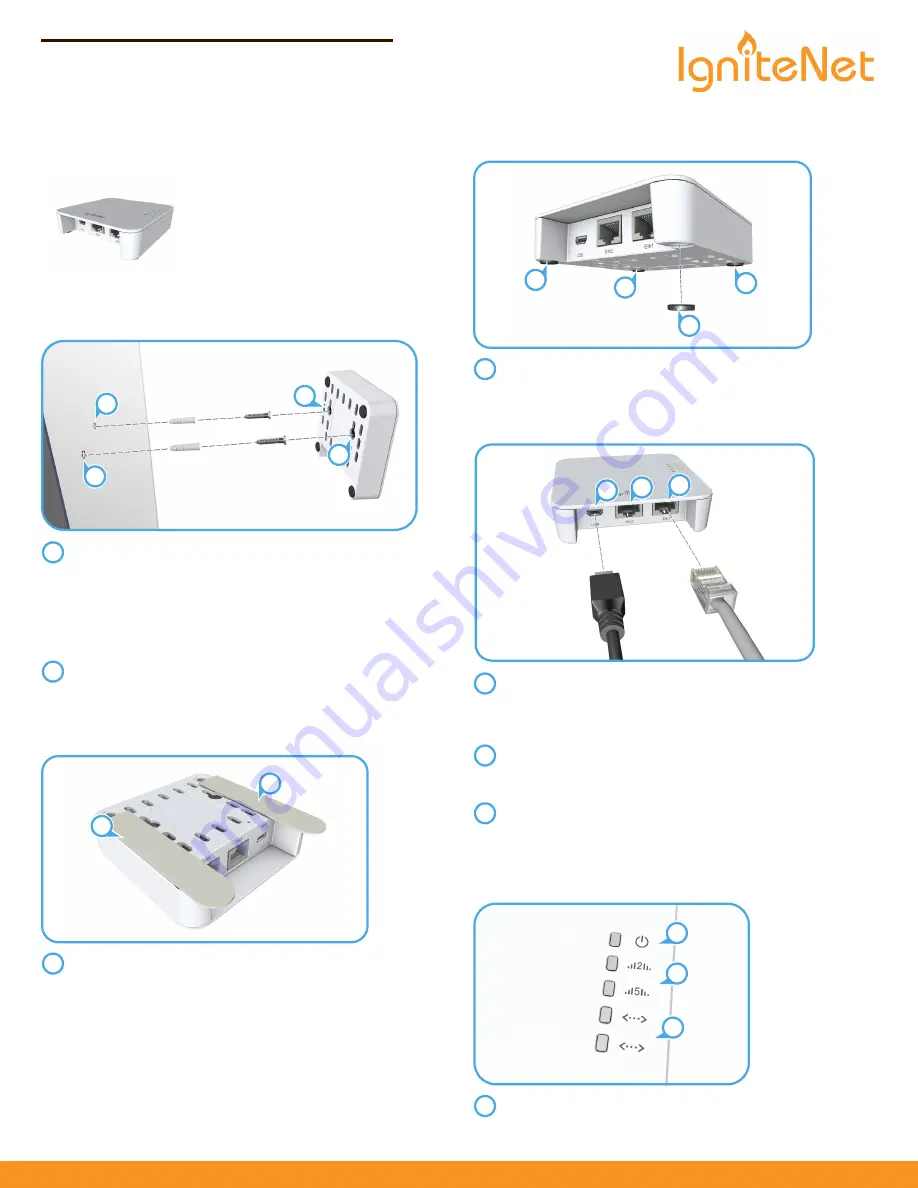
2. Mount the AP
a. Mounting the AP on a Wall
At the installation location on the wall, mark two holes
44 mm (1.73 in) apart for the wall plugs and screws (M3 or #5
wall anchors required).
Drill two holes for the wall plugs, and then insert the plugs
and tap them flush with the wall surface.
Insert the two screws in the wall plugs leaving the screw
heads about 5 mm from the wall surface.
With its ports facing down, place the AP’s mounting points
over the two screws, and then slide it down on the screws.
Do not let go of the AP until you confirm that it is secure.
b. Alternative Wall-Mounting Method
Position and stick the two supplied Command™ strips to the
base of the AP as shown.
Position the AP on the wall and press firmly for 30 seconds.
Remove the AP from the wall to separate the strips. Wait a
further hour before mounting the AP.
Mount the AP by pressing the strips together until they click.
1
2
2
1
1
2
1
1
1
c. Mounting the AP on a Desktop
Attach the included four rubber feet to the base of the AP.
Place the AP on the desktop.
3. Connect Cables
Connect the cable from the AC/DC power adapter to the USB
power jack on the AP.
Connect the power adapter to a nearby AC power source
(100-240 VAC, 50/60 Hz).
Connect Category 5e or better cable to the 1000BASE-T
Eth1
RJ-45 port.
Connect the other end of this cable to a LAN switch.
(Optional) Connect a local LAN device to the
Eth2
RJ-45 port
on the AP using Category 5e or better cable.
This
Eth2
RJ-45 port is a 100BASE-TX port.
4. Verify AP Operation
The
power LED should be on green.
1
1
1
1
1
3
1
2
1
2
3
1
2
3
1
Spark SP-W2M-AC1200
E012018-CS R01
Cloud-Enabled Indoor Access Point
Spark™ AC Wave2 Mini, SP-W2M-AC1200
ignitenet.com


