background image

en

17

User manual Medium-freezing and freezing cabinets 

www.igloo.pl

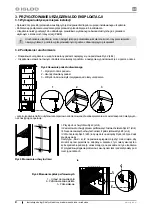
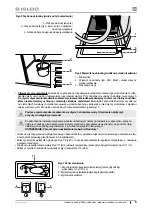
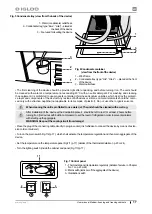
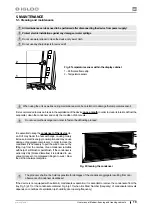
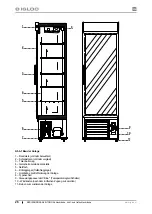
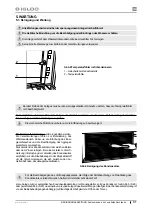
1 – Water (condensate) outlet hose

2 – Condensate tray (type: “Ewa”, “Jola”) – placed at 

the back of the device

3 – Foot used for levelling the device

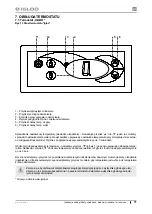
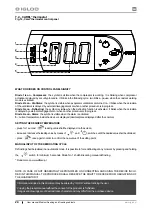
1 – Thermostat panel (temperature regulator) (details of service in Chapter 

No. 7 on p.23 or 24)

2 – Main switch (turns on/ off the aggregate of the device)
3 – Illumination switch

Fig. 5 Condensate tray (view from the back of the device)

Fig. 7 Control panel

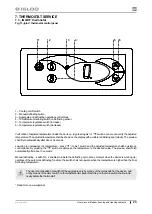
• Place the plug of the connecting cable directly in plug-in socket (it is forbidden to connect the device by means of exten-
sion cords or dividers!)

• Turn on the main switch Fig.7/2 (p.17), which shall activate the temperature regulation and then main aggregate of the 
device. 

• Set the temperature on the temperature panel Fig.7/1 (p.17) (details of the thermostat details on p.23 or 24)

• Turn the lighting switch (inside the cabinet and panel) Fig.7/3 (p.17)

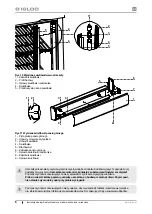
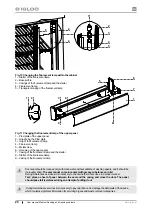
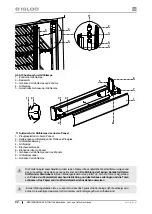
1 – Wind frame
2 – Condensate tray (type: “Ola”, “Ola 2”) – placed at the front 

of the device

3 – Water outlet hose

Fig. 6 Condensate container 
           (view from the front of the device)

1

2

3

• The 

fi

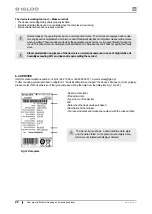
 rst cleaning of the device should be provide right after unpacking, and before turning it on. The unit should 

be cleaned with water at a temperature not exceeding 40°C with a neutral detergent. For washing and cleaning 
the equipment it is prohibited to use products containing chlorine and sodium varieties, which destroy the protecti-
ve layer and components of the device! Any residue of adhesives or silicone on metal elements should be  remo-
ved only with extraction naphtha (not applicable to items made of plastic !). Do not use other organic solvents.

When cleaning the unit is prohibited to use water jet. The unit should be cleaned with a wet rag.

After installation of the device at the destination place it  should be left to rest for at least 2 hours before 
turning it on (for devices with built in compressor) to set the level of refrigerant in order to prevent problems 
with starting up the aggregate.

WARNING: Keep out the cooling circuit from damage!

1

3
2

1

2

3

Summary of Contents for EWA 1400.2

Page 1: ...cie drewnianym zabezpieczone tekturowymi k townikami oraz foli 2 CHARAKTERYSTYKA WYROBU 2 1 Przeznaczenie Szafy produkowane przez firm Igloo nale do profesjonalnych urz dze ch odniczych i mro niczych...

Page 2: ...Podest drewniany zak adany do transportu urz dzenia 8 Tabliczka znamionowa 9 Panel sterowania szaf regulator temp wy czniki 10 Wiatrownica po ci gni ciu dost p do lamel skraplacza NIE BLOKOWA OTWOR W...

Page 3: ...Pr d znamionowy A 2 6 2 6 3 4 3 4 3 4 3 4 Moc zn o wietl W 94 94 94 94 Zu ycie en kWh 24h 8 1 8 1 9 3 9 3 9 3 9 3 Pojemno u ytkowa dm3 1400 1400 1400 1400 1400 1400 Liczba p ek szt 10 10 10 10 10 10...

Page 4: ...d o u a nast pnie wypoziomowa je za pomoc n ek 1 Wykr ci n ki z podestu 2 Usun drewniany podest 3 Wkr ci n ki w nakr tki przyspawane do ramy urz dzenia I Przykr ci uchwyt drzwi Rys 3 str 4 II Zamontow...

Page 5: ...ur szczeg y obs ugi termostatu na str 11 i 12 Za czy przycisk o wietlenia wewn trz szafy i panelu Rys 7 3 str 5 1 2 3 Pierwsze mycie urz dzenia powinno by wykonane po rozpakowaniu urz dzenia i przed j...

Page 6: ...rozrywaj c pojemnik Ryzyko obra e i uszkodze W przeci gu doby nie nale y umieszcza w komorze urz dzenia wi cej produkt w ni wynosi jej zdolno zamra ania Aby zapewni ywno ci w a ciwe warunki przechowyw...

Page 7: ...u jego nape nienia Ilo cz stotliwo usuwania kondensatu zale y od warunk w eksploatacji m in od wilgotno ci powietrza cz stotliwo ci otwierania drzwi i od ilo ci i temperatury wk a danych produkt w 5 K...

Page 8: ...r przy pr bie wyci gania Podczas czynno ci konserwuj cych nale y uwa a aby nie uszkodzi tabliczki znamionowej urz dze nia kt ra zawiera istotne informacje dla serwisant w oraz firm zajmuj cych si usu...

Page 9: ...wiele wie ej ywno ci i nie przekroczono maksymalnej zdolno ci zamra ania Drzwi urz dzenia zamykaj si w a ciwie i czy uszczelka przylega do korpusu urz dzenia Otwory wentylacyjne urz dzenia nie s zabl...

Page 10: ...zyk a dowymi nieodnosz cymi si do Szaf ch odniczych Odg osy wydawane przez urz dzenia pracuj ce s zjawiskiem normalnym W urz dzeniach znajduj si wentylatory silniki i spr arki kt re w czaj si i wy cza...

Page 11: ...atur do danej warto ci Wyj cie z funkcji nast puje automatycznie po ok 3 sek R czne odszranianie przycisk nr 2 pozwala na w czenie cyklu odszraniania w dowolnym momencie pracy urz dzenia niezale nie o...

Page 12: ...tlana bie ca temperatura wewn trz urz dzenia po przecinku wy wietlane miejsca dzie si tne NASTAWA DANEJ TEMPERATURY naci nij przez 1 sekund warto wodz ca pojawi si na ekranie zwi ksz lub zmniejsz wart...

Page 13: ...inet they may be divided into full cabinets and glazed cabinets Cabinets are equipped with 5 rows of net shelves with height regulation Our devices are made according to modern technologies and have a...

Page 14: ...Wooden platform mounted for transportation 8 Data plate 9 Display control panel temperature regulator switches 10 Wind frame when removed allows access to condenser lamellas 11 Feet used for levelling...

Page 15: ...3 4 3 4 3 4 Rated lighting power W 94 94 94 94 Electric energy consumption kWh 24h 8 1 8 1 9 3 9 3 9 3 9 3 Usable volume dm3 1400 1400 1400 1400 1400 1400 Number of shelves items 10 10 10 10 10 10 Sh...

Page 16: ...even basis which is hard enough and then level it with feet 1 Unscrew the feet from the platform 2 Remove the wooden platform 3 Screw the feet in nuts welded to the frame of the device I Screw the do...

Page 17: ...te tray type Ola Ola 2 placed at the front of the device 3 Water outlet hose Fig 6 Condensate container view from the front of the device 1 2 3 The first cleaning of the device should be provide right...

Page 18: ...der to ensure proper food storage conditions it is forbidden to fully fill the shelves It is necessary to en sure even load of the shelves and do not exceed their maximal load In order to prevent free...

Page 19: ...hin the display cabinet It is essential to keep the condenser of the device cle an Dirt may hinder the heat exchange causing mainly increase in electric energy consumption and may cause damage of aggr...

Page 20: ...ry to pay attention not to damage the data plate of the device which contains significant information for servicing organs and waste removal companies Fig 10 Changing the fluorescent lamp within the c...

Page 21: ...bility has not been exceeded Door of the devices close properly and whether the seal adheres to the body of the device Ventilation holes of the device are not blocked This concerns the IGLOO thermosta...

Page 22: ...ry data which are not related with display cabinets Fig 12 Data plate Noises made by the operating device are a normal phenomenon The devices are equipped with ventila tors engines and compressors whi...

Page 23: ...ew shall finish automatically after about 3 seconds Manual defrosting switch No 2 enables to initiate the defrosting cycle at any moment when the device is working re gardless of the automatic defrost...

Page 24: ...ed 5 current temperature inside the device is displayed decimal places displayed after the comma SETTING THE DESIRED TEMPERATURE press for 1 second leading value shall be displayed on the screen incre...

Page 25: ...SM 6 C 2 C und Tiefk hlschr nke M 18 C 12 C bei der Umgebungstemperatur 15 C 25 C und absoluter Luftfeuchtigkeit 60 2 2 Beschreibung der Anlage Die Schr nke sind mit dem inneren Aggregat ausgestattet...

Page 26: ...hlaggregat Tiefk hlaggregat 7 Holzb hne zur Bef rderung derAnlage 8 Typenschild 9 Steuuerungspaneel der Vitrine Temeperaturregler Schalter 10 Windkasten nach dem Entfernen Zugang zu Lamellen 11 Beine...

Page 27: ...Nennleistung der Beleuchtung W 94 94 94 94 Energieverbrauch kWh 24h 8 1 8 1 9 3 9 3 9 3 9 3 Gebrauchskapazit t dm3 1400 1400 1400 1400 1400 1400 Menge der F cher Stck 10 10 10 10 10 10 Abmass des Fac...

Page 28: ...in die an dem Rahmen angeschwiesst Muttern anschrauben I Die Halterung der T ren anschrauben Abb 3 S 28 II Die Halterungen der F cher in der gelocherten Leisten des Gestells einbauen Abb 4 1 S 28 III...

Page 29: ...ils der Bedienung siehe S 35 oder 36 Den Beleuchtungsschalter im Inneren der Schrank und der Paneel einschalten Abb 7 3 S 29 1 2 3 Das erste Waschen der Anlage ist schon nach ihrem Auspacken und vor d...

Page 30: ...bestimmt ist Um die Lebensmittelwaren richtig aufbewahren sollen die F cher nicht voll bef llt werden Um demAnfrieren der Verpackungen entgegen wirken sind diese sorgf ltig zu trocknen bovor sie in ie...

Page 31: ...r im Schrankinneren Der Kondesator der Anlage soll rein gehalten werden Die Verschmutzungen f hren zur Behinderung des W rmeaustausch dabei u a die Erh hung des Ener gieverbrauches und die Besch digun...

Page 32: ...and beim Ausziehen ausweisen Bei der Wartungsarbeiten ist es zu beachten dass das Typenschild der Anlage nicht besch digt wird auf dem die wichtigen Hinweisen f r Serviceteam und Entsorgungsfirmen ent...

Page 33: ...chrank wurde nicht mit zu vielen frischen Waren nicht beschafft und die Frierf higkeit wurde nicht berschreitet Die T ren derAnlage schliessen sich fertig und die Dichtung dem Geh use nicht anliegt Di...

Page 34: ...arbeitendenAnlage sind ganz normal DieAnlage ist mit den Bel ftern Motoren und Ver dichtern ausgestattet die sich automatisch ein und ausschalten Der Verdichter entwickelt ein Typ der Ger uschen Diese...

Page 35: ...er Ausgang aus dem Betrieb erfolgt automatisch nach 3 Sekunden Handentrostung die Taste Nr 2 erm glicht dass der Entrostungsbetrieb in beliebiger Weile w hrend der Arbeit der An lage eingeschaltet wir...

Page 36: ...haltet ist 5 es ist die aktuelle Temperatur innen der Anlage gezeigt nach Komma sind die Zehnstellen gezeigt ENSTELLUNG DER GEW NSCHTEN TEMEPRATUR eine Sekunde lang die Taste dr cken auf dem Display w...

Page 37: ...4 12 46 13 Igloo 47 14 Carel 48 1 37 2 37 2 1 37 2 2 37 2 3 39 3 40 3 1 40 3 2 40 4 42 4 1 42 5 43 5 1 43 6 45 6 1 45 6 2 46 7 47 7 1 IGLOO 47 7 2 CAREL 48 1 2 2 1 Igloo 2 C 8 C SM 6 C 2 C M 18 C 12 C...

Page 38: ...8 www igloo pl 1 2 3 4 5 6 7 8 9 10 11 1 1 2 3 4 5 6 7 9 8 10 11 NS 069 XXX MASA xxx NAPIECIE ZNAM xxx MOC ZN O W xxx MOC GRZA EK xxx NAPIECIE ZNAM xxx KLASA URZADZ xxx Typ NAZWA URZ DZENIA PR D ZNAM...

Page 39: ...510 710 x 510 710 x 510 1 30 30 30 30 30 30 3 OLA 1 1400 P 1400 PS 1400 2 1400 2S 1400 4 1400 4S 230 50 230 50 230 50 230 50 230 50 230 50 A 2 6 2 6 3 4 3 4 3 4 3 4 94 94 94 94 24 8 1 8 1 9 3 9 3 9 3...

Page 40: ...ru 40 www igloo pl 3 3 1 PBUE 3 2 2 40 1 2 3 I 3 40 II 4 1 40 III 4 3 40 IV 5 41 6 41 Ewa Jola 1 2 3 2 3 4 1 2 3 3 1 2...

Page 41: ...ru 41 www igloo pl 1 2 Ewa Jola 3 1 2 Ola Ola2 3 1 7 47 48 2 3 5 6 7 7 2 41 7 1 41 47 48 7 3 41 1 2 3 40 C 2 1 3 2 1 2 3...

Page 42: ...ru 42 www igloo pl 4 10 2 1 2 4 1 Igloo Carel 7 47 48...

Page 43: ...ru 43 www igloo pl 5 41 6 41 9 2 1 5 5 1 1 2 8...

Page 44: ...ru 44 www igloo pl 10 1 2 3 4 5 11 1 2 3 4 5 6 7 8 9 5 2 2 3 4 5 4 1 5 6 7 1 1 2 3 8 9 4...

Page 45: ...ru 45 www igloo pl 6 C 6 1 230 50 Igloo 25 C IGLOO C0 C1 C2 C0 C1 C2 CAREL E0 E1 L0 HI EE Ed DF 0 1 L0 HI EE Ed DF IGLOO 25 C...

Page 46: ...ru 46 www igloo pl 6 2 C IGLOO 48 14 662 19 56 48 605 606 071 serwis igloo pl 6 1 Igloo 12 46 NS 60 12...

Page 47: ...ru 47 www igloo pl 7 7 1 IGLOO 13 Igloo 3 3 2 www igloo pl 1 2 3 4 5 6 1 2 3 4 6 5...

Page 48: ...ru 48 www igloo pl 7 2 CAREL 14 Carel 1 2 4 4 5 1 5 1 www alfaco pl IGLOO 1 2 3 4 5...

Reviews: