


16
Quick Configuration
When you start the VioGate server for the first time, you can follow Quick
Configuration’s 9 steps to finish basic VioGate server configuration. Following details
the 9 steps involved in the Quick Configuration setup.
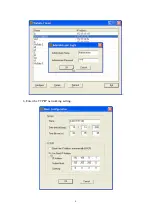
1.
Enter the name and description of this server.
2.
Change the password of the administrator.
3.
Set up the network configuration.
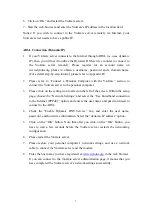
4.
Adjust the time settings.
5.
Add the users to access this server.
6.
Assign the descriptive name for each camera.
7.
Configure the recording settings.
8.
Configure the snapshot settings.
9.
Quick configuration complete.
Depends on the variations on the server configuration, the system setup can take from
3 minutes to 10 minutes to finish.
System Settings
Configure the server name and time.
You can setup some basic information about the system such as the server name, date
and time. You can also verify the current software version in this page.
Server Name
You have to choose a unique system name for your VioGate server so that it can be
identified quickly on the network. System name can contain up to 20 characters,
consisting of the usual Alpha-numeric characters, dash (-) and Chinese characters.
Also, you can assign a short description text for your VioGate server. (An example of
the description might be the administrator’s name, department name, or the location
of the server). When other users use the VioGate Finder utility to locate VioGate
servers located within the same subnet, they will see this short description. The
description text can contain up to 126 characters, consisting of the usual
Alpha-numeric characters, dash (-) and Chinese characters.
Date and Time
Please select the correct time zone according the location of the server, and adjust the