background image


KINO-780AM2 Motherboard 

Page 34 

4.1 Anti-static Precautions 

 WARNING: 

Failure to take ESD precautions during the installation of the 

KINO-780AM2 may result in permanent damage to the KINO-780AM2 

and severe injury to the user.   

Electrostatic discharge (ESD) can cause serious damage to electronic components, 

including the KINO-780AM2. Dry climates are especially susceptible to ESD. It is therefore 

critical that whenever the KINO-780AM2, or any other electrical component is handled, the 

following anti-static precautions are strictly adhered to. 

ƒ


Wear an anti-static wristband

: - Wearing a simple anti-static wristband can 

help to prevent ESD from damaging the board. 

ƒ


Self-grounding

:- Before handling the board touch any grounded conducting 

material. During the time the board is handled, frequently touch any 

conducting materials that are connected to the ground. 

ƒ


Use an anti-static pad

: When configuring the KINO-780AM2, place it on an 

antic-static pad. This reduces the possibility of ESD damaging the 

KINO-780AM2. 

ƒ


Only handle the edges of the PCB

:- When handling the PCB, hold the PCB 

by the edges. 

Summary of Contents for KINO-780AM2

Page 1: ...KINO 780AM2 Motherboard Page i IEI Technology Corp User Manual MODEL KINO 780AM2 Mini ITX AMD Socket AM2 with VGA DVI I and HDMI Dual PCIe USB 2 0 SATA II and Audio Rev 1 00 1 September 2009...

Page 2: ...KINO 780AM2 Motherboard Page ii Revision Date Version Changes 1 September 2009 1 00 Initial release...

Page 3: ...s arising out of the use or inability to use the product or documentation even if advised of the possibility of such damages This document contains proprietary information protected by copyright All r...

Page 4: ...ECTORS 12 3 1 PERIPHERAL INTERFACE CONNECTORS 13 3 1 1 Layout 13 3 1 2 Peripheral Interface Connectors 14 3 1 3 External Interface Panel Connectors 14 3 2 INTERNAL PERIPHERAL CONNECTORS 15 3 2 1 ATX P...

Page 5: ...AND DIMM INSTALLATION 37 4 3 1 CPU Installation 37 4 3 2 Cooling Kit Installation Screw Type 39 4 3 3 Cooling Kit Installation Clip Type 40 4 3 4 DIMM Installation 42 4 4 JUMPER SETTINGS 43 4 4 1 Cle...

Page 6: ...ion 66 5 3 2 1 SATA Channel 67 5 3 3 Super IO Configuration 71 5 3 4 Hardware Health Configuration 73 5 3 5 Power Configuration 74 5 3 6 Remote Access Configuration 76 5 3 7 USB Configuration 79 5 3 7...

Page 7: ...11 C 2 DIO CONNECTOR PINOUTS 111 C 3 ASSEMBLY LANGUAGE SAMPLES 112 C 3 1 Enable the DIO Input Function 112 C 3 2 Enable the DIO Output Function 112 D WATCHDOG TIMER 113 E HAZARDOUS MATERIALS DISCLOSUR...

Page 8: ...Locations 20 Figure 3 9 SPDIF Connector Pinout Locations 21 Figure 3 10 SPI Flash Connector Location 22 Figure 3 11 System Fan Connector Location 23 Figure 3 12 TPM Connector Pinout Locations 24 Figu...

Page 9: ...ection 47 Figure 4 10 SATA Power Drive Connection 48 Figure 4 11 Four Port USB Cable Connection 49 Figure 4 12 Audio Connectors 50 Figure 4 13 DVI Connector 51 Figure 4 14 LAN Connection 52 Figure 4 1...

Page 10: ...Pinouts 19 Table 3 8 SATA Drive Connector Pinouts 21 Table 3 9 SPDIF Connector Pinouts 21 Table 3 10 SPI Flash Connector Pinouts 22 Table 3 11 System Fan Connector Pinouts 23 Table 3 12 TPM Connector...

Page 11: ...nu 10 USB Configuration 79 BIOS Menu 11 USB Mass Storage Device Configuration 80 BIOS Menu 12 PCI PnP Configuration 82 BIOS Menu 13 Boot 84 BIOS Menu 14 Boot Settings Configuration 85 BIOS Menu 15 Boo...

Page 12: ...KINO 780AM2 Motherboard Page xii...

Page 13: ...KINO 780AM2 Motherboard Page 1 Chapter 1 1 Introduction...

Page 14: ...ith clock speeds of up to 800 MHz each Expansion is provided by four SATA II ports eight USB ports a COM port and two PS 2 ports for a keyboard and mouse 1 2 Features Some of the KINO 780AM2 features...

Page 15: ...80AM2 Motherboard Page 3 1 3 Connectors All the connectors are shown in the diagram below Figure 1 2 KINO 780AM2 Overview 1 4 Dimensions The dimensions of the board are listed below Length 305mm Width...

Page 16: ...KINO 780AM2 Motherboard Page 4 Figure 1 3 KINO 780AM2 Dimensions mm...

Page 17: ...low between the chipsets and connectors on the board Figure 1 4 Data Flow Block Diagram 1 6 Technical Specifications All the technical specifications are shown in the table below Specification KINO 78...

Page 18: ...GbE chip COM One RS 232 serial port USB2 0 Eight USB 2 0 devices supported SATA Four 3 0Gb s SATA II drives supported Keyboard mouse Two PS 2 connectors Expansion One PCIe x16 slot Digital I O One 8 b...

Page 19: ...nical Specifications NOTE Due to the limitation of Windows 32 bit operating system when more than 4 GB of physical memory is installed the actual memory available for the operating system is less than...

Page 20: ...KINO 780AM2 Motherboard Page 8 Chapter 2 2 Packing List...

Page 21: ...le anti static wristband can help to prevent ESD from damaging the board Self grounding Before handling the board touch any grounded conducting material During the time the board is handled frequently...

Page 22: ...endor you purchased the KINO 780AM2 from or contact an IEI sales representative directly To contact an IEI sales representative please send an email to sales iei com tw The KINO 780AM2 is shipped with...

Page 23: ...ents 2 4 Optional Items Item and Part Number Image CPU cooler up to 65 W P N CF 478D RS CPU cooler up to 120 W P N CF 478E RS SATA power cable P N 32100 088600 RS Dual USB cable w bracket P N CB USB02...

Page 24: ...KINO 780AM2 Motherboard Page 12 Chapter 3 3 Connectors...

Page 25: ...ws peripheral interface connector locations Section 3 2 lists all the peripheral interface connectors seen in Section 3 1 1 3 1 1 Layout Figure 3 1 shows the on board peripheral connectors rear panel...

Page 26: ...nsion slot 164 pin PCIe slot PCIE1 Serial ATA drive connector 7 pin SATA S_ATA1 S_ATA2 S_ATA3 S_ATA4 SPDIF connector 5 pin header SPDIF1 SPI flash connector 8 pin header JSPI1 System fan connector 3 p...

Page 27: ...und on the motherboard and are only accessible when the motherboard is outside of the chassis This section has complete descriptions of all the internal peripheral connectors on the KINO 780AM2 3 2 1...

Page 28: ...D 7 GND 19 GND 8 POK 20 5V N C 9 5VSB 21 5V 10 12V 22 5V Table 3 3 ATX Power Connector Pinouts 3 2 2 CPU Fan Connector CN Label CPU_FAN1 CN Type 4 pin header CN Location See Figure 3 3 CN Pinouts See...

Page 29: ...connector CN Location See Figure 3 4 CN Pinouts See Table 3 5 Provides additional 12 V power for the CPU Figure 3 4 CPU Power Connector Location Pin Description Pin Description 1 GND 2 GND 3 12 V 4 1...

Page 30: ...iption 1 GND 2 5V 3 Output 3 4 Output 2 5 Output 1 6 Output 0 7 Input 3 8 Input 2 9 Input 1 10 Input 0 Table 3 6 DIO Connector Pinouts 3 2 5 Front Panel Connector CN Label F_PANEL1 CN Type 14 pin head...

Page 31: ...NC 2 Power 3 Power 4 Hard drive LED 5 Hard drive LED 6 Power LED 7 Power LED 8 Power LED 9 Reset 10 Reset Table 3 7 Front Panel Connector Pinouts 3 2 6 PCI Express x16 Slot CN Label CONN1 CN Type PCI...

Page 32: ..._ATA1 S_ATA2 S_ATA3 and S_ATA4 CN Type 7 pin SATA drive connectors CN Location See Figure 3 8 CN Pinouts See Table 3 8 The SATA drive connectors are each connected to SATA drives The SATA connectors s...

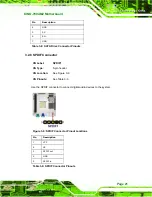
Page 33: ...8 SPDIF Connector CN Label SPDIF1 CN Type 5 pin header CN Location See Figure 3 9 CN Pinouts See Table 3 9 Use the SPDIF connector to connect digital audio devices to the system Figure 3 9 SPDIF Conn...

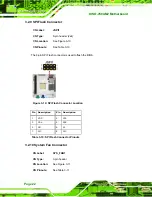
Page 34: ...ble 3 10 The 8 pin SPI Flash connector is used to flash the BIOS Figure 3 10 SPI Flash Connector Location Pin Description Pin Description 1 VDD 2 VSS 3 CS 4 SCK 5 SO 6 SI 7 N C 8 N C Table 3 10 SPI Fl...

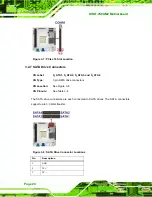
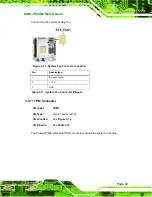
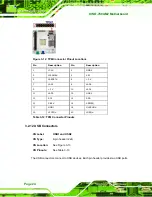
Page 35: ...onnector Location Pin Description 1 Rotation signal 2 12 V 3 GND Table 3 11 System Fan Connector Pinouts 3 2 11 TPM Connector CN Label TPM1 CN Type 20 pin header 2x10 CN Location See Figure 3 12 CN Pi...

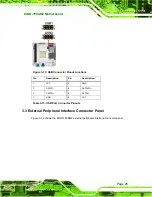
Page 36: ...7 LAD3 8 LAD2 9 3 V 10 LAD1 11 LAD0 12 GND3 13 SCL 14 SDA 15 SB3 V 16 SERIRQ 17 GND1 18 GLKRUN 19 LPCPD 20 LDRQ Table 3 12 TPM Connector Pinouts 3 2 12 USB Connectors CN Label USB1 and USB2 CN Type 8...

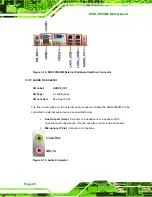
Page 37: ...ocations Pin Description Pin Description 1 VCC 2 GND 3 DATAN 4 DATA1M 5 DATAN 6 DATAM 7 GND 8 VCC Table 3 13 USB Port Connector Pinouts 3 3 External Peripheral Interface Connector Panel Figure 3 14 sh...

Page 38: ...Location See Figure 3 14 The three audio jacks on the external audio connector enable the KINO 780AM2 to be connected to external audio devices as specified below Line Out port Lime Connects to a head...

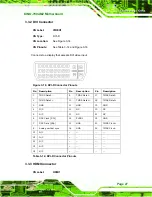
Page 39: ...Connector Pinouts Pin Description Pin Description Pin Description 1 TMDS Data2 9 TMDS Data1 17 TMDS Data0 2 TMDS Data2 10 TMDS Data1 18 TMDS Data0 3 GND 11 GND 19 GND 4 N C 12 NC 20 NC 5 N C 13 NC 21...

Page 40: ...DMI_DATA2 15 HDMI_SCL 4 HDMI_DATA1 16 HDMI_SDA 5 GND 17 GND 6 HDMI_DATA1 18 5V 7 HDMI_DATA0 19 HDMI_HPD 8 GND 20 HDMI_GND 9 HDMI_DATA0 21 HDMI_GND 10 HDMI_CLK 22 HDMI_GND 11 GND 23 HDMI_GND 12 HDMI_CL...

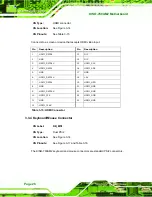
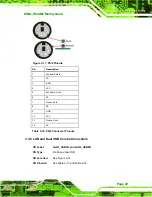
Page 41: ...C 3 GND 4 VCC 5 Keyboard clock 6 NC 7 Mouse data 8 NC 9 GND 10 VCC 11 Mouse clock 12 NC Table 3 16 PS 2 Connector Pinouts 3 3 5 LAN and Dual USB Combo Connectors CN Label LAN1_USB1B and LAN2_USB2B CN...

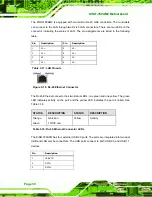
Page 42: ...7 LAN Pinouts Figure 3 18 RJ 45 Ethernet Connector The RJ 45 Ethernet connector has two status LEDs one green and one yellow The green LED indicates activity on the port and the yellow LED indicates t...

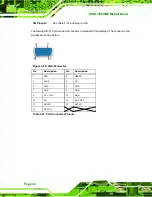
Page 43: ...nectors CN Location See Figure 3 14 CN Pinouts See Table 3 20 and Figure 3 19 Connects to an RS 232 device or network Pin Description Pin Description 1 DCD 6 DSR 2 RX 7 RTS 3 TX 8 CTS 4 DTR 9 RI 5 GND...

Page 44: ...VGA connector connects to standard VGA displays The connector and pinouts are shown below Figure 3 20 VGA Connector Pin Description Pin Description 1 RED 2 GREEN 3 BLUE 4 NC 5 GND 6 GND 7 GND 8 GND 9...

Page 45: ...KINO 780AM2 Motherboard Page 33 Chapter 4 4 Installation...

Page 46: ...ther electrical component is handled the following anti static precautions are strictly adhered to Wear an anti static wristband Wearing a simple anti static wristband can help to prevent ESD from dam...

Page 47: ...age to the KINO 780AM2 KINO 780AM2 components and injury to the user Before and during the installation please DO the following Read the user manual o The user manual provides a complete description o...

Page 48: ...nsure the KINO 780AM2 is properly installed All the items in the packing list are present The CPU is installed The CPU cooling kit is properly installed A compatible memory module is properly inserted...

Page 49: ...also result in injury to the user The CPU CPU cooling kit and DIMM are the most critical components of the KINO 780AM2 If one of these components is not installed the KINO 780AM2 cannot run 4 3 1 CPU...

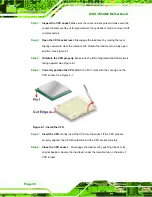
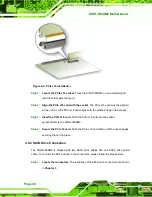
Page 50: ...See Figure 4 1 Step 3 Orientate the CPU properly Make sure the IHS Integrated Heat Sink side is facing upward See Figure 4 1 Step 4 Correctly position the CPU Match the Pin 1 mark with the cut edge on...

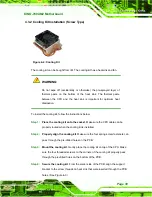
Page 51: ...Step 1 Place the cooling kit onto the socket Make sure the CPU cable can be properly routed when the cooling kit is installed Step 2 Properly align the cooling kit Make sure the four spring screw fast...

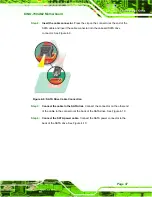
Page 52: ...the screws Step 6 Connect the fan cable Connect the cooling kit fan cable to the fan connector on the KINO 780AM2 Carefully route the cable and avoid heat generating chips and fan blades Step 6 4 3 3...

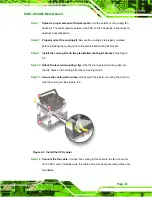
Page 53: ...acket Step 9 Install the cooling kit into the preinstalled cooling kit bracket See Figure 4 5 Step 10 Attach the levered mounting clips Slip the four levered mounting clips into the clip holes on the...

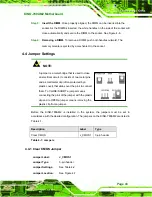
Page 54: ...er 2 To install a DIMM into a DIMM socket please follow the steps below and refer to Figure 4 6 Figure 4 6 Installing a DIMM Step 1 Open the DIMM socket handles The DIMM socket has two handles that se...

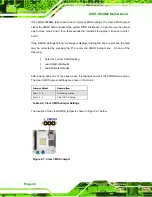
Page 55: ...ical circuit It consists of two metal pins and a small metal clip often protected by a plastic cover that slides over the pins to connect them To CLOSE SHORT a jumper means connecting the pins of the...

Page 56: ...uring the boot up process the fault may be corrected by pressing the F1 to enter the CMOS Setup menu Do one of the following Enter the correct CMOS setting Load Optimal Defaults Load Failsafe Defaults...

Page 57: ...nit the cooling fan of a power supply can also help generate airflow through the board surface 4 5 2 Motherboard Installation To install the KINO 780AM2 motherboard into the chassis please refer to th...

Page 58: ...e in the socket Step 3 Insert the PCIe x16 card Push the PCIe x16 card into the socket perpendicular to the KINO 780AM2 Step 4 Secure the PCI x16 card Push the PCIe x16 card down until the clip engage...

Page 59: ...he onboard SATA drive connector See Figure 4 9 Figure 4 9 SATA Drive Cable Connection Step 3 Connect the cable to the SATA disk Connect the connector on the other end of the cable to the connector at...

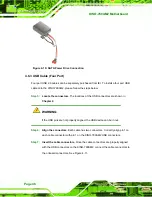
Page 60: ...locations of the USB connectors are shown in Chapter 4 WARNING If the USB pins are not properly aligned the USB device can burn out Step 6 Align the connectors Each cable has two connectors Correctly...

Page 61: ...ces to the external connectors are outlined in the subsections below 4 7 1 Audio Connection Audio signals are interfaced through three phone jack connections The red phone jack is for Mic In blue is f...

Page 62: ...please follow the instructions below Step 3 Locate the DVI connector The location of the DVI connector is shown in Chapter 2 Step 4 Align the DVI connector Align the male DVI connector on the digital...

Page 63: ...AN Connection Single Connector There are two external RJ 45 LAN connectors The RJ 45 connectors enable connection to an external network To connect a LAN cable with an RJ 45 connector please follow th...

Page 64: ...the external peripheral interface panel The dual PS 2 connector is used to connect to a keyboard and mouse to the system Follow the steps below to connect a keyboard and mouse to the KINO 780AM2 Step...

Page 65: ...rnal peripheral interface panel for a serial device Follow the steps below to connect a serial device to the KINO 780AM2 Step 3 Locate the DB 9 connector The location of the DB 9 connector is shown in...

Page 66: ...The external USB Series A receptacle connectors provide easier and quicker access to external USB devices Follow the steps below to connect USB devices to the KINO 780AM2 Step 1 Locate the USB Series...

Page 67: ...se follow the instructions below Step 3 Locate the female DB 15 connector The location of the female DB 15 connector is shown in Chapter 3 Step 4 Align the VGA connector Align the male DB 15 connector...

Page 68: ...e of the connector Step 0 4 8 Driver Installation All drivers are on the included CD Refer to the instructions below to start the driver installation program NOTE The content of the CD may vary throug...

Page 69: ...utorun program when the CD is inserted click the Start button select Run then type X autorun exe where X is the system CD drive to access the IEI Driver CD main menu Step 2 Select KINO 780AM2 from the...

Page 70: ...KINO 780AM2 Motherboard Page 58 Chapter 5 5 BIOS...

Page 71: ...sed restart the computer and try again 5 1 2 Using Setup Use the arrow keys to highlight items press ENTER to select use the PageUp and PageDown keys to change entries press F1 for help and press ESC...

Page 72: ...boot after changes to the system configuration is made CMOS defaults Use the jumper described in Chapter 5 5 1 5 BIOS Menu Bar The menu bar on top of the BIOS screen has the following main items Main...

Page 73: ...t Screen Select Item Enter Go to SubScreen F1 General Help F10 Save and Exit ESC Exit v02 61 Copyright 1985 2006 American Megatrends Inc BIOS Menu 1 Main System Overview The System Overview lists a br...

Page 74: ...Advanced menu BIOS Menu 2 to configure the CPU and peripheral devices through the following sub menus WARNING Setting the wrong values in the sections below may cause the system to malfunction Make s...

Page 75: ...nfiguration Use the CPU Configuration menu BIOS Menu 3 to view detailed CPU specifications and configure the CPU BIOS SETUP UTILITY Main Advanced PCIPNP Boot Security Chipset Exit CPU Configuration Mo...

Page 76: ...ction Intel SpeedStep tech Clock Spread Spectrum Execute Disable Bit CPU TM function Max CUPID Value Limit NOTE If the OS is NT this value must be set to enabled Use the Max CUPID Value Limit BIOS opt...

Page 77: ...nt Cache Line Prefetch Disable feature to be either enabled or disabled Hyper Threading Function Disabled Use the Hyper Threading function to enable or disable the CPU hyper threading function Disable...

Page 78: ...ing scheme where the OS optimizes overall power consumption by dynamically changing CPU frequency based on demand Disabled Disables SpeedStep i e GV3 Enabled DEFAULT Enables SpeedStep i e GV3 Intel R...

Page 79: ...Inc BIOS Menu 4 IDE Configuration OnChip SATA Channel Enabled Toggles the SATA channels on and off Enabled DEFAULT Disabled OnChip SATA Type Native IDE Specifies the operating mode for the SATA conne...

Page 80: ...Auto Use the Type BIOS option select the type of device the AMIBIOS attempts to boot from after the Power On Self Test POST is complete Not Installed BIOS is prevented from searching for an IDE disk...

Page 81: ...Multi Sector Transfer on the specified channel The data to and from the device occurs one sector at a time Auto DEFAULT BIOS auto detects Multi Sector Transfer support on the drive on the specified c...

Page 82: ...rd DMA mode 0 selected with a maximum data transfer rate of 2 1 MB s SWDMA1 Single Word DMA mode 1 selected with a maximum data transfer rate of 4 2 MB s SWDMA2 Single Word DMA mode 2 selected with a...

Page 83: ...ng Analysis and Reporting Technology SMART on the drive on the specified channel S M A R T predicts impending drive failures The S M A R T BIOS option enables or disables this function Auto DEFAULT BI...

Page 84: ...v02 61 Copyright 1985 2006 American Megatrends Inc BIOS Menu 6 Super IO Configuration Serial Port1 Address 3F8 IRQ4 Use the Serial Port1 Address option to select the Serial Port 1 base address Disable...

Page 85: ...2 5165 V 1 2V 1 2142 V Vcc 1 1350 V NB 1 1321 V 1 8V 1 8976 V 1 1V 1 0969 V Vcc 3 344 V VSB 3 376 V VBAT 3 312 V Select Screen Select Item Enter Go to SubScreen F1 General Help F10 Save and Exit ESC E...

Page 86: ...n PS2 Keyboard Mouse Disabled Resume On Ring Disabled RTC Resume Disabled Go into On Off or Suspend when Power button is pressed Select Screen Select Item Enter Go to SubScreen F1 General Help F10 Sav...

Page 87: ...isabled DEFAULT Wake event not generated by PCI PME controller activity Enabled Wake event generated by PCI PME controller activity Resume on PS2 Keyboard Mouse Disabled Use the Resume on PS2 Keyboard...

Page 88: ...not generate a wake event Enabled If selected the following appears with values that can be selected RTC Alarm Date Days System Time After setting the alarm the computer turns itself on from a suspend...

Page 89: ...can Megatrends Inc BIOS Menu 9 Remote Access Configuration Remote Access Disabled Use the Remote Access option to enable or disable access to the remote functionalities of the system Disabled DEFAULT...

Page 90: ...the console redirection is made The following configuration options are available 115200 8 n 1 DEFAULT 57600 8 n 1 38400 8 n 1 19200 8 n 1 09600 8 n 1 NOTE Identical baud rate setting musts be set on...

Page 91: ...d USB 2 0 Controller Mode HiSpeed Enables support for legacy USB AUTO option disables legacy support if no USB devices are connected Select Screen Select Item Enter Go to SubScreen F1 General Help F10...

Page 92: ...B Mass Storage Device Configuration menu BIOS Menu 11 to configure USB mass storage class devices BIOS SETUP UTILITY Main Advanced PCIPNP Boot Security Chipset Exit USB Mass Storage Device Configurati...

Page 93: ...on Type BIOS option to specify the type of emulation BIOS has to provide for the USB device Auto DEFAULT BIOS auto detects the current USB Floppy The USB device will be emulated as a floppy drive The...

Page 94: ...RQ9 Available IRQ10 Available IRQ11 Available IRQ14 Available IRQ15 Available DMA Channel 0 Available DMA Channel 1 Available DMA Channel 3 Available DMA Channel 5 Available DMA Channel 6 Available DM...

Page 95: ...IRQ4 IRQ5 IRQ7 IRQ9 IRQ10 IRQ 11 IRQ 14 IRQ 15 DMA Channel Available Use the DMA Channel option to assign a specific DMA channel to a particular PCI PnP device Available DEFAULT The specified DMA is a...

Page 96: ...legacy ISA devices 64K 54 KB reserved for legacy ISA devices 5 5 Boot Use the Boot menu BIOS Menu 13 to configure system boot options BIOS SETUP UTILITY Main Advanced PCIPNP Boot Security Chipset Exi...

Page 97: ...ase the time needed to boot the system Select Screen Select Item Enter Go to SubScreen F1 General Help F10 Save and Exit ESC Exit v02 61 Copyright 1985 2006 American Megatrends Inc BIOS Menu 14 Boot S...

Page 98: ...10 keys on the keyboard press the Number Lock key located on the upper left hand corner of the 10 key pad The Number Lock LED on the keyboard lights up when the Number Lock is engaged On DEFAULT Allo...

Page 99: ...ice section BIOS SETUP UTILITY Main Advanced PCIPNP Boot Security Chipset Exit Boot Device Priority 1st Boot Device 1st Boot Device 2nd Boot Device 2nd Boot Device 3rd Boot Device 3rd Boot Device Spec...

Page 100: ...Save and Exit ESC Exit v02 61 Copyright 1985 2006 American Megatrends Inc BIOS Menu 16 Hard Disk Drives 5 5 4 Removable Drives Use the Removable Drives menu BIOS Menu 17 to specify the boot sequence o...

Page 101: ...st Drive and 2nd Drive are listed The boot sequence from the available devices is selected If the 1st Drive option is selected a list of available CD DVD drives is shown Select the first CD DVD drive...

Page 102: ...Password Use the Change Supervisor Password to set or change a supervisor password The default for this option is Not Installed If a supervisor password must be installed select this field and enter t...

Page 103: ...ion BIOS SETUP UTILITY Main Advanced PCIPNP Boot Security Chipset Exit Advanced Chipset Settings Northbridge Configuration Northbridge2 Configuration Southbridge Configuration Options for NB Select Sc...

Page 104: ...can Megatrends Inc BIOS Menu 21 Northbridge Configuration 5 7 1 1 ECC Configuration Use the ECC Configuration menu BIOS Menu 22 to set the ECC parameters BIOS SETUP UTILITY Main Advanced PCIPNP Boot S...

Page 105: ...rt and correct memory errors disabled by default Enabled Enabled for all ECC modes DRAM SCRUB REDIRECT Disabled Use the DRAM SCRUB REDIRECT option to enable the system to immediately correct DRAM ECC...

Page 106: ...b option to enable the system to immediately correct memory errors so later reads are correct Doing this while memory is not being used improves performance Disabled DEFAULT 40ns 80ns 160ns 320ns 640n...

Page 107: ...he when idle Disabled DEFAULT 40ns 80ns 160ns 320ns 640ns 1 28 s 2 56 s Max mode 5 12 s 10 2 s 20 5 s 41 0 s 81 9 s 163 8 s 327 7 s 655 4 s 1 31ms 2 62ms 5 24ms 10 49ms 20 97ms 42 00ms 84 00ms L1 Cach...

Page 108: ...KINO 780AM2 Motherboard Page 96 160ns 320ns 640ns 1 28 s 2 56 s Max mode 5 12 s 10 2 s 20 5 s 41 0 s 81 9 s 163 8 s 327 7 s 655 4 s 1 31ms 2 62ms 5 24ms 10 49ms 20 97ms 42 00ms 84 00ms...

Page 109: ...Auto Primary Video Controller PCIE VBIOS Type DVI Options Disable UMA Select Screen Select Item Enter Go to SubScreen F1 General Help F10 Save and Exit ESC Exit v02 61 Copyright 1985 2006 American Meg...

Page 110: ...The HDMI port is activated DVI is disabled 5 7 3 Southbridge Configuration The Southbridge Configuration menu BIOS Menu 24 the Southbridge chipset to be configured BIOS SETUP UTILITY Main Advanced PC...

Page 111: ...uch as a clock sensitive SCSI device Disabled DEFAULT EMI not reduced Enabled EMI reduced HD Audio Azalia Device Enabled Enables and disables the onboard audio Enabled DEFAULT Disabled OnChip SATA Cha...

Page 112: ...ave and Exit ESC Exit v02 61 Copyright 1985 2006 American Megatrends Inc BIOS Menu 25 Exit Save Changes and Exit Use the Save Changes and Exit option to save the changes made to the BIOS options and t...

Page 113: ...780AM2 Motherboard Page 101 Load Failsafe Defaults Use the Load Failsafe Defaults option to load failsafe default values for each of the parameters on the Setup menus F8 key can be used for this opera...

Page 114: ...KINO 780AM2 Motherboard Page 102 Appendix A A BIOS Options...

Page 115: ...66 Intel R SpeedStep tm tech Automatic 66 OnChip SATA Channel Enabled 67 OnChip SATA Type Native IDE 67 Type Auto 68 LBA Large Mode Auto 69 Block Multi Sector Transfer Auto 69 PIO Mode Auto 69 DMA Mo...

Page 116: ...On 86 Boot From LAN Support Disabled 86 Change Supervisor Password 90 Change User Password 90 ECC Mode Disabled 93 DRAM ECC Enable Enabled 93 DRAM SCRUB REDIRECT Disabled 93 4 Bit ECC Mode 93 DRAM BG...

Page 117: ...KINO 780AM2 Motherboard Page 105 Load Optimal Defaults 100 Load Failsafe Defaults 101...

Page 118: ...KINO 780AM2 Motherboard Page 106 Appendix B B Terminology...

Page 119: ...a binary 0 while a high amplitude signal represents a binary 1 BIOS The Basic Input Output System BIOS is firmware that is first run when the computer is turned on and can be configured by the end us...

Page 120: ...dStep Technology EIST allows users to modify the power consumption levels and processor performance through application software The application software changes the bus to core frequency ratio and th...

Page 121: ...ransfers between storage devices and the computer chipsets The SATA bus has transfer speeds up to 1 5 Gbps and the SATA II bus has data transfer speeds of up to 3 0 Gbps S M A R T Self Monitoring Anal...

Page 122: ...KINO 780AM2 Motherboard Page 110 Appendix C C Digital I O Interface...

Page 123: ...Data can be read or written to the selected address to enable the DIO functions NOTE For further information please refer to the datasheet for the Super I O chipset C 2 DIO Connector Pinouts The follo...

Page 124: ...ital I O input functions is listed below MOV AX 6F08H Sets the digital port as input INT 15H Initiates the INT 15H BIOS call C 3 2 Enable the DIO Output Function The BIOS interrupt call INT 15H contro...

Page 125: ...KINO 780AM2 Motherboard Page 113 Appendix D D Watchdog Timer...

Page 126: ...BIOS function call INT 15H is used to control the Watchdog Timer INT 15H AH 6FH Sub function AL 2 Sets the Watchdog Timer s period BL Time out value Its unit second is dependent on the item Watchdog T...

Page 127: ...system resets EXAMPLE PROGRAM INITIAL TIMER PERIOD COUNTER W_LOOP MOV AX 6F02H setting the time out value MOV BL 30 time out value is 48 seconds INT 15H ADD THE APPLICATION PROGRAM HERE CMP EXIT_AP 1...

Page 128: ...KINO 780AM2 Motherboard Page 116 Appendix E E Hazardous Materials Disclosure...

Page 129: ...presences of small quantities of certain materials in the product and is applicable to China RoHS only A label will be placed on each product to indicate the estimated Environmentally Friendly Use Pe...

Page 130: ...it Board X O O O O X Metal Fasteners X O O O O O Cable Assembly X O O O O X Fan Assembly X O O O O X Power Supply Assemblies X O O O O X Battery O O O O O O O This toxic or hazardous substance is cont...

Page 131: ...KINO 780AM2 Motherboard Page 119 RoHS RoHS Pb Hg Cd CR VI PBB PBDE X O O O O X X O O O O X X O O O O X X O O O O O X O O O O X X O O O O X X O O O O X O O O O O O O SJ T11363 2006 X SJ T11363 2006...

Reviews: