background image

8

English

Camera Registration

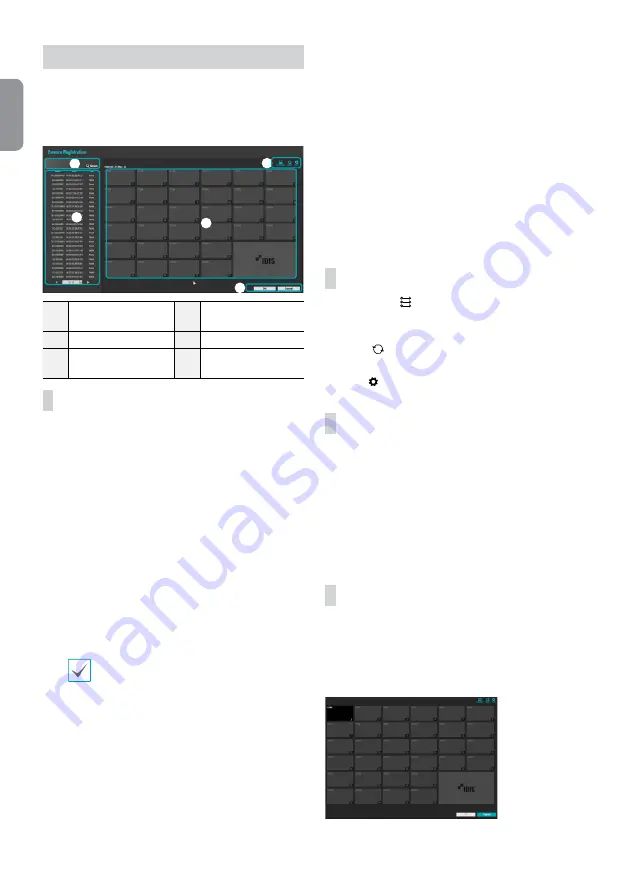
Once Network Setup Wizard is complete, live mode screen 
appears. While in live mode, right-click on the mouse and 
select Camera Registration to run the Camera Registration 
mode. It allows you to scan for the cameras connected to 
the NVR. 

1

3

4

2

5

1

Camera Scan Button

2

Camera View 
Buttons

3

Camera List Area

4

Video Display Area

5

Apply/Cancel 
Buttons

Camera Scan Button

Use this button to scan for and register cameras.
Pressing the 

Scan

 button displays the following submenu:


Rescan

: Scan for DirectIP™ cameras that were not 

scanned automatically. 


Go To Camera

: Moves the focus automatically to the 

camera using MAC address of camera in the camera list.


Search Scope

: Filters the cameras in the camera list 

depending on the search scope such as specified IP 
address range.


Screen Auto. Assign

: Assigns the detected cameras on 

the video display area.


Third Party Scan

: Used to manually scan for third-party 

cameras that cannot be recognized by the auto scan 
feature. 

 - Protocol: Select the protocol used by the camera (or 

video encoder) you wish to search for.

Even if the network device uses a protocol 
supported by the NVR, the device itself may not 
be visible for scanning and registration by the 
NVR.  For more information about supported 
network devices and models, contact your 
retailer.

 - Mode: Select the scan mode.
 - Advanced Setup: If the camera is networked but 

not scanned, use this setup. This setup allows you to 
change the network setting of the NVR’s VIDEO IN 
port which is camera’s network environment. Check 
the camera’s network setting first before you use this 
setup. Make sure that this setting does not conflict 
with the WAN setting. For more information on the 
WAN setting.

Select 

Scan

 to commence scanning.

Select a camera from the scan list and then select 

Add 

Camera

. The Device Login window will appear.

Enter a 

User ID

 and a 

Password

 for the selected 

camera.

Camera View Buttons


ALIGNMENT 


Button: Realigns camera screens 

displayed on the video display area in the order of 

Video 

In

 port connections.


RESET


 Button: Refreshes the video display area and 

the camera list.


TOOL 

  Button: Displays network camera tool window 

and changes the camera protocol and authentication.

Camera List Area

Following options can be accessed by right-clicking on a 
camera list entry:


Add/Remove Camera

: Adds or removes the selected 

camera. The Add Camera option is inactive if the camera 
has already been added to the screen.


Authentication

: Enter the necessary camera login 

info. This option is inactive for DirectIP™ / IDIS cameras 
because they do not require logins. This option is 
inactive for IDIS Protocl only if the password is set.

Video Display Area

Left-click on the video display area to toggle between split 
screen and single screen modes. Drag the camera screens 
around to rearrange them. The maximum number of the 
channels that can be registered on the NVR and the current 
registered camera channels display on the upper left corner 
of each screen.

Summary of Contents for DR-6316PS-S

Page 1: ...DR 6308P S DR 6316PS S DR 6332PS S Network Video Recorder Quick Guide Powered by...

Page 2: ...or objects have fallen into the equipment C If the equipment has been exposed to rain or water D If the equipment does not operate normally by following the operating instructions adjust only those co...

Page 3: ...l ElectronicEquipment Correct Disposal of This Product Applicable in the European Union and other European countries with separate collection systems Thismarkingshownontheproductoritsliterature indica...

Page 4: ...wing accessories are included Item Network Video Recorder Power Cable Quick Guide Manual and IDIS Center Program CD Optical USB Mouse IR Remote Control Assembly Screws for Adding Hard Disk Drives Rack...

Page 5: ...an be connected and the number of cameras that can be displayed For simplicity the illustrations and descriptions in this document refer to the 32 channel model Rear Panel 1 3 5 7 9 11 13 15 10 12 14...

Page 6: ...Gigabit PoE Switch eSATA Storage Device Network Camera IDIS Center Remote Monitoring Remote Control b a c d e f 3 1 2 4 5 6 7 8 9 0 1 ID Button 2 Panic Button 3 Camera Buttons 4 Status Button 5 Layou...

Page 7: ...Quick Setup Wizard Date Time Setup The new date and time settings will only be applied after clicking Next Record Method Setup Record Video Quality Setup Higher recording quality uses up more disk spa...

Page 8: ...ot scanned use this setup This setup allows you to change the network setting of the NVR s VIDEO IN port which is camera s network environment Check the camera s network setting first before you use t...

Page 9: ...tton on the remote control or click on Log in using the mouse 2 Select a user enter the password and then select OK There is no default password for the admin account Select admin and then OK without...

Page 10: ...udio recordings Video Recording Playback You can play back video recordings by using a mouse or remote control All Channel Playback 1 Press the Menu button while in Live mode 2 Select the Search Mode...

Page 11: ...IS Center installs and runs in 32 bit compatibility mode Installation Prior to installing the software click on to the Windows Start menu open Control Panel click on Power Management and set options f...

Page 12: ...er ID is admin without a password You can change User ID and Password in the User menu Device Registration To use the functions provided by IDIS Center you must first register a device and add the dev...

Page 13: ...ce group will be displayed on the right To modify a device group that has been registered select a device group and click E on the bottom of the Sites panel Modify Device Group window will appear You...

Page 14: ...tact your FEN server administrator Address Monitoring Port Search Port Audio Port Enter the device name used to register the device to FEN If FEN feature is not enabled on the device deselect FEN chec...

Page 15: ...Connection GigabitEthernet IPCamera x16 GigabitEthernet Ext x1 DR 6332PS S GigabitEthernet IPCamera x16 GigabitEthernet Ext x1 DR 6316PS S GigabitEthernet IPCamera x8 GigabitEthernet Ext x1 DR 6308P S...

Page 16: ...IDIS Co Ltd For more information please visit at www idisglobal com...

Reviews: