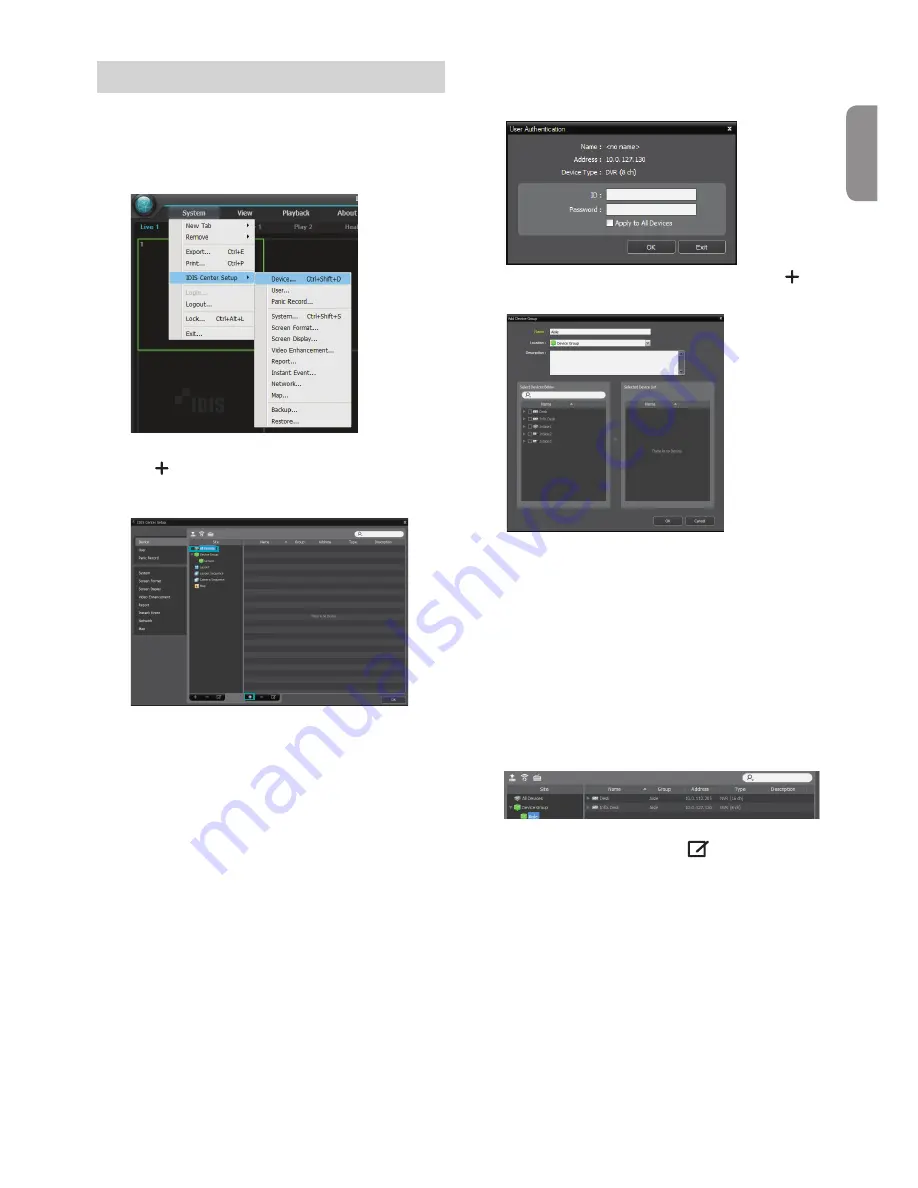
Idis DR-2100P Series Quick Manual Download Page 13

13

English

Device Registration

To use the functions provided by IDIS Center, you must first 
register a device and add the device to a device group.

Select 

System > IDIS Center Setup > Device 

 in the 

menu at the top of the screen.

On the 

Site

 panel, click on 

All Devices

, then click on 

the 

E

 button at the bottom of the Site List panel on 

the right. A 

Device Scan

 window will appear on the 

screen.

After selecting a scan mode, click on 

Start Scan


button and the scan results will be displayed on the 

list. 

Click 

Add Devices

 at the bottom of the 

Device Scan


window.

When user authentication window appears, enter the 

User ID and Password set up on each device, and then 

select OK for remote access.

Click 

Device Group

 on the 

Sites

 panel and click 

E

 at 

the bottom. 

Add Device Group

 window will appear.


Name

: Enter a name for the device group.


Location

: Select an location for the subject device 

group.

When you select a device from the device List on the 
left, it will be added to the 

Selected Device List

 on 

the right. Click 

OK

 to register the device group.

Make sure that the device has been added to the 

device group correctly. Click 

Device Group

 on the 

Sites

 panel and click on  next to 

Device Group

. When 

you click on a registered device group, a list of devices 

added the selected device group will be displayed on 

the right.

To modify a device group that has been registered, 
select a device group and click 

E

 on the bottom of 

the 

Sites

 panel. 

Modify Device Group

 window will 

appear. You can modify the selected device group 
from this window.

Summary of Contents for DR-2100P Series

Page 1: ...DR 2100P Series Network Video Recorder Quick Guide Powered by ...

Page 2: ...ug this equipment from the wall outlet and refer servicing to qualified service personnel under the following conditions A When the power supply cord or the plug has been damaged B If liquid is spilled or objects have fallen into the equipment C If the equipment has been exposed to rain or water D If the equipment does not operate normally by following the operating instructions adjust only those ...

Page 3: ...QUIREMENTSOFTHECANADIANINTERFERENCECAUSINGEQUIPMENT REGULATIONS WEEE WasteElectrical ElectronicEquipment Correct Disposal of This Product Applicable in the European Union and other European countries with separate collection systems Thismarkingshownontheproductoritsliterature indicatesthatitshouldnotbedisposedwithotherhouseholdwastesattheendofits workinglife Topreventpossibleharmtotheenvironmentor...

Page 4: ...mbly Screws for Adding Hard Disk Drives SATA2 Cables Overview Front Panel 1 2 1 USB Ports 2 LEDs For more details on USB ports and LEDs of the front panel refer to the manual Rear Panel 1 3 4 5 6 8 7 9 0 2 1 Factory Reset Button 2 Audio Out Port 3 VGA Out Port 4 HDMI Out Port 5 Video In PoE Ports 6 Network Port 7 Video In Ext Port 8 Alarm Connection Ports 9 RS 232 Port 0 12V Power In Port 7 48V Po...

Page 5: ...s on the Rear Panel Speaker VGA Monitor HDMI Monitor Sensor DirectIP Gigabit PoE Switch Video Encoder Keyboard Power 12V Power 48V Alarm POS IDIS Center Remote Monitoring Network Camera Analog Camera Network Camera Network ...

Page 6: ... Button Sequence Button Zoom Button PTZ Button View Button a Save Button b Menu Button c Playback Buttons d Bookmark Button e Clip Copy Button f Mute Button For more details on remote control buttons refer to the manual Getting Started Setup Wizard Setup Wizard only appears during initial booting To use Wizard after initial booting go to Live menu and select Wizard For more details on Setup Wizard...

Page 7: ...Finish the Quick Setup Wizard Network Setup Wizard After exiting from Quick Wizard you can click Go to Network Setup and set up the network with Network Wizard Start the Network Setup Wizard Internet Connection LAN Setup This test must be performed before proceeding to the next step FEN Setup Enter the NVR name registered on the FEN server in the Device Name field and click the Check to check its ...

Page 8: ...VR For more information about supported network devices and models contact your retailer Mode Select the scan mode Advanced Setup If the camera is networked but not scanned use this setup This setup allows you to change the network setting of the NVR s VIDEO IN port which is camera s network environment Check the camera s network setting first before you use this setup Make sure that this setting ...

Page 9: ...e an authorized user login 1 Bring up the Live menu and either press the Setup button on the remote control or click on Log in using the mouse 2 Select a user enter the password and then select OK There is no default password for the admin account Select admin and then OK without entering a password to log in Leaving the admin account unassigned with a password poses a security risk Please assign ...

Page 10: ...set to Recycle and the HDD has reached 100 of its capacity Audio Recording If the Record Audio option under Record Setup General has been enabled the camera will record audio along with video Check your local laws and regulations on making audio recordings Video Recording Playback You can play back video recordings by using a mouse or remote control All Channel Playback 1 Press the Menu button whi...

Page 11: ...am System Requirements Recommended Minimum OS Microsoft Windows 7 x86 64bit Home Premium Professional Ultimate Microsoft Windows 8 pro Enterprise Microsoft Windows XP Home SP3 CPU Intel CoreTM i5 2550 3 30GHz or better Intel CoreTM 2 Duo E7200 2 53GHz or better RAM 2GB or more 1 5GB or more VGA ATI RadeonTM HD 3650 or NVIDIA GeForce 8400GS or better 1280x1024 32bpp or better multiple monitors ATI ...

Page 12: ...ted on the desktop Run IDIS Center software by double clicking on IDIS Center or IDIS Center Run as administrator shortcut icon If a removable eSATA HDD or SD SDHC memory card are connected to the IDIS Center system you must double click on IDIS Center Run as administrator Login This program does not have a password set by default Leaving the admin account unassigned with a password poses a securi...

Page 13: ...select OK for remote access 6 Click Device Group on the Sites panel and click E at the bottom Add Device Group window will appear Name Enter a name for the device group Location Select an location for the subject device group When you select a device from the device List on the left it will be added to the Selected Device List on the right Click OK to register the device group 7 Make sure that the...

Page 14: ...s service requires heavy data traffic and using a Wi Fi connection is recommended Using wireless internet 3G LTE may result in excessive data charges Android OS device 1 Open the Play Store Google Play on your Android device 2 In Play Store Google Play enter IDIS Mobile in the search field 3 Install IDIS Mobile program and open it 4 The start up menu appears when pressing the Menu button on your m...

Page 15: ...r the device s IP address For port number using the default value is recommended Login Info Enter the User ID and Password used to login to the device Default value of User ID admin No default value of password Specifications These product specifications may change without prior notice General Exterior Dimensions W x H x D 300mm x 61mm x 231mm Weight Main Unit 2 3kg with 2HDDs Weight Packaging 4 5...

Page 16: ...OS Interface ATM Interface It is not currently supported Connector Video In Ethernet 4 9 9 ports Camera Power Out Ethernet 4 8 8 ports Monitor Out HDMI 1 HDMI VGA 1 DB15 Audio Out 1 RCA connector Alarm Terminal block Ethernet Port 1 RJ 45 RS 232 Serial Port Terminal block text insertion POS ATM IR Remote Control Port Remote Control USB Ports 2 x USB 2 0 5V less than 0 5A Storage Internal Storage 2...

Page 17: ......

Page 18: ...IDIS Co Ltd For more information please visit at www idisglobal com ...

Reviews: