background image

7

Camera Registration

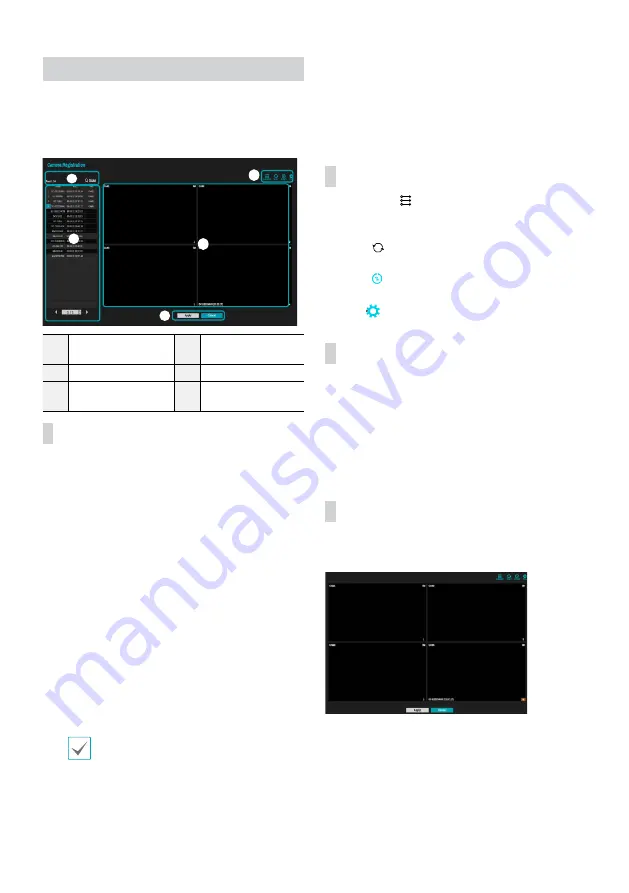
Once Network Setup Wizard is complete, live mode screen 
appears. While in live mode, right-click on the mouse and 
select Camera Registration to run the Camera Registration 
mode. It allows you to scan for the cameras connected to 
the NVR. 

1

Camera Scan Button

2

Camera View 
Buttons

3

Camera List Area

4

Video Display Area

5

Apply/Cancel 
Buttons

Camera Scan Button

Use this button to scan for and register cameras.
Pressing the 

Scan

 button displays the following submenu:


Rescan

: Scan for DirectIP cameras that were not scanned 

automatically. 


Go To Camera

: Moves the focus automatically to the 

camera using MAC address of camera in the camera list.


Search Scope

: Filters the cameras in the camera list 

depending on the search scope such as specified IP 
address range.


Screen Auto. Assign

: Assigns the detected cameras on 

the video display area.


Camera list

: By using the camera information file, .csv, 

the user can register the cameras easily. 


Scan Refresh Interval

: Configures the refresh interval to 

scan the camera. 


Third Party Scan

: Used to Scans for IDIS Open cameras 

that do not support automatic scan feature.

 - Protocol: Select the protocol used by the camera (or 

video encoder) you wish to search for.

Even if the network device uses a protocol 
supported by the NVR, the device itself may not 
be visible for scanning and registration by the 
NVR. For more information about supported 
network devices and models, contact your 
retailer.

 - Mode: Select the scan mode.

Select 

Scan

 to commence scanning.

Select a camera from the scan list and then select 

Add 

Camera

. The Device Login window will appear.

Enter a 

User ID

 and a 

Password

 for the selected 

camera.

Camera View Buttons


ALIGNMENT 


Button: Realigns camera screens 

displayed on the video display area in the order of 

Video 

In

 port connections.


RESET


 Button: Refreshes the video display area and 

the camera list.


Bitrate   

Button: Changes the bitrate allocation for 

each channel. 


TOOL 

Button: Displays netcwork camera tool 

window and changes the camera protocol.

Camera List Area

Following options can be accessed by right-clicking on a 
camera list entry:


Add/Remove Camera

: Adds or removes the selected 

camera. The Add Camera option is inactive if the camera 
has already been added to the screen.


Authentication

: Enter the necessary camera login info. 

This option is inactive for DirectIP cameras because they 
do not require logins.

Video Display Area

Left-click on the video display area to toggle between split 
screen and single screen modes.
Drag the camera screens around to rearrange them.

1

3

4

2

5

Summary of Contents for DR-1504P

Page 1: ...DR 1504P Network Video Recorder Quick Guide Poweredby...

Page 2: ...or the plug has been damaged B If liquid is spilled or objects have fallen into the equipment C If the equipment has been exposed to rain or water D If the equipment does not operate normally by follo...

Page 3: ...Thismarkingshownontheproductoritsliterature indicatesthatitshouldnotbedisposedwithotherhouseholdwastesattheendofits workinglife Topreventpossibleharmtotheenvironmentorhumanhealthfromuncontrolledwasted...

Page 4: ...essories are included Item Network Video Recorder Power Cable DC Adapter 48V Quick Guide Optical USB Mouse Please download IDIS Center software and product manual from this link IDIS Website www idisg...

Page 5: ...5 4 3 2 1 USBPort 2 HDMIOutPort 3 VGAOutPort 4 NetworkPort 5 VideoIn PoEPorts 6 PowerInPort 48V Connections on the Rear Panel Power Keyboard IDISCenter Remote Monitoring Camera VGAMonitor HDMIMonitor...

Page 6: ...izard Date Time Setup The new date and time settings will only be applied after clicking Next Record Method Setup Record Video Quality Setup Higher recording quality uses up more disk space Finish the...

Page 7: ...ideo encoder you wish to search for Even if the network device uses a protocol supported by the NVR the device itself may not be visible for scanning and registration by the NVR For more information a...

Page 8: ...ing up a virtual keyboard you can use to assign a password 3 To log out bring up the Live menu and click on icon using the mouse Find Password 1 Enter a user registered email and then select Get Verif...

Page 9: ...ding mode is not set to Recycle and the HDD has reached 100 of its capacity Video Recording Playback You can play back video recordings by using a mouse All Channel Playback 1 Place the mouse pointer...

Page 10: ...ed IDIS Center and IDIS Center Run as administrator shortcut icons will be created on the desktop Run IDIS Center software by double clicking on IDIS Center or IDIS Center Run as administrator shortcu...

Page 11: ...you click on a registered device group a list of devices added the selected device group will be displayed on the right To modify a device group that has been registered select a device group and clic...

Page 12: ...on IP Address Enter the IP address user ID and password of a device to register FEN Enter the FEN name user ID and password of a device to register For more details contact your FEN server administrat...

Page 13: ...rformance 4chFullHDsynchronousplayback Search Mode Time lapse Eventlog STORAGE HDD SATAx1 Upto2TBcapacityforeachdisk Total Capacity 2TB 2TB x 1 Data Export Device USBHDD USBStick NETWORK Video in Conn...

Page 14: ...75 x 8 52 Unit Weight 1 2kg 2 65 lb 3 5 2 TB HDD Working Temperature 0 C 40 C 32 F 104 F Operating Humidity 0 90 Power Input NVR Adaptor Input 100 240V 50 60Hz 1 2A Output 48V 1 0A Power Consumption...

Page 15: ......

Page 16: ...DR 1504P Poweredby...

Page 17: ...2 1 2 3 4 5 6 SMPS 7 8 9 10 11 12 13 14 A B C D E F 15 16 17 18 19 Tmra 20 21 22 23 24...

Page 18: ...417 No 5031 AVERTISSEMENT Pi ces mobiles dangereuses Se tenir loign des pales de ventilateurs mobiles 15 IDIS Ltd 2022 IDIS Ltd IDIS Ltd IDIS IDIS Ltd OpenSSL OpenSSL http www openssl org eay cryptsof...

Page 19: ...4 USB IDIS Center IDIS www idisglobal com IDIS...

Page 20: ...5 1 6 5 4 3 2 1 USB 2 HDMI 3 VGA 4 5 PoE 6 48 IDISCenter HDMI VGA USB...

Page 21: ...6 1 FEN NVR FEN...

Page 22: ...7 NVR 1 2 3 4 5 DirectIP MAC IP csv IDIS NVR NVR 1 2 3 Video In DirectIP 1 3 4 2 5...

Page 23: ...8 NVR NVR 1 2 OK 3 1 2 SSL TLS 3 UPR UserPasswordReset UPR 4 UPR...

Page 24: ...9 UPR User Password Reset flename upr USB UPR UPR 100...

Page 25: ...ium IV 2 4 Core 2 Duo E4600 1 VGA 128 1280x1024 24 Internet Explorer Ver 7 0 32 IDIS Web Microsoft Internet Explorer IDIS Web Microsoft Windows 8 metro UI IDIS Web 1 Internet Explorer Http IP IP NVR I...

Page 26: ...M 2 1 5 VGA ATI RadeonTM HD 3650 NVIDIA GeForce 8400GS 1280x1024 32 ATI RadeonTM HD 2400 NVIDIA GeForce FX5500 1024x768 24 HDD 6 1 Gigabit Ethernet Ethernet 10 100 Windows 1 IDIS www idis co kr 2 Setu...

Page 27: ...12 IDIS Center 1 IDIS Center 2 E 3 4 5 OK 6...

Page 28: ...13 OK 7 E 1 1 2 1 2...

Page 29: ...oid 1 Android Play Store Google Play 2 Play Store Google Play IDIS Mobile Plus 3 IDIS Mobile Plus 4 QR Code QR IP Address IP FEN FEN iOS 1 App Store 2 IDIS Mobile Plus App Store 3 IDIS Mobile Plus 4 Q...

Page 30: ...VGA 1920x1200 1920x1080 1680x1050 1600x1200 120 20 120 8 H 264 H 265 4 FullHD STORAGE HDD SATAx1 2 2 2 x 1 USB USB Ethernet IP x4 Ethernet x1 20 50 BRP 20 50 BRP PoE IEEE 802 3at 4 4 30 cbf MP4 push I...

Page 31: ...x 44 5 x 216 4 8 07 x 1 75 x 8 52 1 2 2 65 3 5 2 0 C 40 C 32 F 104 F 0 90 NVR 100 240 50 60 1 2 48 1 0 NVR 48 0 85 40 8 FCC CE KC 2 IDIS Co Ltd 8 10 Techno 3 ro Yuseong gu Daejeon 34012 115093 44 I 1...

Page 32: ......

Page 33: ......

Page 34: ......

Page 35: ......

Page 36: ...IDIS Co Ltd For more information please visit at www idisglobal com...

Reviews: