


CONCEPT ACRYLIC SHOWER BATH
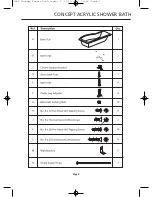
8. Fit the two wall fixing brackets to bath frame as indicated in Fig. 6 and Fig. 1.
Pilot drill holes (Ø 2mm) in frame before fixing brackets.
9. Fit brassware.
10. Place bath into installation position and level bath, ensuring that the bath height is
correct, (510mm to trimmed edge for nominal height). Note: The bath can be installed
at a lower height, but this will reduce the space available for the waste to be fitted.
Also, the panel(s) will need to be reduced in height by cutting a strip from the bottom
edge. Reducing the panel height requires great care, therefore responsibility cannot
be accepted for any errors made.
11. Fix bath to wall.
12. Fix bath to floor and ensure that all nuts are tight. Trail fit the panel(s) to verify height
is correct. Note: Untrimmed panel fitment requires the height of 540mm (510mm to
trimmed edge of bath). Remember to allow for floor coverings.
Re-adjust if necessary.
Fit the single support leg to the black cap previously fastened. Ensure that the leg is
adjusted correctly to support the rim, but not forcing the rim upwards.
13. Connect services and check for leaks.
14. Tile down to the height of the bath rim leaving a 3-4mm gap for waterproof sealant,
see Fig. 6. An extruded sealing strip can be used for the bath to wall joint as an
alternative to waterproof sealant. Protect bath during tiling.
Fig. 6
4994 Concept Shower Bath:Layout 1 02/10/2017 09:54 Page 7
Summary of Contents for CONCEPT
Page 3: ...Fig 2 CONCEPT ACRYLIC SHOWER BATH 4994 Concept Shower Bath Layout 1 02 10 2017 09 54 Page 3 ...
Page 4: ...CONCEPT ACRYLIC SHOWER BATH Fig 3 4994 Concept Shower Bath Layout 1 02 10 2017 09 54 Page 4 ...
Page 11: ...CONCEPT ACRYLIC SHOWER BATH 4994 Concept Shower Bath Layout 1 02 10 2017 09 54 Page 11 ...


