


- 43 -
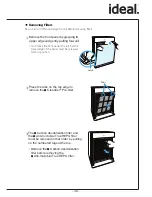
⑤
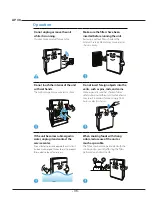
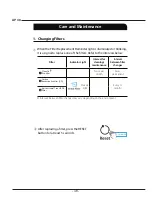
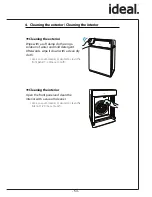
Replace the front panel by first
inserting the latch at the bottom
edge and then snapping the upper
part shut.
For inquiries on purchasing
fi
lters:
www.ideal-health.de
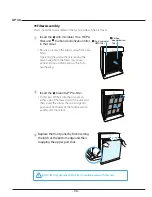
④
In the following order, install the
filters until they are snugly in place
all the way into the interior:
Anti-
microbial HEPA filter
l
Carbon
deodorization filter
l
Pre-filter
x
.When installing the pre-filter, first insert
it into the grooves on either side of
the lower part of the unit, then lock it
into place by inserting the tabs at the
top and then pushing until both sides of
the middle section audibly click into
place.
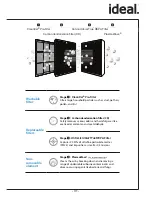
Anti-microbial
HEPA filter
Carbon
deodorization
filter
Pre-filter
In the following order, install the
fi
lters until they are snughy in place
all the way into the interior:
Anti-microbial True HEPA
Filter
Carbon deodorization
fi
lter (CD)
CleanCel
®
Pre-
fi
lter
CleanCel®
Pre-
fi
lter
Anti-microbial
True HEPA
Filter
Carbon
deodorization
fi
lter (CD)
⑥
Intervals for cleaning and replacing
the filters
Filter
Indicator Light
Interval for
cleaning/
maintenance
Interval
between
filter changes
Pre-filter
-
Twice per
month
Semi-
permanent
Carbon deodorization
filter
Steady
light
-
Every 12
months
Anti-microbial HEPA
filter
Ú
Intervals between filter changes may vary depending on the environment.
ⶺ
Refer to pages 21-22 for more detailed information on how to
change filters.
Refer to pages 49 - 50 for more detailed information on how to
change
fi
lters.
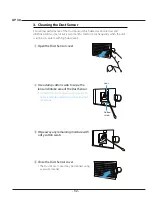
CleanCel®
Pre-
fi
lter
Anti-microbial True HEPA
Filter
Carbon
deodorization
fi
lter (CD)
E
F
G
Summary of Contents for AP 40
Page 86: ... 86 AP 40 Notizen Remarks Notes ...
Page 87: ... 87 Notizen Remarks Notes ...


