


43
Installation and Servicing
Section 3 - Servicing
SER
VICING
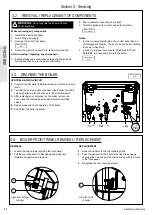
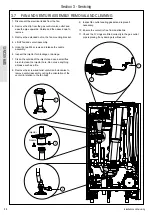
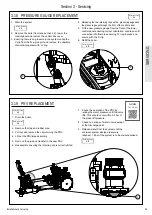
3.18 PRESSURE GAUGE REPLACEMENT
1. Drain the system.
2. Remove the boiler front (see section 3.2), lower the
control panel and remove the control box cover.
3. Ensuring there is no pressure in the system unclip the
C clip from the flow pipe port and remove the capillary
connection together with ‘O’ ring.
4. Releasing the two retaining clips on the pressure gauge ease
the pressure gauge through the front of the control panel.
5. Fit the new pressure gauge from the front of the lower
control panel ensuring correct orientation. Locate push fit
connection into flow pipe ensuring ‘O’ ring in place and
secure with the C clip.
6. Refill the boiler.
3
5
Refer to Section
3.2
Refer to Section
3.3
Refer to Section
2.17
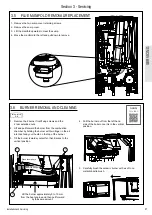
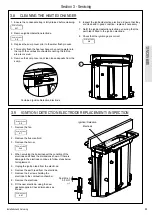
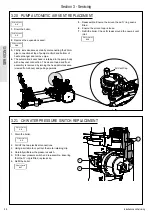
3.19 PRV REPLACEMENT
Refer to Section
3.2
Refer to Section
3.3
SCAN
for video
3
1. Drain the boiler.
2. Remove the trap and rubber pipe.
3. Pull out and remove the clip retaining the PRV.
4. Lift out the PRV/pipe assembly.
5. Remove the pipe and transfer to the new PRV.
6. Reassemble ensuring the retaining clip is correctly fitted.
7. Check the operation of the PRV by
raising the water pressure until the valve
lifts. This should occur within 0.3 bar of
the preset lift pressure.
8. Check no escape of water occurs except
at the discharge point
9. Release water from the system until the
minimum system design pressure is
reached; 1.0 bar if the system is to be pre-pressurised.
Refer to Section
2.17


