Ideal Boilers Mexico Super CF4120 Installation And Servicing Manual Download Page 4

GENERAL

4

Mexico Super CF495 - CF4140

 -

 Installation & Servicing

Operatives should be knowledgeable in handling techniques
when performing these tasks and the following precautions
should be considered:

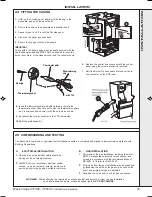
Split the boiler down to reduce the weight, e.g. remove casing
and hardware pack.  Refer to Frame 9.

Be physically capable.

Use PPE as appropriate, e.g. gloves, safety footwear.

During all manoeuvres and handling actions, every attempt
should be made to ensure the following unless unavoidable
and/or the weight is light.

Keep back straight.

Avoid twisting at the waist.

Avoid upper body/top heavy bending.

Always grip with the palm of the hand.

Use designated hand holds.

Keep load as close to the body as possible.

Always use assistance if required.
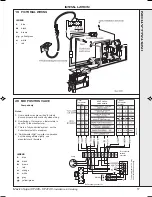
OPTIONAL EXTRA KITS

Programmer Kit

Fits neatly within the casing. Separate fitting
instructions are included with this kit.

Overheat

Is available to allow the boiler to be used

Thermostat Kit

on sealed water systems.

CURRENT GAS SAFETY (INSTALLATION AND USE)
REGULATIONS OR RULES IN FORCE.

The appliance is suitable only for installation in GB and IE and
should be installed in accordance with the rules in force.

In GB, the installation must be carried out by a CORGI
Registered Installer.  It must be carried out in accordance with
the relevant requirements of the:

Gas Safety (Installation and Use) Regulations

The appropriate Building Regulations either The Building
Regulations, The Building Regulations (Scotland), Building
Regulations (northern Ireland).

The Water Fittings Regulations or Water byelaws in Scotland.

The Current I.E.E. Wiring Regulations.

Where no specific instructions are given, reference should be
made to the relevant British Standard Code of Practice.

In IE, the installation must be carried out by a Competent Person
and installed in accordance with the current edition of I.S.813
"Domestic Gas Installations", the current Building Regulations
and reference should be made to the current ETCI rules for
electrical installation.
Detailed recommendations are contained in the following British
Standard Codes of Practice:

BS. 6891

Low pressure installation pipes.

BS. 6798

Installation of gas fired hot water boilers of rated
input not exceeding 60 kW.

BS. 5449:1

Forced circulation hot water systems (small bore
and microbore domestic central heating systems).

BS. 5546

Installation of gas hot water supplies for domestic
purposes (2nd Family Gases).

BS. 5440: 1

Flues for gas appliances of rated input not
exceeding 60 kW.

BS. 5440: 2

Ventilation for gas appliances of rated input not
exceeding 60 kW.

BS 7593

Treatment of water in Domestic Hot Water Central
Heating Systems.

Health and Safety Document No. 635.
The Electricity at Work Regulations, 1989.
Manufacturer’s notes must NOT be taken in any way as
overriding statutory obligations.

IMPORTANT.

 These appliances are certificated by the British

Standards Institution for safety and performance. It is

important, therefore, that no external control devices, e.g. flue

dampers, economisers etc., are directly connected to these
appliances unless covered by these Installation and Servicing

Instructions or otherwise recommended by 

Caradon Ideal

Limited

 in writing. If in doubt please enquire.

Any direct connection of a control device not approved by

Caradon Ideal Limited

 could invalidate the BSI Certification

and the normal appliance warranty. It could also infringe the

Gas Safety Regulations and the above regulations or other

statutory requirements.

SAFE HANDLING OF SUBSTANCES

Care should be taken when handling the boiler insulation

panels, which can cause irritation to the skin.  No asbestos,
mercury or CFCs are included in any part of the boiler.

LOCATION OF BOILER

The boiler must be installed on a flat and level floor, capable of
adequately supporting the weight of the boiler and any ancillary

equipment.

The boiler may be fitted on a combustible floor.

Insulation is not necessary, unless required by the local authority.

The boiler must not be fitted outside.
The boiler must not be installed in a bedroom or in a room
containing a bath or shower.
Timber Framed Buildings

If the boiler is to be fitted in a timber framed building it should

be fitted in accordance with the  Institute of Gas Engineering
document IGE/UP/7:1998.

Compartment Installations

A compartment used to enclose the boiler MUST be designed

and constructed specially for this purpose.
An existing cupboard or compartment may be used, providing it

is modified for the purpose.
Details of essential features of cupboard/compartment design,

including airing cupboard installation, are to conform to the
following:

!

!

!

!

!

BS. 6798.

!

!

!

!

!

The position selected for installation MUST allow
adequate space for servicing in front of the boiler

and for air circulation around the boiler.

!

This position MUST also permit the provision of a

satisfactory flue and an adequate air supply.

!

For the minimum clearances required for safety and
subsequent service see Frame 2.

GAS SUPPLY

The local gas supplier should be consulted, at the installation
planning stage, in order to  establish the availability of an

adequate supply of gas. An existing service pipe must NOT be

used without prior consultation with the local gas supplier.
The boiler is to be installed only on a gas supply with a
governed meter.
A gas meter can only be connected by the local gas supplier or
by a local regional contractor.
Check that the appliance is suitable for the proposed gas
supply. An existing meter should be checked, preferably by the
gas supplier, to ensure that the meter is adequate to deal with
the rate of gas supply required. A 

minimum 

gas pressure of

20mbar MUST be available at the boiler inlet, with the boiler
operating.

Installation pipes MUST be fitted in accordance with BS. 6891.
In IE refer to I.S. 813:2002.  Pipework from the meter to the boiler
MUST be of an adequate size.

200944-1.p65

3/8/2004, 3:41 PM

4

Summary of Contents for Mexico Super CF4120

Page 1: ...e ENGINEERED FOR PEACE OF MIND When replacing any part on this appliance use only spare parts that you can be assured conform to the safety and performance specification that we require Do not use reconditioned or copy parts that have not been clearly authorised by Ideal Boilers CF495 CF4120 CF4140 May 2004 UIN 200 944 A02 ...

Page 2: ...m in 533 21 0 600 23 6 750 29 5 Table 1 General Data Table 2 Performance Data Key to symbols GB United Kingdom Countries of IE Ireland destination PMS Maximum operating pressure of water B11BS An appliance designed for connection to a flue discharging the products of combustion outside the room with air for combustion being drawn directly from the room where the appliance is installed without a fa...

Page 3: ...nly Scale reducer n a Hot water mode Heat input n a Max operating burner pressure n a Max operating water pressure n a Cold water inlet temp n a Hot water outlet temp n a Water flow rate at max setting n a For condensing boilers only Condensate drain n a For all boilers complete sign hand over to customer For GB to comply with Building Regulations Part L1 Part J in Scotland the boiler should be fi...

Page 4: ...es are certificated by the British Standards Institution for safety and performance It is important therefore that no external control devices e g flue dampers economisers etc are directly connected to these appliances unless covered by these Installation and Servicing Instructions or otherwise recommended by Caradon Ideal Limited in writing If in doubt please enquire Any direct connection of a co...

Page 5: ...er the LH side or the RH side DURING installation Refer to Frame 11 A MINIMUM clearance of 25mm 1 MUST also be maintained between the flue pipe and any adjacent combustible material In addition a MINIMUM clearance of 533 mm 21 MUST be available at the front of the boiler for servicing Boiler Clearances Top One side Aggregate A or B A B CF495 mm in 20 3 4 35 1 3 8 135 5 1 4 CF4120 mm in 20 3 4 50 2...

Page 6: ...ned with a non porous acid resistant material it should be lined with a stainless steel flexible flue liner which complies with BS 715 5 Before connecting the boiler to or inserting a liner into a flue that has been previously used then the flue MUST be thoroughly swept clean of any soot or loose material If a register plate restrictor plate or damper etc is fitted in the flue then it MUST be remo...

Page 7: ...be located in accessible positions which permit the draining of the whole system including the boiler and hot water storage vessel They should be at least 1 2 BSP nominal size and be in accordance with BS 2879 If required a drain tap not supplied may be fitted to an unused bottom 1 BSP tapping on the front of the boiler BOILER CONTROL INTERLOCKS Caradon Ideal Limited recommend that heating systems...

Page 8: ...ce MUST be made if surging is liable to occur If in any doubt contact Caradon Ideal Limited 3 MINIMUM REQUIREMENTS Fully pumped systems 4 GRAVITY HOT WATER PUMPED CENTRAL HEATING 1 Separate flow and return connections are used for each service All possible configurations are given in Frame 11 and ONLY those shown should be used 2 The schematic pipework graph is based on the assumption that NO MORE...

Page 9: ... expansion vessel must be connected at a point close to the inlet side of the pump the connecting pipe being not less than 15mm 1 2 nominal size and not incorporating valves of any sort b The vessel capacity must be adequate to accept the expansion of the system water when heated to 110 o C 230 o F c The charge pressure must not be less than the static water head above the vessel The pressure atta...

Page 10: ... between them the stop valve being located between the system and the automatic air vent The stop valve may remain open during normal operation of the system if automatic water make up is required b Through a self contained unit comprising a cistern pressure booster pump if required and if necessary an automatic pressure reducing valve and flow restrictor The cistern should be supplied through a t...

Page 11: ...lignment rings and O rings 6 Thermostat pocket 7 Distributor tube 8 Combustion chamber 12 Collector hood 16 Front plate assy 18 Burner manifold 24 Gas valve 28 Gas cock 41 Draught diverter back panel assembly 41 1 TTB downdraught thermostat bracket 46 Boiler base plate 49 Flue baffle 47 Heat shield 68 Retention clip 69 Split pin 94 Cleanout cover 94 49 41 1 2 1 7 Tie rod 8 46 Mex 2127 Data badge 2...

Page 12: ...ation and Servicing Users Instructions The boiler is supplied fully assembled in Pack A Unpack and check the contents 8 UNPACKING HARDWAREPACK Thermostat pocket 1 off Thermostat clip 1 off Thermostat retaining pin 1 off 1 BSP plugs 5 off 1 x 1 2 BSP reducing bush 1 off Distributor tube Cable strap 2 off 28mm Comp nut 1 off 28mm olive 1 off INSTALLATION ...

Page 13: ... the PCB lead 4 Remove the Burner On neon cable from the back of the control panel 5 Unplug the in line connector to the TTB thermostat 6 Remove the 2 screws securing the control panel and disengage the panel by lowering and pulling it forward 7 Remove the 2 screws securing the top panel to the side 8 Draw the top panel forward and lift it off the boiler 9 Remove the 2 screws securing the LH side ...

Page 14: ...g separate zones must have a common return connection to the distributor tube 2 Select the desired pumped flow tapping 3 Screw the supplied boiler thermostat pocket into the appropriate front section tapping using an approved jointing material Refer to Tables 6 and 7 4 Connect pipe fittings to the rear tappings and plug any unused tappings Note If using iron elbows fit a short straight connector i...

Page 15: ...irectly above the boiler should be provided 14 WATER TREATMENT These boilers incorporate a cast iron heat exchanger IMPORTANT The application of any other treatment to this product may render the guarantee of Caradon Ideal Limited INVALID Caradon Ideal Limited recommend Water Treatment in accordance with the Benchmark Guidance Notes on Water Treatment in Central Heating Systems Caradon Ideal Limit...

Page 16: ... The appliance MUST be efficiently earthed A mains supply of 230 V 50 Hz fused at 3A is required All external controls and wiring MUST be suitable for mains voltage Wiring should be in 3 core PVC insulated cable NOT LESS than 0 75 mm2 24 x 0 2 mm to BS 6500 Table 16 Wiring external to the boiler MUST be in accordance with current l E E BS 7671 Wiring Regulations and local regulations For Ireland r...

Page 17: ...ve details Cylinder Thermostat Terminal Boiler supply connector Pump Terminal strip suitably enclosed Typical programmer CH may be selected independently MAINS Notes 1 Some earth wires are omitted for clarity Ensure proper earth continuity when wiring 2 Numbering of terminals on thermostats is specific to the manufacturer 3 This is a fully controlled system set the boiler thermostat to maximum 4 S...

Page 18: ...ange gy grey y g yellow green Gravity HW Pumped CH Diagram A shows a double pole frost thermostat which should suffice for all systems which do not use the OFF terminals of the programmer Diagram B shows a change over frost thermostat which will cover most systems which do use CH OFF If however on such a system the HW pipework is in an isolated part of the house a second frost thermostat may be us...

Page 19: ... retaining clip Split pin MEX 729 1 Offer up the LH side panel locating it with the peg in the baseplate and push the panel back 2 Secure the panel to the baseplate and collector hood 3 Repeat steps 1 and 2 to refit the RH side panel 4 Place the top panel and push back 5 Secure the top panel to the side panels IMPORTANT Wiring within the boiler casing must be neatly secured with the cable straps p...

Page 20: ...nuing until the pilot is established The main burner will then cross light smoothly If this sequence does not occur refer to the Fault Finding section 6 Test for gas soundness around ALL boiler gas components using leak detection fluid 7 Operate the boiler for 10 minutes to stabilise the burner temperature 8 The boiler is preset at the factory to its nominal rating If the burner setting pressure r...

Page 21: ...ystem controls should be fully explained to the householder to ensure the greatest possible fuel economy consistent with household requirements of both heating and hot water consumption Advise the User of the precautions necessary to prevent damage to the system and to the building in the event of the system remaining inoperative during frosty conditions Notes a If an optional Programmer Kit is fi...

Page 22: ...es are covered more fully in Frames 28 35 and MUST BE CARRIED OUT IN SEQUENCE WARNING Always turn OFF the gas supply at the gas service cock and switch OFF and DISCONNECT the electrical supply to the appliance BEFORE SERVICING IMPORTANT After completing the servicing or exchange of components always test for gas soundness carry out functional checks as appropriate and test for spillage Refer to Fr...

Page 23: ...e the manifold nuts to remove both burners from the burner front plate manifold assembly 5 From each burner remove the 2 air box securing nuts and CAREFULLY remove the air box and venturi arrangement 6 Withdraw both lint gauzes 1 Remove the 2 screws and lift off the front panel and remove the grille assembly from the casing 2 Disconnect the electrical leads from the gas valve 3 Disconnect the igni...

Page 24: ... they are correctly repositioned Refer to Frame 10 2 Refit the flue cleanout cover renewing any damaged or deteriorating sealing gasket 3 Refit the casing top panel 4 Reconnect the electrical wiring ensuring the TTB thermostat is connected Refit the controls panel ensuring that the thermostat phial and phial retaining clip are correctly located in the thermostat pocket and secured by the split pin...

Page 25: ... that a The injector is in position when refitting the pilot supply b A gas tight joint is made c The spark gap is correct Refer to Frame 45 When replacing any component 1 Isolate the electricity supply 2 Remove the lower front panel and grille assembly 3 Turn off the gas supply at the boiler Note In order to assist fault finding the control box PCB is fitted with 2 indicator lights which represen...

Page 26: ...n reverse order 1 Refer to Frame 38 2 Remove the 2 screws and lift off the lower front panel Refer to Frame 30 3 Pull off the thermostat knob 4 Disconnect the in line connector on the PCB lead 5 Remove the Burner On neon cable from the back of the control panel 6 Unscrew the 2 screws and pull down the control panel so that the 2 tabs clear the top panel 7 Remove the thermostat phial from the pocke...

Page 27: ...ip 7 Disconnect the ignition lead from the base of the electrode and the PCB and withdraw the lead 8 Fit the new lead and reassemble in reverse order 1 Refer to Frame 38 2 Remove the 2 screws and lift off the lower front panel Refer to Frame 30 3 Slacken the screw at the thermostat pocket and withdraw the phial from the pocket 4 Remove the thermostat retaining nut and withdraw the thermostat from ...

Page 28: ...shers securing the bottom burner baffle and remove the baffle 7 Remove the 2 screws securing the pilot burner and pull the assembly clear of the main burner 8 Remove the 4 nuts and washers securing the burner s to the front plate and manifold Withdraw the burner 9 Fit the new burner s and reassemble in reverse order taking care not to damage the main burner injector which is screwed into the burne...

Page 29: ... GAS VALVE REPLACEMENT Gas control valve Gas inlet pipe Pilot supply connection MEX 2150 Burner manifold 6 7 4 8 O ring seal Securing screws 1 Refer to Frame 38 2 Remove the 2 screws lift off the lower front panel then remove the grille assembly Refer to Frame 30 3 Disconnect the electrical leads from the gas valve 4 Disconnect the ignition lead from the PCB 5 Undo the gas cock union Remove the 4 ...

Page 30: ... the boiler and carefully lift the TTB bracket from its retaining slot and clip 6 Withdraw the thermostat bracket and lead down the side of the boiler 7 Locate and fit the new TTB downdraught thermostat bracket and lead and reassemble in reverse order ensuring that the in line connector is secured 1 Refer to Frame 38 2 Remove the 2 screws and lift off the lower front panel Refer to Frame 30 3 Undo...

Page 31: ...overheat stat Has the fuse on the PCB blown Reset the overheat stat Set control stat to maximum Allow the boiler to reach temperature if the overheat stat trips again measure flow temperature If above 90 C replace control stat If below 90 C replace overheat stat YES Is there a spark at the ignition electrode Does the pilot burner light NO Is there a gas supply to the boiler has the gas supply been...

Page 32: ...wndraught thermostat 1 173 143 49 E01 540 Flue baffle CF495 2 134 737 Flue baffle CF4120 2 157 924 E01 530 Flue baffle CF4140 1 135 770 67 308 557 Thermostat knob 1 111 904 The following are parts commonly required as replacement components due to damage or expendability Their failure or absence is likely to affect safety or performance of this appliance The list is extracted from the British Gas ...

Page 33: ...SHORT PARTS MEX 2151 17 20 22 23 30 26 21 27 24 67 66 44 1 52 BOILER CASING ASSEMBLY MEX 2152 76 63 73 75 77 46 73 Legend 46 Baseplate 62 Casing complete 63 Controls panel complete 73 Side panel 75 Casing front panel 76 Top panel 77 Grille assy 78 Casing fixing pack not shown ...

Page 34: ...ate 17 Sightglass 18 Burner manifold 19 Pilot pipe 20 Burner 21 Burner injector 2 off 22 Pilot burner 24 Gas valve 25 O ring 26 Ignition electrode 27 Ignition lead 28 Gas service cock Legend 63 Controls panel complete 65 Control box 66 Boiler control thermostat 67 Thermostat knob 64 Control panel 72 Magnetic strip 71 Controls front panel 53 BOILER CONTROL PANEL Exploded View ...

Page 35: ...LIST OF PARTS 35 Mexico Super CF495 CF4140 Installation Servicing 55 PCB BOX Exploded View Legend 29 PCB chassis assy 30 PCB sub assy 33 PCB support 37 PCB cover 33 29 30 37 MEX 2155 ...

Page 36: ...of first class training courses for domestic commercial and industrial heating installers engineers and system specifiers For details of courses please ring 01482 498 432 THIS SYMBOL IS YOUR ASSURANCE OF QUALITY These appliances are designed for use with Natural Gas only They have been tested and conform with the provisions of BS 6332 and BS 5258 CERTIFIED PRODUCT Manufactured under a BS EN ISO 90...

Reviews: