background image


www.friendtech.com


-14- 

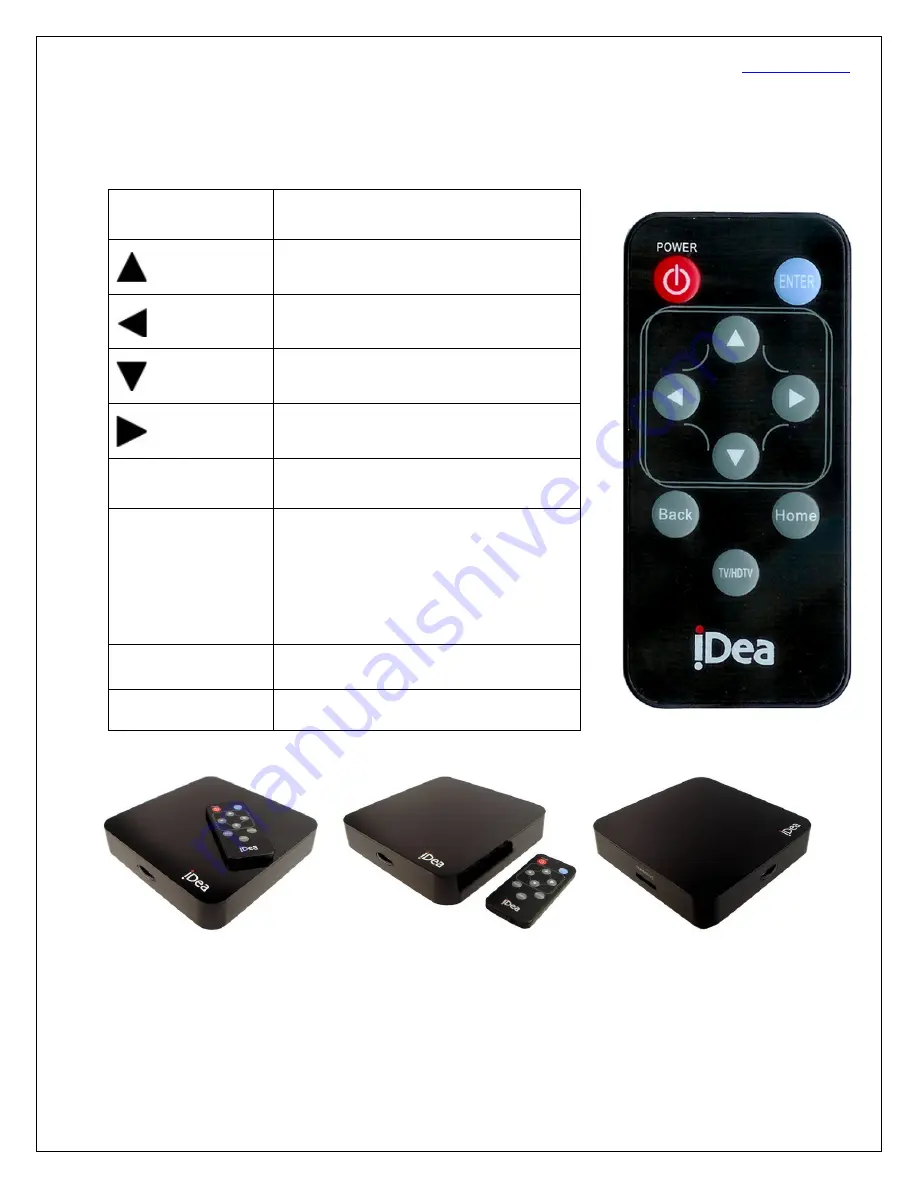
Remote control Unit   

Function Introduction 

POWER 

ower On/Off 


File Up key /

 Back


Previous / Left Key 


File Down Key / 

Rotate


Next / Right Key 

ENTER 

Confirmation and Play 

TV / HDTV   

Set the TV-Mate output frequency 
to TV (480i / 576i) or HDTV (720p).   

Note: only HDTV (1366*768 or 
1920*1020) supports the 720p 
mode. 

HOME 

HOME Page 

BACK 

Back to Previous Page 


Note: 

the Remote Control Unit and the TV-Mate as shown above. 

Summary of Contents for TV-Mate

Page 1: ...T TV Mate User s Manual Page 1 ...

Page 2: ...ideshow with background Music Enjoy watching the digital camera Photo on larger TV HDTV screen It supports the HD picture and HD video on HDTV 720p scaler built in It s the screen less DPF Digital Photo Frame that use the TV screen Package Contents a iDea TV MateTM x1 b 3 5mm video audio output cable x1 c Remote control unit w battery x1 d Universal 100 240V A C power adapter x1 Note Media card an...

Page 3: ...and MS media cards Getting Started 1 Plug the A C power adapter into the DC IN socket of the TV Mate and then connect the A C power adapter to the wall power socket 2 Pull out the battery isolation sheet in the battery compartment of the remote control unit 3 Connect the 3 5 mm video audio output cable to your TV video and audio port 480i for the NTSC TV 576i for PAL TV Note Use the Remote Control...

Page 4: ...cator light turns Green when the TV Mate Power is on The Start up menu screen should come on after a few seconds as shown in Fig 1 Use Left Right keys to select the desired icon 1 When no media card is inserted the Setup screen shown as in Fig 1 2 If one SD SDHC MMC MS memory card is inserted the Photo screen shown as in Fig 2 3 If more than one card USB drive are inserted the Device screen shown ...

Page 5: ...to get correct and clear images as Fig 1 Fig 3 Fig 4 2 If you find shown image Fig 5 it means incorrect frequency match i e 720p HDTV frequency on the TV it should be 480i or 576i please press the TV HDTV button several times to get correct and clear images If the problem remains please refer to your TV HDTV manual for accurate setup information 3 Only HDTV ready television 1366 768 or 1920 1020 s...

Page 6: ...tech com 5 On Screen Help Bar The On Screen Help Bar will show up for 5 seconds each time when entering display mode Use Left Right keys to choose a function and press Enter button to activate it Information Key ...

Page 7: ...Return to previous menu Press Enter button to start the slide show e g Fig 8 The slide show will stop at the end of picture file Press Enter button again to display on screen Help Bar Use Left Right keys to choose a function as listed below and press Enter button to activate it Next page file Previous page file Play Pause Rotation Zoom mode Information On Off Zoom and Pan Mode While viewing a phot...

Page 8: ...11 The music will start playing automatically Fig 11 Fig 12 The function corresponding to each icon in the Help Bar is shown as below Next page Previous page Music photo slide show Repeat Show Hide graphics EQ Return to previous menu Select the Show Hide graphics EQ icon and press Enter button you will see the equalizer graphics as shown in Fig 18 while listening to the music Sound Effect Select R...

Page 9: ...as below Next pagee file Previous page file Repeat Return to previous menu Use Left Right keys to choose one of the pre stored movies then press the Enter button to start playing the movie e g Fig 15 Fig 15 Fig 16 Press Enter button to get Help Bar The function corresponding to each icon is shown as below Next page file Previous page file Play Pause Fast forward Fast backward Information On Off Re...

Page 10: ...onds 5 Second 10 Seconds B Video Setup When Video Setup icon is highlighted press ENTER button and a setup menu will be shown The options under each icon are listed in the following table TV Mode Wide Screen TV 16 9 Normal TV 4 3 Video Full Screen Wide 16 9 720p Normal 4 3 480p DIVX MPEG4 Subtitle On Off Subtitle Language English Francis Deutsch Italia no Portuguese Spanish Polski Turkish Greek 1 ...

Page 11: ...n Off Help Row On Off File Editing On Off File Sorting A to Z Z to A Recent Date Oldest Date Auto Start Off Photo Music Photo Video 5 Device When Device icon is highlighted see Fig 19 press Enter button and a device list screen will be shown as in Fig 20 Use the Up Down keys to select the device which you want to play and then press Enter button to activate it The USB mark means the TV Mate accept...

Page 12: ...y Files Step 1 Enable the File Editing to ON there ll be 3 added icons in the Help Bar see Fig 23 Destination Copy File Delete File Fig 23 Step 2 Select Targeted Device where you want to copy files to 1 Enter Device screen choose the USB disk as the Targeted device see Fig 24 2 Go to the Help Bar press see Fig 25 3 The Help Bar upper part will display Copy to USB ROOT see Fig 26 Fig 25 Fig 24 Fig ...

Page 13: ... device see Fig 27 Fig 27 Step 4 Select file from the Source and Copy to the targeted device 1 Select File see Fig 28 2 Move to Help Bar and press the icon to activate the file copying see Fig 29 Fig 28 Fig 29 3 The COPYING message will be shown see Fig 30 4 After the file been copied the message COPY DONE will be displayed see Fig 31 Fig 30 Fig 31 ...

Page 14: ...hat you want to delete see Fig 32 2 Enter the Help Bar and press see Fig 33 Fig 32 Fig 33 3 The query window will be popped up press Yes to confirm the file deletion or press No to abort see Fig 34 4 After press down the Yes the file will be deleted see Fig 35 Fig 34 Fig 35 ...

Page 15: ...us Left Key File Down Key Rotate Next Right Key ENTER Confirmation and Play TV HDTV Set the TV Mate output frequency to TV 480i 576i or HDTV 720p Note only HDTV 1366 768 or 1920 1020 supports the 720p mode HOME HOME Page BACK Back to Previous Page Note the Remote Control Unit and the TV Mate as shown above ...

Page 16: ...ol Sensor is located at the front center of your TV Mate please make sure that you are pointing the Remote Control directly at the Remote Control Sensor on your TV Mate within a 3 foot range with no other object blocking the line of sight 2 Make sure the battery is not low or replace it with a new battery 3 480i to 720p press the TV HDTV key 720p to 480i TV HDTV key refer to page 4 Some of the fil...

Page 17: ...nverter It also supports the iPod as the external USB Hard Disk for the Music HD Picture slideshow It scales up the resolution of picture from 480i to 720p high definition You may use the adapter to read the files from Mini SD Micro SD and MS Pro Duo cards 2008 Mar Manual Rev 2 03 All other trademarks mentioned here belong to their respective companies ...

Reviews: