Icy Box IB-RD3621-C31 Manual Download Page 11

Manual IB-RD3621-C31

Manual IB-RD3621-C31

5.  CONFIGURE THE RAID MODE

ATTENTION: 

- Setting or changing the RAID mode requires you to re-format the drives. This will erase all data
  on the hard drives that are being formatted. 

Make sure to backup all existing data first!

Be careful!

 When using the confirmation button in any RAID mode, 

all data will be erased. 

  Never use the confirmation button when all settings have been completed and the drives contains your data!!!

RAID Description:

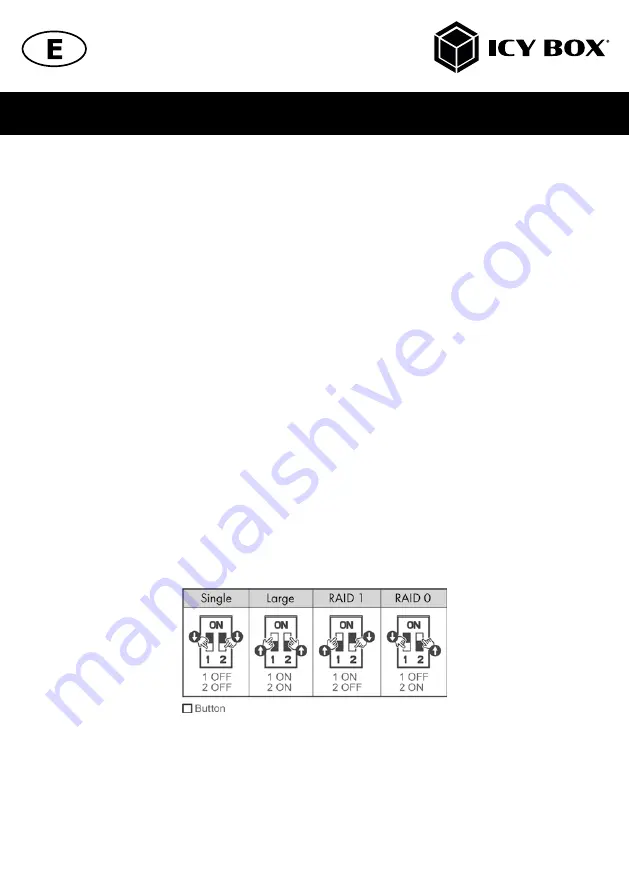
The following table shows the available RAID options and settings:

1.  LARGE

To be exact LARGE is not a real RAID mode, but could be seen as one. In LARGE Mode, the space of the second
disc is simply appended to the first disc. The space of the two disks is added to one big disk.

2.  RAID 1

In RAID 1 mode all data is written identically on both discs. If one disc fails the other contains all data again. This provi-
des security against the failure of one disk at the cost of the bigger disks space.
Notice: the RAID 1 mode is NOT a data backup! The thought behind RAID 1 is to have a system you can work with 
even when 1 HDD fails!

3.  RAID 0

RAID 0 writes data block wise alternating on the two disks. Two data blocks can be written at the same time which 
enhances speed. The disk space of the combined volume is twice the smaller disk size.

4.  SINGLE

Like LARGE it is not really a RAID mode. This means that both discs are integrated as separate hard drives with its own 
content, independent from each other.

ATTENTION: 

You have to choose a RAID mode as described. In default there is no RAID configuration and the

device shuts down within a few seconds.


- Make sure the device is connected via the delivered USB Type-C

 cable to a supported computer that is ON.  

- To configure the RAID mode you want to use, the device has to be turned on. 
- Please choose the RAID mode with the DIP-switches shown as in the chart above. 
- Now press and hold the confirmation button for about 10 seconds.
 

 Be careful! When using the confirmation button in any RAID mode, all data will be erased. 

  Never use the confirmation button when all settings have been completed and the drives contains your data!!!

- The HDD red/purple indicators will be flashing and the RAID mode setup is completed after about 10 seconds.
- Now you can release the confirmation button. 
- You just need to initialize, create a partition and format the drives accordingly to your operation system. 

Summary of Contents for IB-RD3621-C31

Page 1: ...USB 3 1 Gen 2 Raid enclosure for 2x 2 5 3 5 SATA drives Handbuch IB RD3621 C31 USB 3 1 Gen 2 Raidgeh use f r 2x 2 5 3 5 SATA Laufwerke Manual IB RD3621 C31...

Page 2: ...h conducting parts Do not bring plug contacts in contact with pointed and metal objects Use in intended environments only Operate the device using a power unit meeting the specifications of the type p...

Page 3: ...ure after cleaning We recommend cleaning devices using a dry anti static cloth 7 Disposing of the device Environmental pollution unsuitable for recycling Potential environmental pollution caused by co...

Page 4: ...sf hrenden Komponenten vermeiden Steckkontakte nicht mit spitzen und metallischen Gegenst nden ber hren Verwendung nur in daf r vorgesehenen Umgebungen Ger t ausschlie lich mit Typenschildkonformen Ne...

Page 5: ...einigung der Ger te am besten mit trockenem Antistatiktuch durchf hren 7 Entsorgung des Ger tes Umweltverschmutzung Wiederverwertung nicht m glich M gliche Umweltbelastung durch Bestandteile Recycling...

Page 6: ...pecialists do the repair never repair the device yourself you might damage the device or endanger yourself or your data 1 5 Disposing of the device When you dispose of the device be sure to dispose it...

Page 7: ...x 2 5 to 3 5 SSD HDD bracket 1x set of screws 1x manual 2 2 Front view 1 LED for power 2 LED for HDD1 HDD2 Blue HDD ready Purple HDD access Red HDD failure Red flashing RAID rebuilding 2 3 Rear view 1...

Page 8: ...ntistatic gloves before the operation Attention PCB of this device and HDDs are precision machinery please be careful do not collision and please notice the direction of HDD Be careful the cutting edg...

Page 9: ...C31 3 Make sure the hard drives are properly installed and then secure them with the provided screws 3 5 drive 2 5 drive 4 Close the cover and secure it with the screws removed in step 1 5 Connect the...

Page 10: ...fan pull out the power cord clean the fan and assemble it back b If the noise is still present change with another fan of size 60x60x10 mm 2 pins 1 Open the device as shown 2 Remove the following scr...

Page 11: ...0 RAID 0 writes data block wise alternating on the two disks Two data blocks can be written at the same time which enhances speed The disk space of the combined volume is twice the smaller disk size...

Page 12: ...restored the HDD LEDs will turn a steady blue Note We recommend not turning off the power during the rebuild process but if the process is interrupted it will continue rebuilding the data as soon as t...

Page 13: ...actions and enable GPT when initializing HDD 7 For Macintosh users the total capacity of more than 2 TB could be recognized only for the operation system 10 4 1 1 Tiger or later 8 Rebuild time is base...

Page 14: ...ie Reparaturen an dem Ger t durch Sie k nnten es besch digen oder sich selbst oder Ihre Daten gef hrden 1 5 Entsorgung des Ger tes Die Entsorgung des Ger tes muss nach den gesetzlichen Bestimmungen er...

Page 15: ...alterung 1x Schraubenset 1x Handbuch 2 2 Frontansicht 1 LED f r Betrieb 2 LED for HDD1 HDD2 Blau Festplatte betriebsbereit Lila Festplattenzugriff Rot Festplattenfehler Rot blinkend RAID Wiederherstel...

Page 16: ...mpfindliche Komponenten Setzen Sie die Laufwerke bitte vorsichtig ein und achten auf die richtige Ausrichtung Gehen Sie behutsam vor da im Inneren des Ger tes scharfe Kanten vorhanden sind Um Datenver...

Page 17: ...wie folgt dargestellt Stecken Sie das Netzteil an einer entsprechenden 220 V Steckdose ein Stecken Sie den entsprechen den 12 V Stecker des Netzteils an vorgesehener Schnittstelle des Ger tes ein Schl...

Page 18: ...en k nnten Sie den 60x60x10 mm 2 Pin L fter gegen einen baugleichen L fter austauschen 1 ffnen Sie dazu das Ger t wie weiter vorn gezeigt 2 Entfernen Sie die folgend markierten Schrauben 3 Ziehen Sie...

Page 19: ...e zu einem gro en virtuellen Laufwerk als eine logische Einheit Die Daten werden parallel auf alle Festplatten geschrieben was zu einer Steigerung der Datentransferrate f hrt Bei Ausfall einer Festpla...

Page 20: ...e HDD s des Raidverbundes angezeigt werden Hinweis Falls notwendig m ssen Sie dem entsprechenden Laufwerk erneut einen Laufwerksbuchstaben hin zuf gen Zur Datensicherheit Um Ihre Daten zu sichern und...

Page 21: ...die Initialisierung zu lange dauern berpr fen Sie bitte ob die Festplatte korrekt eingebaut wurde oder f hren Sie ein Treiberupdate Ihrer SATA Hosttreiber aus 1 1 Wenn Ihnen die Transferrate bei geju...

Page 22: ...RaidSonic Technology GmbH reserves the right to make changes in the specifications and or design of the above mentioned product without prior notice The diagrams contained in this manual may also not...

Reviews: