background image

WP-2000-CE7 Series (WinCE7 Based) User Manual                      v 1.0.4              Page: 120 

6.


I/O Modules and SDK Selection 

This chapter describes how to select a suitable I/O expansion module and the corresponding SDK library 

to be used for developing programs on WinPAC series devices. 


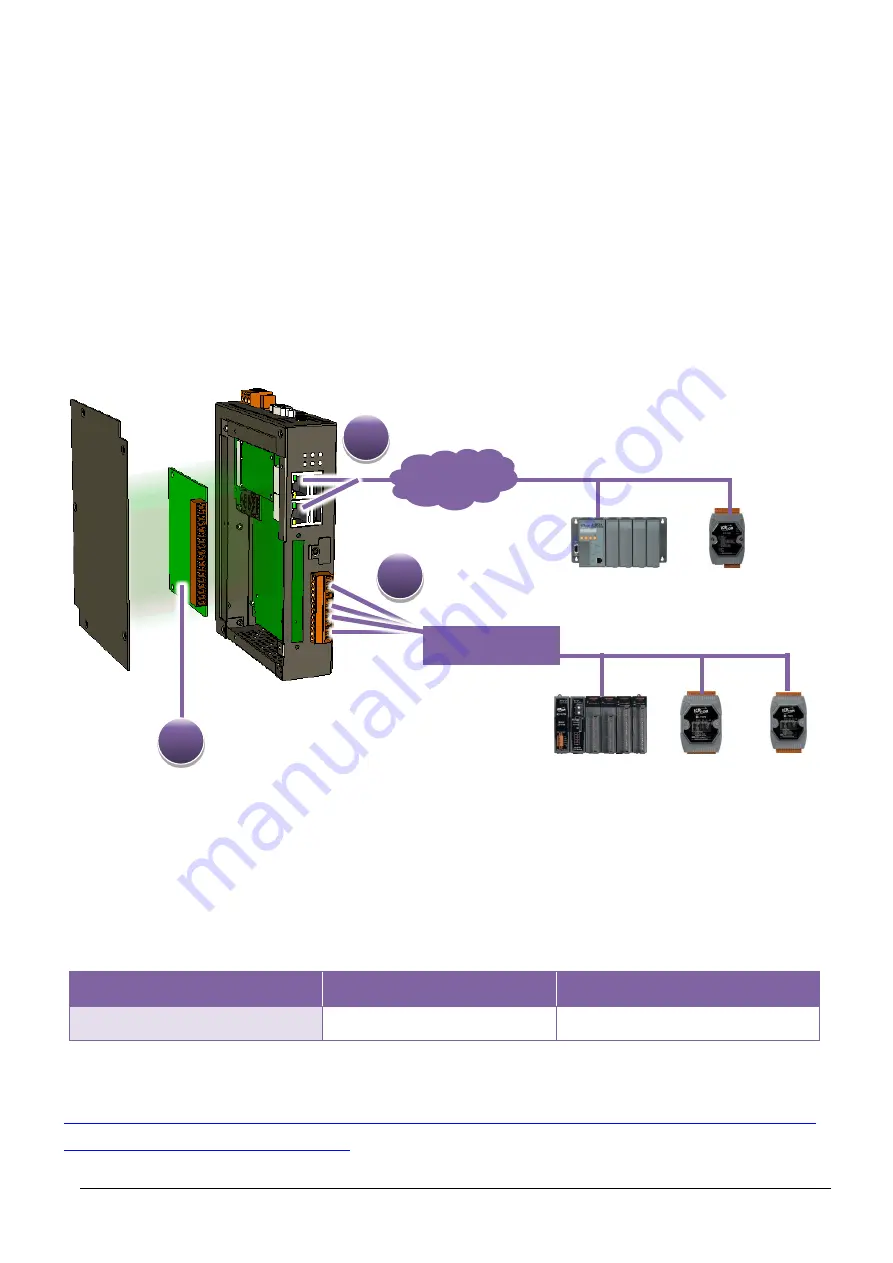
Selecting an SDK Library for I/O Expansion 


Local I/O Module (XV-Board) 

There are more than 8 XV-Board available for expanding the function of the WP-2000-CE7. The 

following table shows the appropriate SDK library to be used for I/O modules. 


Module 

Native SDK 

.NET CF SDK 

XV-Board 

Modbus Demo 

Modbus Demo 


For more detailed information about these support modules, please refer to 

https://www.icpdas.com/en/product/guide+Remote__I_O__Module__anPAC__%EF%BC%86a

mp;__Local__I_O__XV-board


Etherne

ET-7000 

I-8KE4 

RS-232/RS-485 

I-7000 

M-7000 

RU-87Pn 

Summary of Contents for WP-2000-CE7 Series

Page 1: ...WP 2000 CE7 Series User Manual Version 1 0 4 November 2021 Service and usage information for Technical support service icpdas com Author Tunglu Yu Editor Anna Huang...

Page 2: ...is manual at any time without notice The information furnished by ICP DAS is believed to be accurate and reliable However no responsibility is assumed by ICP DAS for its use not for any infringements...

Page 3: ...ion LTE Module 26 2 2 3 Installing the antenna 28 2 2 4 2 3 Configuring the Boot Mode 29 2 4 Using PAC Utility to Manage WinPAC 31 2 5 Changing the User Interface Language 32 2 6 Using DCON Utility Pr...

Page 4: ...oject 81 4 4 1 Specify the Path of PAC Reference 84 4 4 2 Add the Control to the Form 87 4 4 3 Add the Event Handling for the Control 89 4 4 4 Upload the Application to WinPAC 90 4 4 5 Execute the App...

Page 5: ...How to Online Debug the WP 2000 CE7 Program 134 A 2 How to Automatically Synchronize WinPAC Clock 139 A 3 How to use User Account Control in WinPAC 141 A 3 1 How to Create an User Account 142 A 3 2 Ho...

Page 6: ...uencies of WCDMA 900 2100 MHz TDSCDMA 1900 2100 MHz CDMA2000 BC0 800 MHz FDD LTE B1 B3 B8 TDD LTE B38 B39 B40 B41 and GSM 850 900 1800 1900 MHz The 4G module of WP 2241MX 4GE CE7 work on frequencies o...

Page 7: ...plication Windows Embedded Compact 7 0 Support PC based software Visual Studio NET Web server FTP server Telnet server Local I O and Communication Expansion Board WP 2000 CE7 series module is equipped...

Page 8: ...oSDHC to implement portable data logging applications supports up to 32 GB Unique 64 bit Hardware Serial Number to Protect Your Program A unique 64 bit serial number is assigned to each hardware devic...

Page 9: ...ousing The WP 2000 CE7 series modules come with the metal casing Highly Reliable Under Harsh Environment Our WP 2000 CE7 series modules operate in a wide range of temperature and humidity Operating Te...

Page 10: ...512 MB Flash 256 MB FRAM 64 KB Expansion Flash Memory microSD socket with one 4 GB microSD card support up to 32 GB microSDHC card RTC Real Time Clock Provide second minute hour date day of week month...

Page 11: ...ional XV board 4G Expansion Bus Yes Mechanical Dimensions W x H x D 35 mm x 167 mm x 119 mm Housing Metal Installation DIN rail mounting Environmental Operating Temperature 25 C to 75 C Storage Temper...

Page 12: ...GB microSD card support up to 32 GB microSDHC card RTC Real Time Clock Provide second minute hour date day of week month year 64 bit Hardware Serial Number Yes for software copy protection Dual Watch...

Page 13: ...Frequency Band GSM 850 900 1800 1900 MHz GPRS Connectivity GPRS class 12 10 GPRS station class B Data GPRS Downlink transfer Max 85 6 kbps Uplink transfer Max 42 8 kbps 3G System Frequency Band WCDMA...

Page 14: ...is an overview of the components and its descriptions Front View Item Description LED Indicators The WP 2000 CE7 series module has 6 LED indicators shown as below LED Indicator Color Meaning RUN Green...

Page 15: ...r State Color Meaning 1G ON Orange Network Speed 1 G OFF Network Speed 10 100 M Link Act ON Green The Link is active OFF The Link is inactive Blinking Green Network activity USB Port The WP 2000 CE7 s...

Page 16: ...WinCE7 Based User Manual v 1 0 4 Page 16 Item Description Pin Assignment Pin Signal Description 1 TxD COM1 RS 232 2 RxD 3 GND 4 TxD COM2 RS 232 5 RxD 6 GND 7 D COM3 RS 485 8 D 9 ISO GND 10 D COM4 RS 4...

Page 17: ...that can be used with a variety of supported VGA resolutions and the output resolution covers 640x480 800x480 800x600 1024x768 Rotary Switch Rotary Switch is an operating mode selector switch which p...

Page 18: ...imensions The diagrams below provide the dimensions of the WP 2000 CE7 series modules to use in defining your enclosure specifications Remember to leave room for potential expansion if you are using o...

Page 19: ...ng with the WP 2000 CE7 series modules for the first time Before starting any task please check the package contents If any of the following package contents are missing or damaged contact your dealer...

Page 20: ...WinCE7 Based User Manual v 1 0 4 Page 20 2 1 Mounting the Hardware The WP 2000 CE7 series module has simple rail clips for mounting reliably on a standard 44 mm DIN rail Step 1 Mounting WP 2000 CE7 on...

Page 21: ...necting to a PC the USB device and the power supply i Connect the mouse or keyboard to the USB port ii Connect PC to the Ethernet port through an Ethernet switch iii Connect the power supply 12 to 48...

Page 22: ...onents Accessories Mounting the XV Board 2 2 1 WP 2000 CE7 series modules have one expansion I O slots to expand the functions For more detailed information about the XV board specifications please re...

Page 23: ...s WinCE7 Based User Manual v 1 0 4 Page 23 Step 2 Hold the XV board vertically and align the socket and then carefully press the XV board onto the I O expansion bus Step 3 Fasten the XV board using th...

Page 24: ...WP 2000 CE7 Series WinCE7 Based User Manual v 1 0 4 Page 24 Step 4 Close the cover and then fasten the screws Step 5 Insert the I O terminal...

Page 25: ...n the top side of the module The eject button is on the right side of the tray door Step 1 Remove stripped screws and then remove the cover Step 2 Insert the SIM card into the Socket and Step 3 Close...

Page 26: ...ion LTE Module 2 2 3 for Mobile network expansion card had installed Step 1 Remove stripped screws and then remove the cover Step 2 Remove the fixed tape and move the cable to the edge Step 3 Insert t...

Page 27: ...WP 2000 CE7 Series WinCE7 Based User Manual v 1 0 4 Page 27 Step 4 connect the cable and then put the cable inside Step 5 Close the cover and then fasten the screws Put the cable inside...

Page 28: ...enna 2 2 4 for Mobile network expansion card had installed The Mobile network expansion card has an antenna connector that can be used to connect the 3G 4G antenna To install the antenna just screw th...

Page 29: ...e WP 2000 CE7 Position Operating Mode 0 Normal mode Default 1 Safe mode 2 Debug mode 3 OS update mode by Ethernet 4 Reserve 5 OS update mode by Micro_SD 6 Reserve OS Development Mode 7 9 User Mode The...

Page 30: ...ogram debug functions can be used in addition to normal system functions Debug mode is unsupported OS Update Mode OS update mode is a way used to update OS For more information on updating the WP 2000...

Page 31: ...f the WinPAC system tool that allows user quickly and easily manage and configure the WinPAC For more detailed information on PAC Utility applications please refer to 3 1 PAC Utility Step 1 Double cli...

Page 32: ...1 0 4 Page 32 2 5 Changing the User Interface Language The Windows CE operating system on the WP 2000 CE7 comes with several built in functions Step 1 Click Start menu point to Settings click Control...

Page 33: ...ies WinCE7 Based User Manual v 1 0 4 Page 33 Step 2 Click User Interface Language tab choose to your local language and then click OK Step 3 Run the PAC Utility and then reboot the WinPAC for changes...

Page 34: ...34 2 6 Using DCON Utility Pro to Configure I O Modules DCON Utility Pro enables users easily to configure and manage the I O modules via Ethernet or serial ports RS 232 RS 485 Step 1 Double click the...

Page 35: ...WP 2000 CE7 Series WinCE7 Based User Manual v 1 0 4 Page 35 Step 3 Configure the communication settings Tips Warnings The COM port settings for expansion I O modules are listed below COM0 Backplane...

Page 36: ...WP 2000 CE7 Series WinCE7 Based User Manual v 1 0 4 Page 36 Step 4 Click the button Step 5 Click the module name to configure the I O module...

Page 37: ...ws CE dial up networking component driver can be efficiently used to include support for transferring data over GPRS modems in WP 2000 CE7 Step 1 Click Start menu point to Settings click Network and D...

Page 38: ...5200 in the Baud Rate option and click then click OK button Step 5 Select Call Options tab enter the modem dialing settings in the commands field and then click OK button The modem dialing settings de...

Page 39: ...s in the Phone number option and then click OK button The phone number settings should fit the Telecom Company s setting For example the following setting is for Telecom Company in Taiwan 99 1 Step 7...

Page 40: ...CE7 Series WinCE7 Based User Manual v 1 0 4 Page 40 Step 8 Wait for the connection to be established Tips Warnings If the connection fails as shown below please repeat the instructions to view the se...

Page 41: ...ed on WP 2000 CE7 and can work directly on WP 2000 CE7 and some of these are supporting tools and can help you to manage the WP 2000 CE7 remotely on a PC The following tools are pre installed on WP 20...

Page 42: ...following tools are supporting tools for remote managing the WP 2000 CE7 used on PC that can be found by downloading the latest version from ICP DAS web site https www icpdas com en download show php...

Page 43: ...applications that enable management and configuration of WinPAC system and features The PAC Utility includes the following menu bars and property tabs All of these functions will be explained later M...

Page 44: ...es WinCE7 Based User Manual v 1 0 4 Page 44 Menu Bar File 3 1 1 The menus use to How to use Reboot Restarts the WinPAC Restore Default Settings Restore the settings of WinPAC to its default Exit Exits...

Page 45: ...eries WinCE7 Based User Manual v 1 0 4 Page 45 Menu Bar Help 3 1 2 The menus use to How to use About Displays a dialog box with information about PAC Utility including the current version and copyrigh...

Page 46: ...ck box Auto save or manual save to flash By default these options are unavailable Auto save to flash This option is checked by default Any changes made to the WP 2000 CE7 will be saved and only take e...

Page 47: ...ettings The tab use to How to use Adjust the screen resolution Move the slider to the left to decrease the resolution or move the slider to the right to increase the resolution and then click the Appl...

Page 48: ...monitor the MAC address Generally DHCP is the default settings but if you don t have a DHCP server you must configure the network settings by using manual configuration The tab use to How to use Set t...

Page 49: ...FTP and HTTP directory path The tab use to How to use Enable or disable the FTP access Enable Select the Enable check box in the FTP field and then click the Apply button Disable Select the Disable ch...

Page 50: ...o field and then click the Apply button Set the HTTP directory path Enter a new path in the Set HTTP document root directory to field and then click the Apply button Login The Login tab provides funct...

Page 51: ...7 Based User Manual v 1 0 4 Page 51 File Server Settings The File Server Settings tab provides functions to set the SMB server The tab use to How to use Set the SMB server Click the Settings button to...

Page 52: ...ual v 1 0 4 Page 52 Property Tab Device Information 3 1 7 The Device Information tab provides functions to monitor necessary system information of the WinPAC The information is the most important note...

Page 53: ...s running at WinPAC startup it allows users to configure ten execute files at most Tips Warnings The specific extensions are exe and bat and they are executed in order of program 1 program 2 etc The t...

Page 54: ...tions to configure programs running at WinPAC startup in one of the user defined mode it allows users to configure ten execute files at most The tab use to How to use Configure programs running at sta...

Page 55: ...ro DCON Utility Pro enables users easily to configure and manage the I O modules via Ethernet or serial ports RS 232 RS 485 For more detailed information on how to use DCON Utility Pro to configure I...

Page 56: ...E7 Based User Manual v 1 0 4 Page 56 3 3 TaskMgr The TaskMgr is a Windows CE application which provides real time info on all processes and threads including System threads similar in appearance to th...

Page 57: ...uns on a Desktop PC Once a connection is established between the client and server initiated by the client the client will periodically send requests for screen updates and send mouse key click inform...

Page 58: ...ay The Remote Display allows WinPAC to be controlled and monitored from a remote location This tool is composed of two parts a client and a server The server is a program named cerdisp exe running on...

Page 59: ...ule To use the SendToCOM you can send data to expansion module through the serial port and receive data from other device through the serial port For more information about these commands for communic...

Page 60: ...r similar in appearance to the Windows Registry Editor The standard registry roots are represented you can add keys beneath a root to point to existing registry keys or you can add your own keys Value...

Page 61: ...WP 2000 CE7 Series WinCE7 Based User Manual v 1 0 4 Page 61 3 8 ISQLW35 The ISQLW35 is a Windows Embedded Compact 7 functionality that implements SQL Server Compact 3 5 Query...

Page 62: ...WP 2000 CE7 Series WinCE7 Based User Manual v 1 0 4 Page 62 3 9 INotepad The INotepad is a common text only editor The resulting files have no format tags or styles...

Page 63: ...s are installed on your system Development Tools WP 2000 CE7 series modules are Windows CE based units Windows CE is a mature embedded operating system which supports rapid development The table below...

Page 64: ...T Compact Framework which uses public Internet standards to enable integration with new and existing applications running on any platform Supported languages include Visual C Visual C and Visual Basic...

Page 65: ...file The installation program for the latest version of the WinPAC Platform SDKs can be obtained from https www icpdas com en download show php num 2409 File name PlatformSDK zip Step 2 Unzip the arc...

Page 66: ...then select the AM335x_WINCE7_SDK ARMv4I Include files at Platform and Show directories for item Step 5 Add the path VCInstallDir ce7 include and VCInstallDir ce7 atlmfc include and then click the OK...

Page 67: ...eate a demo program with VB NET that includes the following main steps 1 Create a new project 2 Specify the path of the PAC reference 3 Add the control to the form 4 Add the event handling for the con...

Page 68: ...a New Project 4 3 1 The Visual VB net project template is a composite control that you use in this example creates a new project with this user control Step 1 Run the Visual Studio 2008 Visual Studio...

Page 69: ...ane click Smart Device Step 5 Type a name in the Name field and then click OK Here we will enter the name SDKInformation and a different location for the project if you wish Tips Warnings The WCE7 onl...

Page 70: ...anual v 1 0 4 Page 70 Step 6 In the Target platform item choose Windows CE Step 7 in the NET Compact Formwork version item choose NET Compact Framework Version 3 5 Step 8 in the Templates pane choose...

Page 71: ...t s compatible with Visual C Visual Basic net and C In order to use a component in your application you must first add a reference to it Step1 Get the PACNET dll and copy it to the project folder The...

Page 72: ...WP 2000 CE7 Series WinCE7 Based User Manual v 1 0 4 Page 72 Step 2 In Solution Explorer right click the References node and then click Add Reference...

Page 73: ...WP 2000 CE7 Series WinCE7 Based User Manual v 1 0 4 Page 73 Step 3 Select Browse tab and add the PACNET dll...

Page 74: ...are convenient to move around on the form into a precise location After you add a control to your form you can use the Properties window to set its properties such as background color and default text...

Page 75: ...Series WinCE7 Based User Manual v 1 0 4 Page 75 Step 2 Right click the Button control and then click Properties Step 3 In the Properties window type Check the SDK version and press ENTER to set the Te...

Page 76: ...our application and are at the point when you can start adding some code to provide the program s functionality Step 1 Double click the button on the form Step 2 Inserting the following code Dim data...

Page 77: ...d User Manual v 1 0 4 Page 77 Upload the Application to WinPAC 4 3 5 WinPAC supports FTP server service You can upload files to WinPAC or download files from a public FTP server Step 1 On the Build me...

Page 78: ...Upload the SDKInformation exe application and the corresponding PACSDK dll and PACNET dll files to WinPAC Tips Warnings For applications programming in C and VB net with net compact framework when exe...

Page 79: ...WP 2000 CE7 Series WinCE7 Based User Manual v 1 0 4 Page 79 Execute the Application on WinPAC 4 3 6 After uploading the application to WinPAC you can just double click it on WinPAC to execute it...

Page 80: ...monstrates how to create a demo program running on WinPAC with C To create a demo program with C that includes the following main steps 1 Create a new project 2 Specify the path of the PAC reference 3...

Page 81: ...Create a New Project 4 4 1 The C project template is a composite control that you use in this example creates a new project with this user control Step 1 Run the Visual Studio 2008 Visual Studio 2008...

Page 82: ...n the Project types pane expand Visual C and then click Smart Device Step 4 In the Templates pane click Smart Device Step 5 Type a name in the Name field and then click OK Here we will enter the name...

Page 83: ...pact Formwork version item choose NET Compact Framework Version 3 5 Step 8 in the Templates pane choose Device Application and then click Next Tips Warnings The WCE7 only support NET Compact Framework...

Page 84: ...ble with Visual C Visual Basic net and C In order to use a component in your application you must first add a reference to it Step1 Get the PACNET dll and copy it to the project folder The PACNET dll...

Page 85: ...WP 2000 CE7 Series WinCE7 Based User Manual v 1 0 4 Page 85 Step 2 In Solution Explorer right click the References node and then click Add Reference...

Page 86: ...WP 2000 CE7 Series WinCE7 Based User Manual v 1 0 4 Page 86 Step 3 Select Browse tab and add the PACNET dll...

Page 87: ...are convenient to move around on the form into a precise location After you add a control to your form you can use the Properties window to set its properties such as background color and default text...

Page 88: ...Series WinCE7 Based User Manual v 1 0 4 Page 88 Step 2 Right click the Button control and then click Properties Step 3 In the Properties window type Check the SDK version and press ENTER to set the Te...

Page 89: ...inished the design stage of your application and are at the point when you can start adding some code to provide the program s functionality Step 1 Double click the button on the form Step 2 Inserting...

Page 90: ...d User Manual v 1 0 4 Page 90 Upload the Application to WinPAC 4 4 5 WinPAC supports FTP server service You can upload files to WinPAC or download files from a public FTP server Step 1 On the Build me...

Page 91: ...Upload the SDKInformation exe application and the corresponding PACSDK dll and PACNET dll files to WinPAC Tips Warnings For applications programming in C and VB net with net compact framework when exe...

Page 92: ...WP 2000 CE7 Series WinCE7 Based User Manual v 1 0 4 Page 92 Execute the Application on WinPAC 4 4 6 After uploading the application to WinPAC you can just double click it on WinPAC to execute it...

Page 93: ...rence 4 Add the control to the form 5 Add the event handling for the control 6 Upload the application to WinPAC 7 Execute the application on WinPAC All main steps will be described in the following su...

Page 94: ...ate a New Project 4 5 1 The Visual C project template is a composite control that you use in this example creates a new project with this user control Step 1 Run the Visual Studio 2008 Visual Studio 2...

Page 95: ...oject types pane expand Visual C and then click Smart Device Step 4 In the Templates pane click MFC Smart Device Application Step 5 Type a name in the Name field and then click OK Here we will enter t...

Page 96: ...7 Series WinCE7 Based User Manual v 1 0 4 Page 96 Step 6 On the first page of the wizard click Next Step 7 On the next page of the wizard select AM335x_WINCE7_SDK to be added to the project and then c...

Page 97: ...WP 2000 CE7 Series WinCE7 Based User Manual v 1 0 4 Page 97 Step 8 On the next page of the wizard select Dialog based and then click next Step 9 On the next page of the wizard click next...

Page 98: ...WP 2000 CE7 Series WinCE7 Based User Manual v 1 0 4 Page 98 Step 10 On the next page of the wizard click next Step 11 On the next page of the wizard click Finish...

Page 99: ...u must configure the Platform to indicate what platform and device you intend to download the application to Before you deploy your project check the platform On the Debug configuration toolbar select...

Page 100: ...PACSDK library and header files 4 5 3 The PAC SDK provides the PACSDK library and header files with WP 2000 CE7 It s compatible with C In order to use a component in your application you must first ad...

Page 101: ...E7 Series WinCE7 Based User Manual v 1 0 4 Page 101 Step 2 In left pane expand Configuration Properties and then click Link Step 3 In the right pane choose the PACSDK_CE lib in the Additional Dependen...

Page 102: ...v 1 0 4 Page 102 Step 4 In the right pane choose the following path in the Additional Include Directories item C Program Files Windows CE Tools SDKs N2000_WINCE7_SDK Include X86 C Program Files Micros...

Page 103: ...trol to your form you can use the Properties window to set its properties such as background color and default text The values that you specify in the Properties window are the initial values that wil...

Page 104: ...WP 2000 CE7 Series WinCE7 Based User Manual v 1 0 4 Page 104 Step 3 From the Toolbox drag a Button control onto the form Step 4 Right click the Button control and then click Properties...

Page 105: ...WP 2000 CE7 Series WinCE7 Based User Manual v 1 0 4 Page 105 Step 5 In the Properties window type Check the SDK version and press ENTER to set the Text property...

Page 106: ...esign stage of your application and are at the point when you can start adding some code to provide the program s functionality Step 1 Double click the button on the form Step 2 Inserting the followin...

Page 107: ...WP 2000 CE7 Series WinCE7 Based User Manual v 1 0 4 Page 107 Step 3 Inserting the following code into the header area include PACSDK h...

Page 108: ...d User Manual v 1 0 4 Page 108 Upload the Application to WinPAC 4 5 6 WinPAC supports FTP server service You can upload files to WinPAC or download files from a public FTP server Step 1 On the Build m...

Page 109: ...WP 2000 CE7 Series WinCE7 Based User Manual v 1 0 4 Page 109 Step 2 Open the browser and type the IP address of WinPAC Step 3 Upload the SDKInformation exe application to WinPAC...

Page 110: ...WP 2000 CE7 Series WinCE7 Based User Manual v 1 0 4 Page 110 Execute the Application on WinPAC 4 5 7 After uploading the application to WinPAC you can just double click it on WinPAC to execute it...

Page 111: ...rovides a set of demo programs in different programming languages You can examine the sample codes which includes numerous comments to familiarize yourself with the PAC APIs This will allow developing...

Page 112: ...E7 Series WinCE7 Based User Manual v 1 0 4 Page 112 5 1 PAC Standard APIs The diagram below shows the set of each system operation API provided in the PACSDK Watchdog UART Registry Buzzer LED System O...

Page 113: ...eInformation DeviceInformation Retrieves information about the OS version CPU version SDK version etc GetRotaryID GetRotaryID Retrieves information about the status of the rotary switch Memory Memory...

Page 114: ...DeviceInformation Retrieves information about the OS version CPU version SDK version etc GetRotaryID GetRotaryID Retrieves information about the status of the rotary switch Memory Memory Shows how to...

Page 115: ...buzzer Shows how to make a simple buzzer beep DeviceInformation DeviceInformation Retrieves information about the OS version CPU version SDK version etc GetRotaryID GetRotaryID Retrieves information a...

Page 116: ...WP 2000 CE7 Series WinCE7 Based User Manual v 1 0 4 Page 116 5 2 PAC IO APIs PAC_IO...

Page 117: ...e latest version from ICP DAS web site For VB NET applications these demo programs can be obtained from https www icpdas com en download show php num 2409 File name Standard_PAC_demo_Am335x_WinCE7 zip...

Page 118: ...lications these demo programs can be obtained from https www icpdas com en download show php num 2409 File name Standard_PAC_demo_Am335x_WinCE7 zip Folder Demo Explanation XVBoard XV107 ModbusRTU_Mast...

Page 119: ...est version from ICP DAS web site For Visual C applications these demo programs can be obtained from https www icpdas com en download show php num 2409 File name Standard_PAC_demo_Am335x_WinCE7 zip Fo...

Page 120: ...O Module XV Board There are more than 8 XV Board available for expanding the function of the WP 2000 CE7 The following table shows the appropriate SDK library to be used for I O modules Module Native...

Page 121: ...7000 series I O modules and its demos please refer to https www icpdas com en download show php num 2409 File name Standard_PAC_demo_Am335x_WinCE7 zip M 7000 series I O modules Module Native SDK NET...

Page 122: ...KE4 8 MTCP and support the Modbus TCP communication protocol Module Native SDK NET CF SDK ET 7000 Modbus Demo Modbus Demo I 8KE4 8 MTCP Modbus Demo Modbus Demo For more detailed information about ET 7...

Page 123: ...DKs ICP DAS will continue to add additional features to WinPAC SDK and OS in the future so we advise you to periodically check the ICP DAS web site for the latest updates Both the files of OS updates...

Page 124: ...image can be found by downloading the latest version from ICP DAS web site There are two ways to update the OS 1 Update from eshell Please refer to section 7 1 1 We recommend that you use this one for...

Page 125: ...e file and then unzip it The latest version of the installation package file can be found from ICP DAS web site http ftp icpdas com pub cd winpac_am335x wp 2241 os_image update_from_eshell_o r_micro_s...

Page 126: ...be found by downloading the latest version from ICP DAS web site http ftp icpdas com pub cd winpac_am335x wp 2241 pc_tools eshell Step 5 Select the device which you want to update the OS image and the...

Page 127: ...rocedure is completed the Warning dialog box will appear as below shown then turn the rotary switch in position 0 normal mode Step 8 Click the OK button Step 9 Check the OS version Start the PAC Utili...

Page 128: ...0 CE7 failure Step 1 Get the latest version of the installation package file then unzip the file and then copy them to microSD card The latest version of the installation package file can be found fro...

Page 129: ...0 CE7 Step 5 Wait a few minutes for the following desktop to be displayed Step 6 Turn the rotary switch in position 0 normal mode Step 7 Reboot the WP 2000 CE7 Step 8 Check the OS version Start the PA...

Page 130: ...vide additional and more efficient features and functionality for WP 2000 CE7 operating system The updates files of SDK files can be found by downloading the latest version from ICP DAS web site https...

Page 131: ...ion of the PACNET dll The latest version of the PACNET dll can be obtained from ICP DAS web site http ftp icpdas com pub cd winpac_am335x wp 2241 sdk pacnet Step 2 Copy the PACNET dll file to PC and W...

Page 132: ...m http ftp icpdas com pub cd winpac_am335x wp 2241 sdk pacsdk Step 2 Copy the latest version of header files and libraries to Host PC The header files are located at C Program Files Windows CE Tools S...

Page 133: ...WP 2000 CE7 Series WinCE7 Based User Manual v 1 0 4 Page 133 Appendix A Tips How to...

Page 134: ...stalled correctly For more information on how to install the WP 2000 CE7 SDK please refer to 4 2 Installing WP 2000 CE7 SDK Step 1 Copy the following files to the System_Disk icpdas system on the WP 2...

Page 135: ...User Manual v 1 0 4 Page 135 Step 3 On the Tools menu click the Options Step 4 In the left pane expand Device Tools node and select Devices Step 5 In the Show devices for platform select AM335x_WINCE...

Page 136: ...WP 2000 CE7 Series WinCE7 Based User Manual v 1 0 4 Page 136 Step 6 Click the Configure Step 7 Select the Use specific IP address and then type the IP address of WP 2000 CE7...

Page 137: ...WP 2000 CE7 Series WinCE7 Based User Manual v 1 0 4 Page 137 Step 8 Click the OK and then click OK to end the dialog...

Page 138: ...er Manual v 1 0 4 Page 138 Step 9 On the Tools menu click the Connect to Device Step 10 Wait for the connection to be established Tips Warnings If the connection fails as shown below please repeat the...

Page 139: ...Synchronize WinPAC Clock You can synchronize your WinPAC clock with an Internet time server If synchronization is enabled the WinPAC clock is synchronized with an Internet time server Step 1 Double c...

Page 140: ...r a value in the Autoupdate Frequency field Step 4 Check the Automatically synchronize with an internet time server check box Step 5 On the File menu click Save and Reboot Step 6 The WinPAC will autom...

Page 141: ...WP 2000 CE7 Series WinCE7 Based User Manual v 1 0 4 Page 141 A 3 How to use User Account Control in WinPAC...

Page 142: ...1 How to Create an User Account Here are step by step instructions on how to add a user account Step 1 Double click the PAC Utility on the desktop Step 2 On the Login tab of the Network tab click Log...

Page 143: ...WinCE7 Based User Manual v 1 0 4 Page 143 Step 3 The user has been added to the allowed under the remote login and included in the following list Step 4 On the File menu click Save and Reboot for chan...

Page 144: ...A 3 2 How to Use Telnet to remote login the WinPAC from PC Here are step by step instructions on how to use telnet to remote login the WinPAC from PC Step 1 On the PC open a MS DOS command prompt Step...

Page 145: ...WP 2000 CE7 Series WinCE7 Based User Manual v 1 0 4 Page 145 Step 3 The connection has been set up and then type the name and password Step 4 The remote login has been completed...

Page 146: ...t Here are step by step instructions on how to remote the user from the login list Step 1 Click a user from the list which you want to remove and the user will display in the field and then press Dele...

Page 147: ...installed in the WinPAC CPU board Checking the current battery power 1 Run the PAC utility and check the Battery 1 fields that display the current status Refer to Section 3 1 PAC utility General for...

Page 148: ...vice 2 Remove the CPU board 3 Remove the battery that is running low on power from the battery holder in CPU board 4 Insert a new battery 5 Set the RTC time Ordering information Battery type BR1632 Pa...

Page 149: ...v 1 0 4 Page 149 A 5 How to Using the Practical Functions of the 3G 4G I O Module The Mobile network module of WinPAC series Except for WP 2241M CE7 that use the 3G 4G network to implement SMS and GP...

Page 150: ...nstalling the SIM card please cancel the PIN lock function of SIM card otherwise you will not be able to dial the Internet The demos can be found by downloading the latest version from ICP DAS web sit...

Page 151: ...cpdas com pub cd winpac_am335x wp 2241 demo 3g_modem 3g_modem_sms_demo gs m_lib_manual_v1 0 1 pdf The demos can be found by downloading the latest version from ICP DAS web site http ftp icpdas com pub...

Page 152: ...he latest version from ICP DAS web site http ftp icpdas com pub cd winpac_am335x wp 2241 demo 3g_modem gpstimesynchronization The description of the demo can be found by downloading the latest version...

Page 153: ...07 8 Wet Source 8 Sink XV107A Sink Source XV110 16 Dry Wet Sink Source XV111 16 Sink XV111A Source Relay Output Expansion Model DI Relay Output Channel Type Sink Source Channel Type XV116 5 Wet Sink S...

Page 154: ...revision history Revision Date Description 1 0 1 December 2018 Initial issue 1 0 2 June 2019 Changed the specifications of FRAM and COM3 in section 1 2 Specification 1 0 3 August 2019 Changed the XV b...

Reviews: