background image


Quick Start Guide for WISE-7xxx Series Module Version 1.3


WI

SE

-7

xxx

 Qu

ick

 S

tar

t G

ui

de


2


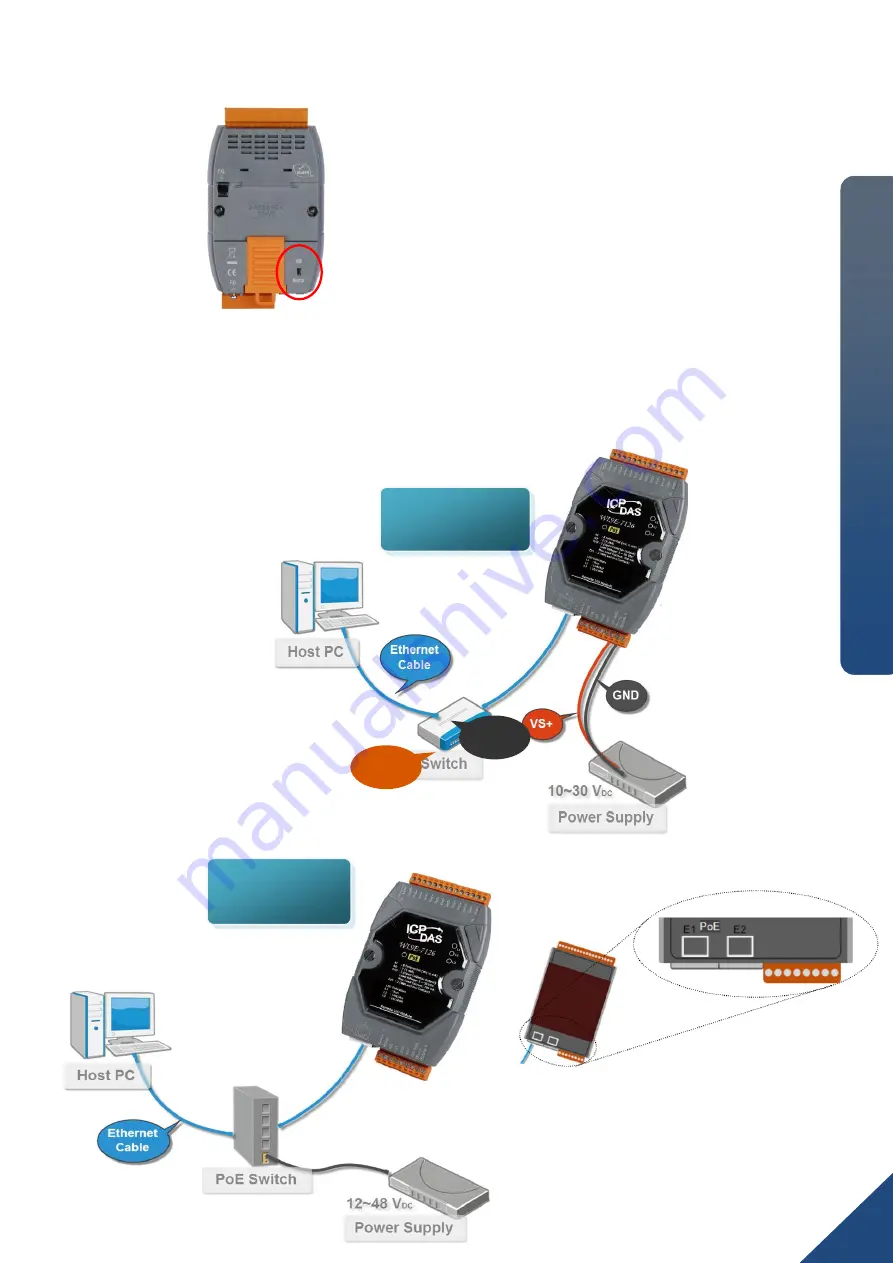
Make sure the switch is in the 
“Normal” position. (except WISE-75xxM) 


---------------------------------------------------------------------------------- 

Connect to Network, PC and Power 

  Connect to Ethernet hub/switch and PC via the RJ-45 Ethernet port. 


-------------------------------------------- 

Configure Boot Mode 

Non-PoE 

GND 

+Vs 

PoE 

WISE-72xx / WISE-75xxM 

support POE only on E1 

port. 

Summary of Contents for WISE-7 Series

Page 1: ...lease refer to the full user manual on the CD included in this package In addition to this guide the package includes the following items WISE 71xx WISE 790x Series Module WISE 72xx Series Module WISE 75xxM Series Module Software Utility CD WISE 71xx WISE 72xx User Manual CD WISE 71xx document User Manual ftp ftp icpdas com pub cd wise_cd wise 71xx document user manual WISE 75xxM User Manual CD WI...

Page 2: ...ick Start Guide 2 Make sure the switch is in the Normal position except WISE 75xxM 2 Connect to Network PC and Power Connect to Ethernet hub switch and PC via the RJ 45 Ethernet port 1 Configure Boot Mode Non PoE GND Vs PoE WISE 72xx WISE 75xxM support POE only on E1 port ...

Page 3: ...MiniOS7 Utility tool The MiniSO7 Utility can be obtained from companion CD or our FTP site CD Tools MiniOS7_Utility ftp ftp icpdas com pub cd wise_cd tools minios7 utility Step 2 Follow the prompts to complete the installation After the installation has been completed a new short cut for MiniOS7 Utility will appear on the desktop ...

Page 4: ...fault IP Address 192 168 255 1 Subnet Mask 255 255 0 0 Gateway 192 168 0 1 Step 1 Run MiniOS7 Utility Double click the MiniOS7 Utility shortcut on your desktop Step 2 Press F12 or click Search from the Connection menu Press F12 or click Search from the Connection menu a MiniOS7 Scan dialog will appear and will display all the MiniOS7 modules that are currently connected to your network The Search ...

Page 5: ...dule name and then click IP setting from the toolbar Select the module name from the list of the fields and then click IP setting from the toolbar Step 4 Assign a new IP address and then click Set button Step 5 Click Yes button After completing the settings click the Yes button to save and exit the procedure ...

Page 6: ... a browser recommended internet browsers Mozilla Firefox or Internet Explorer Step 2 Type in the URL address of the WISE 7xxx Make sure the IP address assigned is accurate please refer to section 4 Assign a New IP by MiniOS7 Utility Type in the URL address of the WISE 7xxx module in the address bar Step 3 Get on the WISE 7xxx web site Get on the WISE 7xxx web site Implement the control logic confi...

Page 7: ...Alias of the WISE module Ethernet setting of the WISE module the analog input output range or the downloading password in the Basic Setting page as needed Step 5 Edit Advanced Settings Edit channel attribute internal register Timer Email CGI commands Recipe and P2P configuration settings in the Advanced Setting page as needed ...

Page 8: ...dit Rule Settings Edit your IF THEN ELSE rules in the Rules Setting page Step 7 Download to Module After finishing rules setting download the rules to the WISE module The WISE module will reboot and execute the rules automatically Step 8 For more detail information please refer to WISE User Manual ...

Reviews: