


Technical support:
VPD-173N/173N-64
Quick Start
v1.1, Jan. 2019
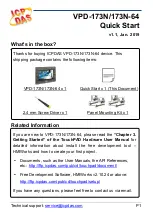
What’s in the box?
Related Information
Thanks for buying ICPDAS VPD-173N/173N-64 device. This
shipping package contains the following items:
VPD-173N/173N-64 x 1
Quick Start x 1 (This Document)
2.4 mm Screw Driver x 1
Panel Mounting Kit x 1
If you are new to VPD-173N/173N-64, please read the
“Chapter 3.
Getting Started”
of the TouchPAD Hardware User Manual
for
detailed information about install the free development tool
–
HMIWorks and how to create your first project.
Documents, such as the User Manuals, the API References,
etc.:
http://ftp.icpdas.com/pub/cd/touchpad/document/
Free Development Software, HMIWorks v2.10.24 or above:
http://ftp.icpdas.com/pub/cd/touchpad/setup/
If you have any questions, please feel free to contact us via email.


