background image


14 


Can be separated from the counting messages by looking to the “detection type” fie

l

d of the message (see 

12.5 Detection 

types

).


Are available only for incoming targets (targets that are approaching the detector when they are measured). 


Should not be considered for the counting application of the TMA-3B3 as they will be followed by a standard counting message 
corresponding to the same target (immediately, or a few seconds after the fast message). 


Are disactivated by default. 

11.2.5.2.2


Activation of the ITC messages 

To activate the ITC messages, it is necessary to set the fixed message delay (parameter 298) to a value different from 0, typically 2500 
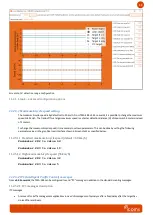
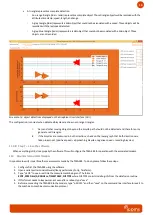
ms. Those values can be set in the graphical user interface shown in Screenshot 2 as specified below: 

Parameter 298 to value 2500 

To deactivate the ITC messages, set parameter 298 to 0: 

Parameter 298 to value 0 

11.2.5.3


Dry contact relay 

11.2.5.3.1


Description 

When switching on the relay feature, the internal relay is activated every time a bicycle is detected. 


The relay can be either linked 

to counting events or to “

ITC

” events (fast counting in the incoming direction

, see section 

11.2.5.2). 


When the relay is linked to counting events: 

o


One click of the relay per bicycle counted (one click = temporary closure of the 

NO

 output). 

o


This click occurs when the target is validated by the TMA-3B3. This validation takes place when the target leaves 
the radar detection zone (which extends approximately from the installation point up to ~ 8 m from it). Compared 
to the cut-off point of the laser beam, approaching targets will therefore be taken into account more quickly than 
receding targets. If the radar detection is not validated, the validation of the target seen by the laser is done after a 
timeout of 9 seconds.


When the relay is linked to 

ITC

” events:


o


One click of the relay per approaching bicycle detected by the TMA-3B3 (one click = temporary closure of the 

NO


output). 

o


This click occurs when the target is validated by the TMA-3B3. 


A minimum duration of 100 ms (configurable) during which the state of the relay does not change, is guaranteed for both 
"active" and "inactive" times. 


If more targets are detected than the relay can output given the time constraint described above, they are added to a queue 
until they can be issued to the relay. 


The size of this queue is fixed at 10 (configurable, parameter 041). If the queue size grows beyond the maximum size, 
corresponding targets will be ignored (to allow limitation of the detection rate and as protection against possible abnormal 
situations). 


The relay will not be energized in the inactive state (for consumption reasons) but can be configured in positive security if 
desired. 


The relay will make a click at start-up (to be able to easily check its operation). All other clicks will take place for counting only. 

11.2.5.3.2


Parameter settings 

To change the relay parameter settings, use the following parameter settings: 


Relay maximum buffer size (parameter 41)  

o


Maximum number of events queued in the buffer. If more events happen than can be transmitted or queued, they 
the exceeding detection messages are ignored. 

o


Default = 10 

Summary of Contents for TMA 3B3

Page 1: ...ction precision in function of the installation height offset and width of bicycle path 7 10 ADDITIONAL CABINET 10 10 1 Functional description 10 10 2 Setup 10 11 RADAR SETTINGS 11 11 1 Communication 11 11 2 Configuration of the radar using the IcomSoft TMA 3B3 11 11 2 1 Tabs 11 11 2 2 Step 1 serial communication 12 11 2 3 Step 2 background configuration 12 11 2 4 Step 3 range and speed configurat...

Page 2: ...3 The manufacturer 24 2 FIGURES Figure 1 content of the delivery 4 Figure 2 identification label 4 Figure 3 TMA 3B3 LV radar connector Weipu SP1712 P9 6 Figure 4 installation general overview 7 Figure 5 installation side view 7 Figure 6 detection precision in function of offset O and width of bicycle path W for an installation height H of 2 m 8 Figure 7 detection precision in function of offset O ...

Page 3: ...nshot 1 setting the background range 12 Screenshot 2 detection range configuration 13 Screenshot 3 object detections displayed on the Graphical User Interface GUI 16 Figure 15 vandal proof additional housing front view 19 Figure 16 vandal proof additional housing vertical angle adjustment screws 19 ...

Page 4: ...sts of a serial interface The unit can be delivered with a solar panel and with an additional cabinet containing a battery a modem and a solar regulator 4 PRODUCT DESCRIPTION 4 1 DELIVERY Figure 1 content of the delivery 4 2 LABELSLOCATION 4 2 1 Identification label 4 2 2 Radar serial number Figure 2 identification label A Do not remove the labels B D E C F G ...

Page 5: ... of both radar and bracket are firmly tightened The radar needs to point to the region of interest for proper detection Ensure the radar is configured properly 6 THEORY OF OPERATION 1 Unpack the unit and check the following items are in the box please refer to Figure 1 p 4 A Radar lidar with rear side connectors and mounting bracket B Additional cabinet with solar regulator and modem C USB AB cabl...

Page 6: ...bloc of measurements with the same time stamp corresponds to the case where a target stopped for some time in the laser beam Currently this is not filtered out and generate a long target that is then sliced in so many bicycles The sensor measures both directions If the bicycle path is one direction install the radar in the way it detects the approaching direction Max measurement distance of the se...

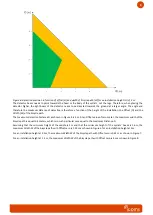
Page 7: ...ALLATIONHEIGHT OFFSETANDWIDTHOFBICYCLEPATH The higher the radar is installed the larger vertical angle of the radar to detect the cyclists and therefore the smaller the detection Distance D Figure 6 shows in green the possible combinations of Offsets and Width at installation height of 2 m for a high degree of precision 97 or more The orange area shows the combinations of Offsets and Width for whi...

Page 8: ...le path The maximum detection Distance D as shown in Figure 4 is 4 m At an Offset value of zero meter the maximum width of the bicycle path is equal to 4 meters which is in such particular case equal to the maximum Distance D Assuming that the minimum height of the saddle is 1m and that the minimum height of the cyclists heads is 1 6m the maximum Width W of the bicycle path with Offset zero is 1 2...

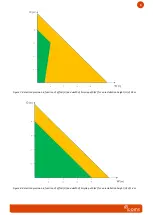
Page 9: ...n precision in function of offset O and width of bicycle path W for an installation height H of 2 5 m Figure 8 detection precision in function of offset O and width of bicycle path W for an installation height H of 1 4 m ...

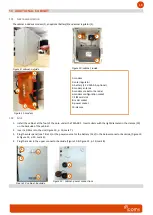
Page 10: ...t 9 power socket 10 clamps 10 2 SETUP 1 Install the cabinet at the foot of the pole under the TMA 3B3 Insert collars with the right diameter in the clamps 10 on the backside of the cabinet 2 Insert a SIM card in the slot Figure 10 p 10 mark 7 3 Plug the solar panel see Title 11 or the power source for the battery 12 V in the below connector backside Figure 10 Figure 12 p 10 mark 9 4 Plug the radar...

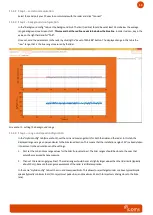
Page 11: ... It will open a DOS window and will take some time to launch the Graphical User Interface GUI please be patient while the software starts up Figure 14 IcomSoft TMA 3B3 GUI when first opened 11 2 1 Tabs There are two tabs The Background config tab used to configure the background of the lidar This tab shows the raw range the true range measured by the lidar The limit must be fixed to reject objects...

Page 12: ... the Hybrid config tab Screenshot 2 set the min and max range limits for both the lidar and the radar In this tab the displayed ranges are given perpendicular to the bike lane direction This means that the installation angle of 45 is already taken into account in the calculations and the settings 1 First set the min and max range values for the lidar turquoise lines The lidar ranges should be clos...

Page 13: ...setting the following parameter values in the graphical user interface shown in Screenshot 2 as specified below 11 2 5 1 1 Standard maximum bicycle speed default 40 km h Parameter 282 to value 64 Parameter 283 to value 10 11 2 5 1 2 High maximum bicycle speed 55 km h Parameter 282 to value 32 Parameter 283 to value 5 11 2 5 2 ITC Intelligent Traffic Control messages From v2 2 3 onwards the TMA 3B3...

Page 14: ...tallation point up to 8 m from it Compared to the cut off point of the laser beam approaching targets will therefore be taken into account more quickly than receding targets If the radar detection is not validated the validation of the target seen by the laser is done after a timeout of 9 seconds When the relay is linked to ITC events o One click of the relay per approaching bicycle detected by th...

Page 15: ... relay when inactive no detection 1 energized relay when inactive no detection o Default 0 non energized when no detection 11 2 6 Step 5 save the settings Once the limits are set send them to the radar by clicking the Save to TMA 3B3 button 11 2 7 Step 6 check the detections Check that the measured radar and lidar objects are properly validated brown of rejected red Laser object are represented by...

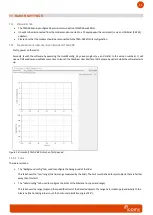
Page 16: ... in both directions check on the lower graph that both directions are taken in account positive speed approaching bicycles negative speed receding bicycles 11 2 8 Step 7 close the software When everything is OK close properly the software This will configure the TMA 3B3 for operation with the associated modem 11 3 REAL TIMEDATAONHYPERTERMINAL It is possible to verify in real time the measurements ...

Page 17: ...ry 0x20 BCD 16 Year 0x00 0x99 BCD Notes The given timestamp is the validation time of the laser detection if available that is 80 ms after the target has finished crossing the laser beam for the default configuration of the device BCD means binary coded decimal Ex decimal 42 is encoded as 0x42 decimal 66 The vehicle counter is reset at each detector reset and loops over itself in case of overflow ...

Page 18: ...ages immediately or after a few seconds 13 MODEM CONFIGURATION The modem has settings stored locally Those settings can be modified by changing the setup ini file accessible via the USB connection to the modem Logs file are stored as well on the modem and can be accessed in the same way as the setup ini file Please note that the PIN of the SIM card is supposed to be 0000 when the modem is first in...

Page 19: ...G A vandal proof additional housing is available as an option Figure 15 vandal proof additional housing front view Figure 16 vandal proof additional housing vertical angle adjustment screws Please ask your reseller for more information ...

Page 20: ...15 SOLAR PANEL 1 Cut the tie wraps to untie the 2 supporting slats and the accessories 2 Fasten the 2 supporting slats with the provided mounting angles nuts Pay attention right and left lats are different ...

Page 21: ...ole bracket on the pole and hang the upper part of the solar panel on the bracket 4 Fasten the slats on the lower part of the pole bracket with the provided nuts 5 Fasten the central screw on the upper part with the nut ...

Page 22: ...22 Please first switch the battery on before connecting the solar panel ...

Page 23: ...p is faulty If the modem could not synchronise immediately with its NTP server the measurements can have a faulty timestamp 17 TECHNICAL FEATURES 17 1 TMA 3B3 Protection level IP 65 Power supply 12 16V DC Power consumption 1 6 W excl modem 130 mA 12V DC 20 C User output RS 232 Temperature range 20 C to 60 C Dimensions 68 x 99 x 150 mm Weight Sensor 475 g Mounting bracket 435 g Wiring connectors We...

Page 24: ...nappropriate packaging abnormal working conditions failure to follow Icoms Detections instructions whether oral or in writing misuse improper installation alteration or repair without Icoms Detections approval 19 FURTHER INFORMATION 19 1 LEGALNOTIFICATION Hereby Icoms Detections declares that the TMA range is in compliance with the requirements and other relevant provisions of Directive 2014 53 EC...

Reviews: