

RoIP GATEWAY
Converter mode guide
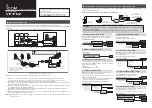
VE-PG2
This guide describes the Converter mode, and includes a
connection example.
When you use only the [TRX1] port, you can easily setup
the VE-PG2 using the easy configuration wizard.
Read “
PRECAUTIONS
” first, if you have not read it.
‘
About Converter mode
If you communicate between the IP telephone and the transceiver, set the VE-PG2 to the Converter mode.
When you use the VE-PG2 in the Converter mode, an IP router (a third party product, either a SIP server or an IP-PBX) is
required.
Set the extension numbers of the VE-PG2’s [TRX1], [TRX2] and [TRX3] into the IP router.
In the office
In the shop
HUB
1
2
3
4
5
STAFF
Figure 1: Converter mode example
VE-PG2
192.168.0.2
IP telephone
HUB
1 2 3 4 5
IP router
192.168.0.3
Extension number: 301
If the channel for transceiver 2
and transceiver 3 is set to CH2,
the transceivers can communicate
with the IP telephone.
Icom transceiver
Channel: CH2
Transceiver 1
Transceiver 2 Transceiver 3
OPC-2073
[TRX1]
Channel: CH2
Transceiver A
[LAN]
Transmission from transceiver 1 to the IP telephone.
Transmission from the IP telephone to transceiver 1.
Figure 2: Example of the Converter mode operation
Example of the Converter mode operation: Calling the IP telephone from transceiver 1.
q
Set transceiver 1’s channel to CH2, hold down [PTT], and speak into the microphone at your normal voice level.
• If you set transceiver 2 and transceiver 3’s channel to CH2, transceiver 1 can also be heard on transceiver 2 and transceiver 3.
w
When transceiver A receives a call from transceiver 1, it sends the voice signal to the VE-PG2.
The VE-PG2 converts the voice signal to an RoIP signal, then transmits it from the [LAN] port to the IP router through the
IP network, and the IP telephone rings.
e
The person called takes the IP telephone off the hook, and speaks into the telephone at their normal voice level. Their
voice signal is sent to the IP router and the VE-PG2.
The VE-PG2 converts the RoIP signal to the voice signal, then transceiver A receives it and transmits it on channel 2.
Transceiver 1 receives the signal from transceiver A.
r
When the IP telephone handset is put on the hook, or no audio is received from transceiver 1 or the IP telephone for 15
seconds, the communication will be disconnected.
[NOTE]
If calling transceiver 1 from the IP telephone, dial extension number “301”, then speak into the telephone at your
normal voice level.
MODE
DC
LAN
TRX1
TRX2
TRX3
IN
+
+
+
OUT
SW
ABC
Figure 3: Converter mode connection example
IP
network
VE-PG2
192.168.0.1
Connect the transceiver to the
VE-PG2’s [TRX1] port.
CAUTION:
To connect the transceivers or repeaters, use only the following cables: OPC-2073 for the transceivers and
OPC-2074 for the repeaters.
Using another cable, like an Ethernet cable, may damage the VE-PG2, transceivers or repeaters.
IP telephone
Extension number: 201
IP router
192.168.0.2
Use ID: 301
Password: 14a399k
Extension number: 301
[TRX1]
This explanation describes how you set the VE-PG2 to the Converter mode using the easy configuration wizard, with a
connection example, shown below.
NOTE:
Connect the transceiver to only the VE-PG2’s [TRX1] port.
‘
Set the VE-PG2 to the Converter mode using the easy configuration wizard
4. “IP Address setting” setting
When “Start the Easy Setup Wizard for Converter mode” is
displayed on the web browser, click “Next>>.”
Enter the VE-PG2’s IP address and subnet mask in “IP
address” and “Subnet mask.”
• Set the default gateway when your VE-PG2 communicates with a
network device which has a different network IP address.
Click “Next>>” after you finish entering the addresses.
Enter the extension number of the transceiver connected to
the VE-PG2’s [TRX1] port.
Click “Next>>” after you finish entering.
5. “IP phone number setting” setting
q
Enter
w
Click
w
Click
Confirm the VE-PG2 setting in “Verify setting,” then click
“Save and Reboot” to save the settings.
• If you want to change the VE-PG2’s setting, click “<<Back.”
8. Confirm the VE-PG2 setting
q
Enter
w
Click
q
Enter
If you want to call the IP telephone from the transceiver,
enter the IP telephone’s extension number.
Click “Next>>” after you finish entering.
7. “Call phone number setting” setting
w
Click
q
Enter
6. “Connection setting” setting
Enter the destination IP address (IP router’s IP address) of
the transceiver connected to the [TRX1] port, the IP router’s
user ID and password.
Click “Next>>” after you finish entering.
3. Set the IP router’s telephone book
Set the extension numbers, and other settings of the IP
telephone and the VE-PG2’s [TRX1] port to the IP router’s
telephone book, as follows:
• IP telephone
: 201
• VE-PG2’s [TRX1] port : 301
q
Confirm
w
Click
Set the VE-PG2’s “Operating mode” to “Converter mode” in
“Operating mode setting,” then click “Save and Reboot.”
1. “Operating mode setting” setting
When you click “Begin wizard,” the VE-PG2 starts the
setting wizard.
2. Start the configuration wizard
q
Select
w
Click
Click


