background image

MANUAL for kg20   kg6   kg6 bAsic

dr

ic

bl

a

sting 

eq
uipm

ent 

fro

m

 icetech


 | 


P

A

ge  

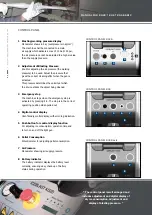
“  The battery indicator displays the  

battery level currently,  

ensuring easy check-up of battery  


status during operation.  ”

2

 battery recharging

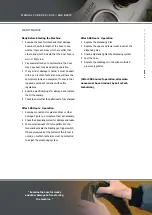
 connect the charger to the plug on the back of the  
 

machine and to 100V/220V. recharging starts auto- 


matically and the indicator turns yellow. the indica- 


tor turns green when the battery is fully recharged.  

 the red diode on the battery charger indicates that  
 

the charger is on.

 unplug the charger from the machine and the  
 

100V/220 supply when the battery is fully charged.

 the machine is ready for use.

 if the effective operating time is considerably re- 
 

duced, even after normal recharge, the battery may  


be worn out. replace it by a new battery.


iMPorTANT!!!


before putting the machine into operation, the  


battery must be charged for 6 hours. after that,  


recharging will normally last approx. 5 hours.  

 the battery indicator on the machine displays the  
 

status of the battery.

bATTerY cHArgiNg

The battery indicator is composed of  diodes:


<25%  red


  25% 

yellow (recharge battery)


  50% 

green


  75% 

green


  100%  green (fully charged)

kg20 + kg6:

the machine stops automatically if the battery  
capacity is below 18%. recharge the battery  
before use.

kg6 basic:

the battery must be recharged immediately if  
the red diode of the battery indicator is on.
the battery should be recharged every 7

th

 day in 

order to maintain optimum battery 

efficiency.

  battery


24 V handy interchangeable battery.

2 battery plug

 on change of battery: unplug the battery plug  
 

and remove the battery to be recharged.  

 insert the new fully charged battery.  
 always check to ensure that the battery plug is  


fixed


correctly.


Summary of Contents for IceBlast KG20

Page 1: ...IceBlast KG6 IceBlast KG20 MANUAL for kg20 kg6 kg6 bAsic Uk Us IceBlast KG20 IceBlast KG6 IceBlast KG6 Basic...

Page 2: ...r pressure 9 MAcHiNe iLLUsTrATioNs 10 Vibrator speed 10 lifting precautions 11 coNTroL PANeL 12 bATTerY cHArgiNg 13 kg20 coNTroL fUNcTioNs 14 bLAsTiNg Hose 15 bLAsTiNg gUN 15 sTArTiNg THe icebLAsT MAc...

Page 3: ...without having to cover adjacent plant cleaning in industry in industrial processes it is often impossible to avoid production apparatus from getting dirty with the consequent impairment of productio...

Page 4: ...ich forces the dry ice through a hose to the blasting gun in the gun the air stream is accelerated and with it the velocity of the dry ice pellets they leave the nozzle of the blasting gun at very hig...

Page 5: ...eTY regULATioNs general this manual contains instructions and safety regula tions which must be followed on starting operating and servicing the dry ice blasting machine it is important that the manua...

Page 6: ...oom where such a risk might be present is well ventilated Note that low co2 concentrations 3 5 result in headaches and rapid breathing co2 concentrations of 7 10 produce headaches and nausea and may l...

Page 7: ...bjects being thrown back Therefore small objects must be firmly secured before blasting and loose objects must not be left in the area where the cleaning process is to take place the operator must alw...

Page 8: ...ger of congelation When using the blasting equipment the operator must wear gloves in order to eliminate the risk of congelation by contact between dry ice and unpro tected skin read the health and sa...

Page 9: ...e and cleaning object static electricity can be generated and create sparking the control cabinet which houses the electrical controls must only be opened when the mains con nection has been cut off t...

Page 10: ...tion kg 15 to 40 lbs 33 to 88 kg20 Dry ice Dispensing dry ice quantity per hour can be adjusted by pressing or kg 16 to 55 lbs 36 to 122 filling up with Dry ice The dry ice tank in the machine must be...

Page 11: ...machine is ready for operation the valve opens for blasting air every time the trigger switch on the blasting gun is activated When the trigger is released the valve cuts off the air stream regulator...

Page 12: ...e is ensured by the use of high quality components throughout DrY ice MAcHiNe 6 When lifting with a forklift the forks must be inserted under the machine frame the cabinet bottom plate must not be loa...

Page 13: ...ure the working pressure to be used adjust the pressure that gives the correct cleaning effect when the gun is activeted this pressure determines the velocity at which the dry ice strikes the object b...

Page 14: ...ce it by a new battery iMPorTANT before putting the machine into operation the battery must be charged for 6 hours after that recharging will normally last approx 5 hours the battery indicator on the...

Page 15: ...T T o T service Volume ice quantity per hour can be adjusted by pressing or kg 16 1 to 55 lbs 35 8 to 122 c o T current operation Time can be reset by pressing r and holding it for approx 10 sec T o...

Page 16: ...onnecting the blasting hose to the ice gun electrical ice gun plug male for electrical socket female on the blasting hose 6 standard 7 mm blasting nozzle interchangeable gun trigger switch Starts stop...

Page 17: ...dry ice for the cleaning process must be applied into the built in dry ice tank this can be done while the machine is in operation it is recommended that the dry ice tank be run empty for each fillin...

Page 18: ...e the system make sure that the emergency stop is in off position when pushed in disconnect the main air supply avoid kinking the blasting hose especially when rolling it up eMergeNcY sToP activation...

Page 19: ...7 plug with earth the control circuit uses 24 V in the off position the emergency switch cuts off voltage to the control circuits but does not make the machine voltage free the machine is only voltage...

Page 20: ...lations 4 examine electrical plugs for damage and replace them if necessary 5 check to ensure that the batteries are fully charged After 00 Hours operation 1 examine connections for wear and tear or o...

Page 21: ...pplied by the manufacturer of the machine may be used in order to comply with the terms of the warranty and for safety reasons repairs other than those stated above require special equipment and there...

Page 22: ...attery is fully charged and correctly connected for more information see page 13 release the emergency button pull outwards and make sure it can turn activate the blasting gun check the machine is pro...

Page 23: ...lly turn into ice and produce more blockages empty the pellet tank and let the vibrator unfreeze or warm it up with hot air make sure that the internal air pressure supplied to the vibrator is at leas...

Page 24: ...sired pressure in the nozzle velocity of the dry ice pellets for guidance on possible combinations Air consumption Table the marked areas in the table indicate the combi nations used for most cleaning...

Page 25: ...e bar 2 6 0 2 6 0 0 2 6 2 2 2 6 2 0 0 6 0 2 0 2 2 0 0 2 2 2 6 2 6 6 2 0 6 2 6 6 0 2 0 6 6 6 0 0 2 0 2 6 6 6 6 0 2 6 Air coNsUMPTioN TAbLe psi 2 02 6 60 20 2 2 2 2 2 2 6 6 2 06 6 2 6 6 60 06 20 66 0 20...

Page 26: ...essed air must be kept clean and free of oil foreign bodies and water Power consumption 110 230 V ac 50 60 hz 24 V handy rechargeable interchangeable battery and battery charger single Hose system Noi...

Page 27: ...ing on nozzle combination compressed Air connection 3 4 claw coupling the compressed air must be kept clean and free of oil foreign bodies and water Power consumption 110 230 V ac 50 60 hz 24 V handy...

Page 28: ...cfm 35 175 depending on nozzle combination compressed Air connection 3 4 claw coupling the compressed air must be kept clean and free of oil foreign bodies and water Power consumption 110 230 V ac 50...

Reviews: