


v
Follow
the
suggested
actions
in
the
order
in
which
they
are
listed
in
the
Action
column
until
the
problem
is
solved.
v
See
to
determine
which
components
are
customer
replaceable
units
(CRU)
and
which
components
are
field
replaceable
units
(FRU).
v
If
an
action
step
is
preceded
by
“(Trained
service
technician
only)”,
that
step
must
be
performed
only
by
a
trained
service
technician.
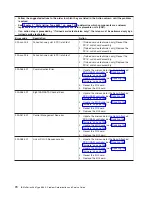
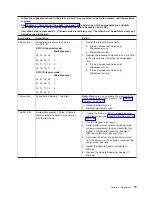
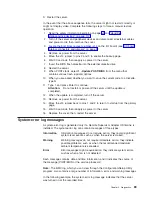
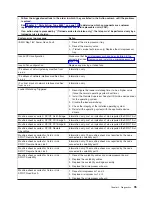
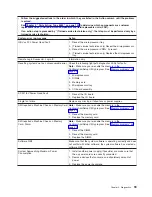
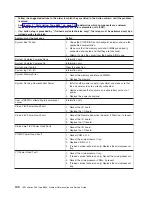
Error
code
Description
Action
305-xxx-xxx
Failed
video
monitor
test.
1.
Reseat
the
following
components:
a.
Monitor
b.
I/O
board
2.
Replace
the
components
listed
in
step
one
at
a
time,
in
the
order
shown,
restarting
the
server
each
time.
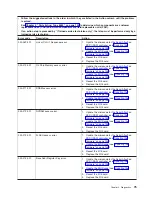
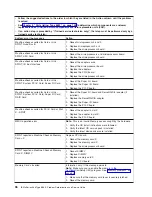
405-xxx-000
Failed
Ethernet
test
on
controller
on
I/O
board.
1.
Make
sure
that
Ethernet
is
not
disabled
in
the
Configuration/Setup
Utility
program
and
that
the
BIOS
code
is
at
the
latest
level.
2.
Run
the
loopback
diagnostic.
3.
Reseat
the
I/O
board.
4.
Replace
the
I/O
board.
405-xxx-00n
No
good
link!
Check
loopback
plug.
1.
Make
sure
that
the
loopback
plug
is
a
gigabit
loopback
plug
(see
2.
Check
for
any
loose
connections
between
the
loopback
plug
and
the
Ethernet
connector.
Recovering
from
a
BIOS
update
failure
If
the
BIOS
code
in
the
server
has
become
damaged,
such
as
from
a
power
failure
during
an
update,
your
server
has
an
advanced
recovery
feature
that
will
automatically
switch
to
a
backup
BIOS
page.
The
flash
memory
of
the
server
consists
of
a
primary
page
and
a
backup
page.
If
the
BIOS
code
in
the
primary
page
is
damaged,
the
onboard
baseboard
management
controller
will
detect
the
error
and
automatically
switch
to
the
backup
page
to
start
the
server.
In
this
event,
a
POST
warning
message
“Booted
from
backup
POST/BIOS
image”
will
be
displayed.
Note:
The
backup
page
version
may
not
be
the
same
version
as
the
primary
image.
You
can
then
recover
or
restore
the
original
primary
page
BIOS
by
using
the
BIOS
flash
diskette.
Note:
To
create
and
use
a
diskette,
you
must
add
an
optional
external
diskette
drive
to
the
server.
To
recover
the
BIOS
code
and
restore
the
server
operation
to
the
primary
bank,
complete
the
following
steps:
1.
Download
the
latest
version
of
the
BIOS
code
from
2.
Update
the
BIOS
code,
following
the
instructions
that
come
with
the
update
file
that
you
downloaded.
This
will
automatically
restore/update
the
primary
page.
88
IBM
xSeries
366
Type
8863:
Problem
Determination
and
Service
Guide
Summary of Contents for xSeries 366
Page 1: ...IBM xSeries 366 Type 8863 Problem Determination and Service Guide...
Page 2: ......
Page 3: ...IBM xSeries 366 Type 8863 Problem Determination and Service Guide...
Page 8: ...vi IBM xSeries 366 Type 8863 Problem Determination and Service Guide...
Page 28: ...12 IBM xSeries 366 Type 8863 Problem Determination and Service Guide...
Page 160: ...144 IBM xSeries 366 Type 8863 Problem Determination and Service Guide...
Page 170: ...154 IBM xSeries 366 Type 8863 Problem Determination and Service Guide...
Page 181: ...V video connector 6 VRM LED 64 W Web site 1 weight 3 World Wide Web 1 Index 165...
Page 182: ...166 IBM xSeries 366 Type 8863 Problem Determination and Service Guide...
Page 183: ......
Page 184: ...Part Number 31R1508 Printed in USA 1P P N 31R1508...


