background image

Contents

Page iii

Contents

Chapter 1: Getting Started With Your WorkPad

Locating Front Panel Controls.............................................................2
Protective Flip Cover ............................................................................3
Locating Back Panel Components ......................................................4
Installing the Batteries ..........................................................................5
Calibrating the Screen...........................................................................6
Setting the Time .....................................................................................8
Setting the Current Date.......................................................................9
Connecting the Cradle ........................................................................10
Installing WorkPad Desktop Software.............................................10

Chapter 2: Working With Your WorkPad

Selecting Applications ........................................................................13
Using the On-Screen Keyboard.........................................................16
Writing With the Stylus......................................................................18
Using Application Controls ...............................................................28
Using Menus ........................................................................................29
Choosing Fonts ....................................................................................33
Using Categories..................................................................................34
Attaching Notes ...................................................................................38
Marking Private Entries .....................................................................38
Beaming Information to Other WorkPads.......................................39

Chapter 3: Finding Information With Your WorkPad

Using the Find Command..................................................................41
Using Phone Lookup ..........................................................................42

Chapter 4: Installing and Removing Applications

Installing Applications .......................................................................45
Installing Games ..................................................................................48
Removing Applications......................................................................48
Removing WorkPad Desktop Software ...........................................49

Chapter 5: Getting Help With Your WorkPad

Displaying Online Tips.......................................................................51
Troubleshooting...................................................................................52
Technical Support, Service and Repair ............................................57

Chapter 6: Maintaining Your WorkPad

Caring for Your WorkPad ..................................................................59

Index

Index......................................................................................................63

Summary of Contents for WorkPad

Page 1: ...Basic Handbook for the IBM WorkPad...

Page 2: ...he Palm Computing Platform logo is a trademark of Palm Computing Inc 3Com Corporation or its subsidiaries The following are registered trade marks of International Business Machines Corporation in the...

Page 3: ...tylus 18 Using Application Controls 28 Using Menus 29 Choosing Fonts 33 Using Categories 34 Attaching Notes 38 Marking Private Entries 38 Beaming Information to Other WorkPads 39 Chapter 3 Finding Inf...

Page 4: ...Page iv Basic Handbook for the IBM WorkPad...

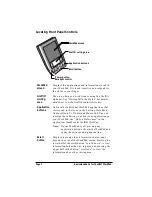
Page 5: ...dbook describes how to use your WorkPad To learn about the applications that come with your WorkPad refer to the Applications Handbook for the IBM WorkPad This chapter explains the physical buttons an...

Page 6: ...ress Book To Do List and Memo Pad You can reassign these buttons to activate any application on your WorkPad See Button Preferences in the Applications Handbook for the IBM WorkPad Note If your WorkPa...

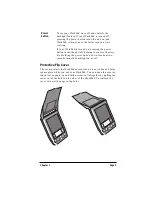
Page 7: ...the sides of the WorkPad To reattach the cover reinsert the pegs in the holes Power button Turns your WorkPad on or off and controls the backlight feature If your WorkPad is turned off pressing the po...

Page 8: ...trokes on the WorkPad screen Never use an actual pen pencil or other sharp object to write on the WorkPad screen IR port Uses infrared technology to transmit data to and receive data from other WorkPa...

Page 9: ...ontrast control Adjusts the appearance of the screen for the clearest screen display Depending on the lighting conditions or temperature of the environment where you use your WorkPad you may need to a...

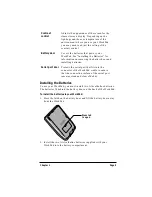
Page 10: ...ies are correctly installed the battery door clips smoothly into place If you feel resistance when replacing the battery door make sure the door is aligned with the slots on the back of your WorkPad a...

Page 11: ...have difficulty seeing the information on your WorkPad you can use the backlight feature to illuminate your screen To activate the backlight feature Press the power button and hold it down for about...

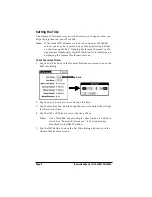
Page 12: ...nformation on displaying the General Preferences screen To set the current time 1 Tap the Set Time box in the General Preferences screen to open the Set Time dialog 2 Tap the up or down arrows to chan...

Page 13: ...e top to select the current year 3 Tap a month box to select the current month 4 Tap the current date to close the Set Date dialog and return to the General Preferences screen Note You do not need to...

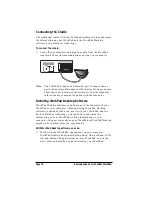
Page 14: ...er to the user s manual supplied with the computer Installing WorkPad Desktop Software WorkPad Desktop software extends many of the functions of your WorkPad to your computer Although using WorkPad De...

Page 15: ...into Address Book or Memo Pad Print your Date Book Address Book To Do List and Memo Pad information on any Windows compatible printer System Requirements To install and operate WorkPad Desktop your co...

Page 16: ...it all programs including those that run automatically at startup such as fax software virus protection software screen saver software and application toolbars such as Microsoft Office Do not simply c...

Page 17: ...er to open any application installed on your WorkPad You can also open the four main applications Date Book Address Book To Do List and Memo Pad with the buttons on the front panel of your WorkPad Tip...

Page 18: ...ny other application Your WorkPad saves your work in the current application and displays it when you return to the current screen Changing the Applications Launcher Display Format By default the Appl...

Page 19: ...3 Tap Category from the App menu to open the Category dialog 4 Tap the pick list next to each application to assign it to a category Tip To create a new category tap Edit Category from the pick list...

Page 20: ...the Records button to display the percentage of memory available and the number of entries stored in each application 6 Tap the Size button to display the total amount of memory available and the amo...

Page 21: ...any time to enter the exact text you need 5 After you finish tap the Done button to close the on screen keyboard and place the text in your WorkPad application Tap here for letters keyboard Tap here f...

Page 22: ...ffiti characters See Installing Games for instructions on how to install Giraffe Opening the Memo Pad Application The Memo Pad application is ideal for practicing the Graffiti alphabet This section ex...

Page 23: ...in the tables later in this chapter like the shapes shown in the following diagram you achieve 100 accuracy The heavy dot on each shape shows where to begin the stroke Certain characters have similar...

Page 24: ...lable for some letters For these letters choose the one that s easiest for you As you ll see later you use these shapes to create both upper and lowercase letters 3 Position the stylus in the left han...

Page 25: ...affiti writing area your WorkPad does not recognize them as text characters Graffiti Tips When writing Graffiti characters keep these tips in mind Accuracy improves when you write large characters You...

Page 26: ...Page 22 Basic Handbook for the IBM WorkPad The Graffiti Alphabet Letter Strokes Letter Strokes A N B O C P D Q E R F S G T H U I V J W K X L Y M Z Space Back Space Carriage Return Period tap twice...

Page 27: ...ine To draw the first letter of a word as a capital letter Use the Caps Shift stroke Tip When Caps Shift is active an up arrow symbol appears in the lower right corner of the WorkPad screen To enter o...

Page 28: ...All punctuation marks begin with a single tap on the Graffiti writing area When you make this tap you activate Punctuation Shift and a dot appears to show it is active The next stroke you make with th...

Page 29: ...tters or numbers side Writing Symbols and Extended Characters All symbols and extended characters begin with the stroke in the Graffiti writing area of your WorkPad When the Symbol Shift is active a s...

Page 30: ...letter For example the following diagram shows the strokes required to draw an accented e Accent Strokes Using these accent strokes you can write the following accented letters Additional Non English...

Page 31: ...ShortCuts and you can also create your own Each ShortCut can represent up to 45 characters For example you might create a ShortCut for your name or for the header of a memo See ShortCuts Preferences i...

Page 32: ...ntry ShortCut Entry ShortCut Date stamp ds Breakfast br Time stamp ts Lunch lu Date time stamp dts Dinner di Meeting me Check box When a check mark appears in a check box the corresponding option is a...

Page 33: ...e Memo Pad as described earlier in this chapter 2 Tap the icon to open the menus for the application at the top of the screen Button Tap a button to perform a command Buttons appear with different tex...

Page 34: ...t are available depend on the application that is currently running on your WorkPad Also the menus and menu selections vary depending on which part of the application is currently on the screen Using...

Page 35: ...n you use the Graffiti menu commands However since the Command mode is active for approximately two seconds you must write the letter character immediately to activate the menu command Edit Menu Comma...

Page 36: ...kPad You can paste the text that you copy into another area of the WorkPad application or into a different WorkPad application Paste Inserts the text that you cut or copied at the selected point in yo...

Page 37: ...application does not support changing fonts To change the font style 1 Open a WorkPad application 2 Tap the icon to open the menus at the top of the screen 3 Tap Font from the Options menu to open the...

Page 38: ...ng and reviewing records The category you select does not affect the actual contents of the record Note The use of categories is optional You do not need to assign categories to use WorkPad applicatio...

Page 39: ...steps and tap All in the category pick list to restore the list of all Address Book entries Tip Pressing the application button on the front panel of the WorkPad toggles through the available categori...

Page 40: ...n the Edit Categories dialog 3 Tap the New button to open another Edit Categories dialog 4 Enter the name of the new category and tap the OK button to close the Edit Categories dialog 5 Tap the OK but...

Page 41: ...want to rename and then tap the Rename button to open another Edit Categories dialog 4 Enter the new name that you want to assign to the category and tap the OK button to close the Edit Categories dia...

Page 42: ...Carriage Return stroke to move down to new lines in the note 5 Tap the Done button to close the note and return to the application screen Note A small note icon appears at the right side of any item...

Page 43: ...entry which you designate as your business card see Beaming Address Entries to Other WorkPads in the Applications Handbook for the IBM WorkPad An application installed in RAM memory see Installing Ap...

Page 44: ...irectly at the IR port of the transmitting WorkPad to open the Beam Status dialog 3 Tap the Yes button to accept the transmission 4 Wait for the Beam Status dialog to indicate that the transfer is com...

Page 45: ...e you want to find a particular name but aren t sure where you stored it The Find command immediately lists all instances of that name and enables you to jump directly to the name To use the Find comm...

Page 46: ...ay phone numbers with the Phone Lookup menu command After you find a phone number you can paste it directly into a WorkPad application For example if you want to include a phone number in a memo you c...

Page 47: ...Command stroke L to activate the Phone Lookup feature You can use Phone Lookup while entering text For example to insert the full name and phone number for someone with the last name Williams you wou...

Page 48: ...Page 44 Basic Handbook for the IBM WorkPad...

Page 49: ...stall applications by beaming them between WorkPads There are a variety of third party applications available for your WorkPad To learn more about these applications visit the 3Com Palm Computing web...

Page 50: ...ad 3 Click the Install button to open the WorkPad Install Tool dialog Tip You can also access the Install Tool dialog by selecting Install Tool from the WorkPad Desktop program group or by double clic...

Page 51: ...tion from your computer it simply removes it from the list of applications to install 8 Perform a local HotSync operation to install the application s you selected in step 6 See Conducting a Local Hot...

Page 52: ...e is a fun easy way for you to practice writing Graffiti character strokes After you install and start a game the instructions appear in the Game menu Depending on the game the Game menu may also cont...

Page 53: ...cations Launcher Removing WorkPad Desktop Software If you no longer want to use the WorkPad Desktop software you can remove it from your computer To remove the WorkPad Desktop software 1 Select Settin...

Page 54: ...Page 50 Basic Handbook for the IBM WorkPad...

Page 55: ...se methods Displaying Online Tips Many of the dialogs that appear on your WorkPad contain an online tips icon in the upper right corner Online tips contain a summary of what is required by the dialog...

Page 56: ...ng If HotSync Manager is running exit and restart it Make sure you selected Local from the HotSync Manager menu or the WorkPad Desktop menu Check the cable connection between the WorkPad cradle and th...

Page 57: ...s America Online CompuServe or WinFax that uses the serial port you selected in the Setup dialog box Make sure your modem resets before you try again Turn off your modem wait a minute then turn it bac...

Page 58: ...It takes a few minutes for the battery gauge to accurately show the condition of the batteries No sound Check the System Sound option in the General Preferences screen If the option is set to off ther...

Page 59: ...t application A message appears stating that your WorkPad memory is full Delete unused memos and records If necessary you can save these records on your computer using the Save Backup Copy option that...

Page 60: ...tore the private entries by transferring them from your computer to your WorkPad I forgot the password and my WorkPad is locked If you assign a password and lock your WorkPad you must perform a hard r...

Page 61: ...and Repair If you have a problem using your WorkPad make sure you have reviewed the following The Troubleshooting section earlier in this chapter The README file and HelpNotes located in the folder wh...

Page 62: ...Page 58 Basic Handbook for the IBM WorkPad...

Page 63: ...ot waterproof and should not be exposed to rain or moisture Under extreme conditions water may enter the circuitry through the front panel buttons In general treat your WorkPad as you would a pocket c...

Page 64: ...teries always use good quality batteries of the same type Use only alkaline batteries with your WorkPad When you remove the batteries the built in backup power of your WorkPad maintains memory data fo...

Page 65: ...a soft reset the IBM WorkPad welcome screen appears followed by the General Preferences screen to set time and date To perform a soft reset Use the tip of an unfolded paper clip or similar object wit...

Page 66: ...n 3 When a message appears on the WorkPad screen warning that you are about to erase all the data stored on your WorkPad do one of the following Press the upper half of the scroll button on the front...

Page 67: ...ital Letters 23 Categories 34 beaming 39 merging 37 renaming 37 using in Applications Launcher 15 using in lists 35 Check Box 28 Computer connecting 10 Contrast Control 5 Copy 32 Cover 3 Cradle 10 Cut...

Page 68: ...a 39 K Keyboard 16 screen options 17 L Letters font style 33 Graffiti 19 22 on screen keyboard 16 M Maintenance Information 59 Memory 16 Menus activating 29 choosing 30 command equivalents 30 edit men...

Page 69: ...16 punctuation marks 24 symbols 25 with WorkPad 18 writing tips 21 Time setting 8 Toubleshooting infrared communications 55 Transmit Data 39 Troubleshooting 52 applications 56 Date Book 57 general 54...

Page 70: ...top features 10 install tool 45 removing 49 software installation 12 system requirements 11 Writing accent characters 26 capital letters 23 Graffiti shortcuts 27 numbers 23 on screen keyboard 16 punct...

Reviews: