14
Customizing Your Monitor
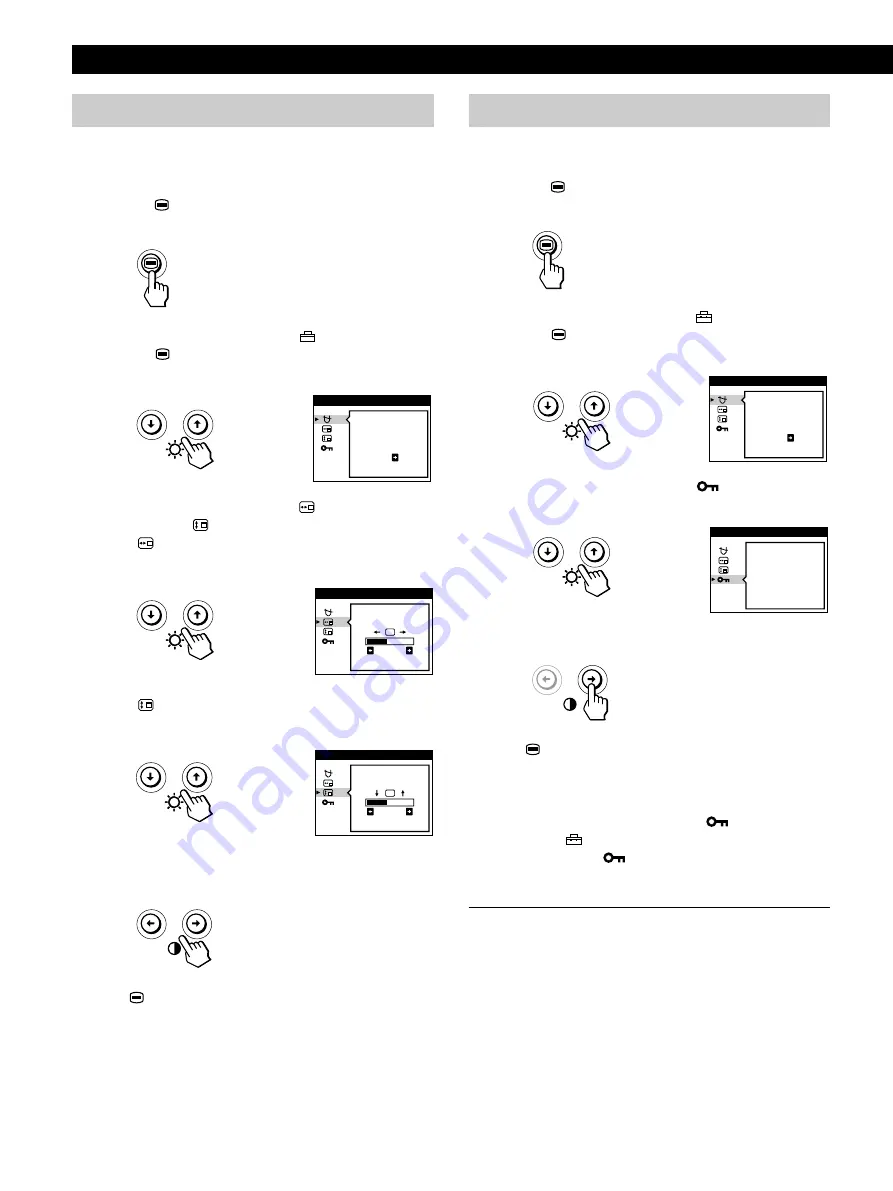
Changing the on-screen display position
You can change the OSD position (for example, when you
want to adjust the picture behind the OSD).
1
Press the
button.
The MENU OSD appears.
2
Press the
.
/
>
buttons to select “
OPTION” and
press the
button again.
The OPTION OSD appears.
3
Press the
.
/
>
buttons to select “
(OSD H
POSITION)” or “
(OSD V POSITION).”
Select “
(OSD H POSITION)” to adjust the horizontal
position.
Select “
(OSD V POSITION)” to adjust the vertical
position.
4
Press the
?
/
/
buttons to move the OSD to the
desired position.
Press the
button once to return to the MENU OSD, and
twice to return to normal viewing. If no buttons are pressed,
the OSD closes automatically after about 30 seconds.
To reset, press the
?
(reset) button while the OSD is on.
Locking the controls
You can protect adjustment data by locking the controls.
1
Press the
button.
The MENU OSD appears.
2
Press the
.
/
>
buttons to select “
OPTION” and
press the
button again.
The OPTION OSD appears.
3
Press the
.
/
>
buttons to select “
(CONTROL
LOCK).”
4
Press the
/
button to select “ON.”
Press the
button once to return to the MENU OSD, and
twice to return to normal viewing. If no buttons are pressed,
the OSD closes automatically after about 30 seconds.
Only the
u
(power) switch, EXIT, and “
(CONTROL
LOCK)” of the “
OPTION” OSD will operate. If any other
items are selected, the
mark appears on the screen.
To cancel the control lock
Repeat steps 1 through 3 above and press the
?
button to
select “OFF.”
OSD H
POS I T I ON
2 6
OPT I ON
OSD V
POS I T I ON
2 6
OPT I ON
CONTROL
LOCK
OF
•
F
ON
•
OPT I ON
DEGAUS
S
ON
OPT I ON
DEGAUS
S
ON
OPT I ON
Summary of Contents for P260
Page 2: ......
Page 7: ...EN English ...
Page 29: ...F Français ...
Page 51: ...D Deutsch ...
Page 73: ...ES Español ...
Page 95: ...I Italiano ...
Page 127: ...Getting Started Getting Started XI ...
Page 128: ...XII ...


