6. Adjust the following scan page settings:
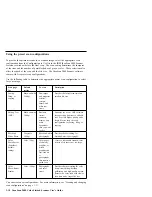
Page Size
Select a page size in the Page Size drop-down menu. The outlines on the
picture represent the possible page sizes. You can also click an outline to
select a page size for the scan. If you select Custom from the drop-down
menu, boxes display instead of the picture. Type the horizontal and vertical
page dimensions for your scan in the boxes.
AutoCrop
When you select AutoCrop, the scanner automatically determines the item
size before scanning the item. For example, if you place a photograph in the
middle of the glass, the scanner automatically determines the size of the
photograph before scanning the image. The AutoCrop option overrides the
Page Size menu selection.
DeScreen
Select this option to produce a clearer image when you scan a picture from a
newspaper or magazine article, or any item that contains images with
patterns or dots. If you do not select the DeScreen option, the scanner might
produce a moire pattern from a scan of patterns or dots. However, the
scanner might take longer to produce an image when you select DeScreen.
You do not need to select this option when scanning photographs.
Gamma
Note: You must scan in an image before adjusting the Gamma setting.
You can use the Gamma option to more precisely match colors. The default
Gamma setting works fine in most cases and usually does not need to be
adjusted. However, because the computer does not always accurately display
color information on the monitor, you might need to use the Gamma feature
to make color adjustments. Drag the slider to adjust how the colors in a
scanned image display on your monitor.
7. If you are creating a new configuration or you are adjusting settings in a preset
configuration, type a new name for the configuration and press Enter. If you are
adjusting a configuration that you created, verify that the configuration name is
correct, and press Enter.
8. Click OK to return to the IBM IdeaScan 2000 Scanner Preferences window.
9. Verify that the configuration you defined is selected; then click OK so that
changes take effect.
Note: If you select the Copy/Print or Fax button, you can use the Device tab to
select an option for a printer or copier when you make changes in the
configuration setting window. For more information, refer to the online
help.
1-12 IdeaScan 2000 Color Flatbed Scanner User’s Guide
Summary of Contents for IdeaScan 2000
Page 1: ...IdeaScan 2000 Color Flatbed Scanner User s Guide OPTIONS by IBM ...
Page 6: ...vi IdeaScan 2000 Color Flatbed Scanner User s Guide ...
Page 41: ...2 14 IdeaScan 2000 Color Flatbed Scanner User s Guide ...
Page 42: ...Union Europea Normativa EMC Part 2 Appendixes 2 15 ...
Page 43: ...IBM Part Number P00N7787 Printed in U S A P N7787 ...

