background image


24

Operator’s Guide

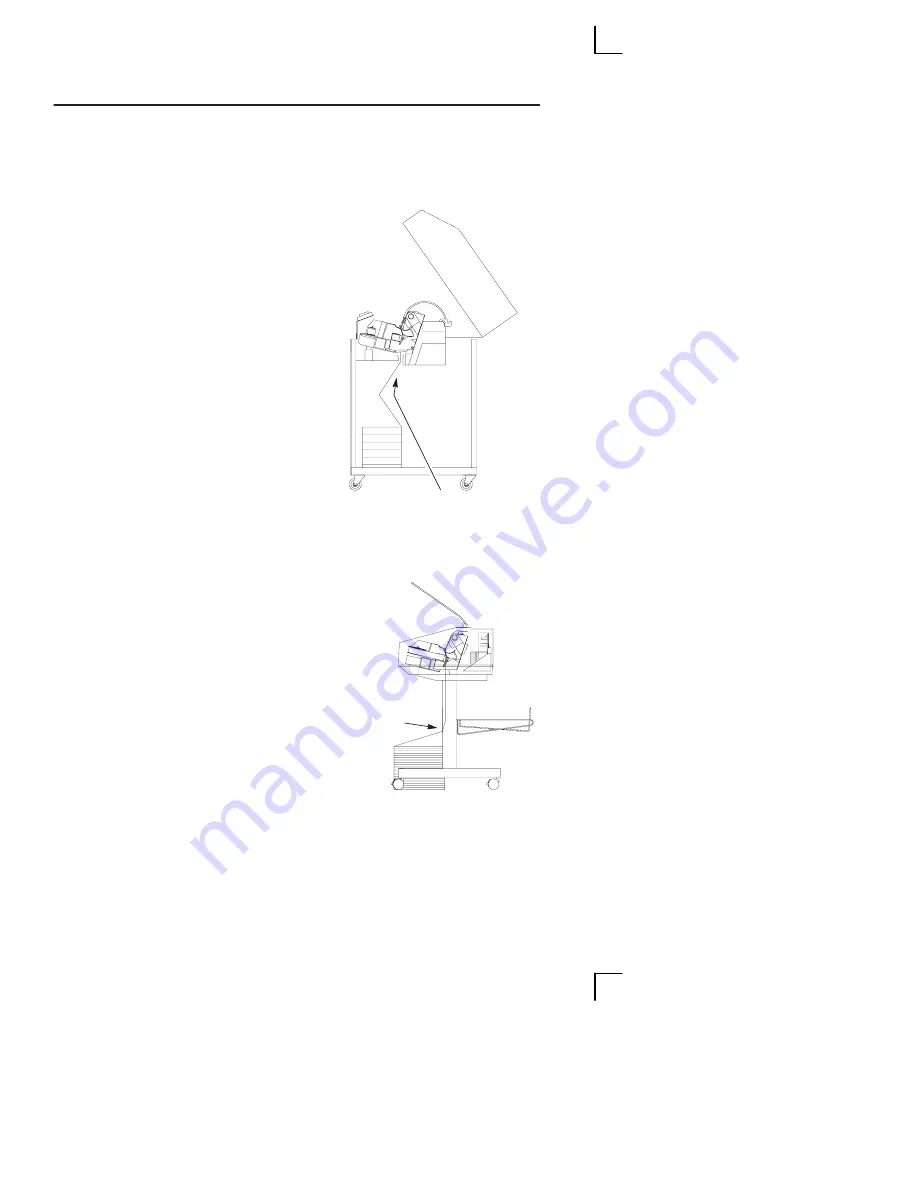
Feed the paper up through the paper

slot.

On Pedestal models, make sure the

paper is inserted between the two wire

guides.

Hold the paper in place with one

hand (to prevent it from slipping

down through the paper slot) and

pull it through from above with your

other hand.

Paper Slot

Pedestal Models

Cabinet Models

Paper Slot is
8 inches below
printer base

Summary of Contents for 6400 Series

Page 1: ...Form Number S246 0115 02 Copyright IBM Corp 1995 1996 1997...

Page 2: ......

Page 3: ...S246 0115 02...

Page 4: ...uld be made to your IBM representative or to the IBM branch serving your locality Publications are not stocked at the address given below A Reader s Comments form is provided at the back of this publi...

Page 5: ...ters The Operator s Guide is divided into three sections Basic Operating Procedures gives an overview of the operator panel and provides procedures for loading paper and ribbon Configurations provides...

Page 6: ...ety Notices booklet A Danger notice calls attention to a situation that is potentially lethal or extremely hazardous to people A Caution notice calls attention to a situation that is extremely hazardo...

Page 7: ...etting Top of Form 39 Replacing the Ribbon 42 Canceling a Print Job 45 CONFIGURATIONS Parameters and Configurations 49 Saving Configurations 51 Recalling Configurations 53 Deleting Configurations 55 T...

Page 8: ...hose expressly designated by IBM is the user s responsibility Any performance data contained in this document was obtained in a controlled environment based on the use of specific data The results tha...

Page 9: ...e caused by using other than recommended cables and connectors or by unauthorized changes or modifications to this equipment Unauthorized changes or modifications could void the user s authority to op...

Page 10: ...interference to radio and TV communication and to other electrical or electronic equipment Such cables and connectors are available from IBM authorized dealers IBM cannot be responsible for any interf...

Page 11: ...st und Telekommunikation oder des Bundesamtes f r Post und Telekommunikation betrieben werden Die Genehmigung wird erteilt wenn keine elektromagnetischen St rungen zu erwarten sind Auszug aus dem EMVG...

Page 12: ...product is designed and manufactured in accordance with national requirements intended to minimize safety hazards IBM equipment meets a very high standard of safety in design and manufacture Remember...

Page 13: ...n on proper power sources CAUTION 2 Disconnect the AC power cord before cleaning the printer FORSIGTIG Forvis Dem om at printeren er tilsluttet den korrekte type str m inden De t nder for den Korrekt...

Page 14: ...teen valinnasta VAARA Irrota vaihtovirtajohto ennen kirjoittimen puhdistusta Normas de Seguran a ATEN O Antes de ligar a impressora certifique se que esta est ligada ao tipo de corrente apropriado Con...

Page 15: ...finns information om r tt str mf rs rjning FARA Koppla loss n tkabeln innan du reng r skrivaren Sikkerhetsinformasjon OBS Kontroller at skriveren er tilknyttet riktig str mkilde f r du sl r den p Du f...

Page 16: ...xii...

Page 17: ...uide Powering On the Printer 2 Using the Operator Panel 4 Changing the Paper Exit Location Pedestal Models Only 19 Loading Paper 22 Reloading Paper 29 Unloading Paper 37 Setting Top of Form 39 Replaci...

Page 18: ...ropriate power source Refer to the Select a Site section in Chapter 2 of the Setup Guide for information on proper power sources Push the On side of the switch to power on the printer Push the Off f s...

Page 19: ...goes either to READY or NOT READY state depending on the menu selection In the READY state the READY indicator lights and the message READY displays If there is a fault during the self test the Atten...

Page 20: ...erator panel keys are described on the following pages Operator Panel Layout Keys Status Indicators Power Ready Processing Attention Menu Micro Printer Con figuration Scroll Micro Scroll Enter Start R...

Page 21: ...ate may be either locked or unlocked When program state is unlocked you may select and save new configuration settings When program state is locked you may view the current settings but cannot change...

Page 22: ...ators provide information about existing printer operation as follows Power Lit when the printer is powered on Ready Lit when the printer is in READY state no errors are pending and the printer is rea...

Page 23: ...enus without changing settings press Menu from NOT READY state To change the configuration settings press Scroll Scroll at the same time to unlock program state then press Menu 2 In program state pres...

Page 24: ...e See page 15 In NOT READY state generates a printed record of the current configuration parameters After pressing Stop press Printer Configuration When the display message confirms the Printer Config...

Page 25: ...to place the printer in the NOT READY state See page 15 In program state scrolls backward through the options in the existing level of the operator menu Scroll Scroll In NOT READY state locks or unlo...

Page 26: ...rogram state selects a configuration option value 3 In program state starts and stops a Print Test selected from the Operator Print Tests menu 4 In the NOT READY state pressing Stop Enter perfoms a so...

Page 27: ...state See page 15 In NOT READY state micro steps the paper upward in 1 72 inch increments Press and hold to move paper at 10 increments per second Micro This key operates only in NOT READY state Press...

Page 28: ...buffer The data in the attachment buffer is not affected View In NOT READY state press to move the paper s existing print position up to the tractor area for viewing This allows you to check the prin...

Page 29: ...13 Operator s Guide original print position and puts the printer in NOT READY state...

Page 30: ...e data contained in the printer buffer The data in the attachment buffer is not affected Set Top Of Form This key operates only in NOT READY state Press Stop to place the printer in the NOT READY stat...

Page 31: ...from READY state to NOT READY state enabled for operator functions such as viewing or changing configuration parameters 2 In program state exits the menus and places the printer in the NOT READY stat...

Page 32: ...ill occur in the READY state only When pressed 059 CANCEL PRINT ACTIVE is displayed Twinax Interface Effective in READY and NOT READY state When pressed 059 CANCEL PRINT ACTIVE is displayed Serial Par...

Page 33: ...press Eject Restore to move the paper forward to the tear off position toward the back of the printer Once you have torn the paper at the perforation press Eject Restore Start or Stop to retract the p...

Page 34: ...to the tear off position When tearing forms from the top exit pull the form toward you and begin tearing from one corner of the form When you have torn the paper at the perforation press one of the fo...

Page 35: ...ill be using the forms soon after printing as forms will not stack when in this mode Setting Rear Paper Exit Use this procedure to change the pedestal printer from top exit to rear exit Press Stop to...

Page 36: ...Paper Exit Location 20 Operator s Guide Tighten the two hinge adjustment thumbscrews Place the paper guide in its lower position Load paper page 22 feeding the paper out the rear paper exit Quick Acce...

Page 37: ...nter in NOT READY state If there is paper in the printer unload the paper page 37 then continue with step 3 of this procedure Open the printer cover Loosen the two hinge adjustment thumbscrews Slide t...

Page 38: ...Press Stop to place the printer in NOT READY state Open the printer cover If necessary unload the current paper page 37 then continue with step 3 of this procedure Raise the forms thickness lever as f...

Page 39: ...n the cabinet front door Place the paper supply inside the printer on the floor of the cabinet Align the paper supply with the front label on the floor of the printer On pedestal models Place the pape...

Page 40: ...sure the paper is inserted between the two wire guides Hold the paper in place with one hand to prevent it from slipping down through the paper slot and pull it through from above with your other han...

Page 41: ...osition of the left tractor If adjustment is necessary unlock the left tractor Slide the tractor until its inner edge is aligned with the number 1 on the paper scale and lock it You can also use the p...

Page 42: ...he right tractor Load the paper on the tractor and close the tractor door If necessary slide the right tractor to remove any slack The paper should be flat without damaging the form feed holes Lock th...

Page 43: ...ssive friction can cause paper jams ribbon jams with potential for ribbon damage smeared ink or wavy print On pedestal models Guide the paper over the lower paper guide and through the top or rear pap...

Page 44: ...er paper guide and into the paper stacking area Feed sufficient paper to ensure that the paper stacks correctly Ensure that the paper folds the same way in the stacking area as it does in the supply a...

Page 45: ...oices Raise the printer cover Raise the forms thickness lever as far as it will go Do not open the tractor doors or remove the existing paper Press any key on the operator panel except Form Feed to si...

Page 46: ...When this corner can be grasped from the top rotate the paper back to the normal position If necessary gently press the existing paper back Hold the paper to prevent it from slipping down and through...

Page 47: ...gently press the existing paper back Align the top edge of the new paper with the top perforation of the existing paper Load the new paper over the existing paper Open and load the tractors one at a t...

Page 48: ...to clear the END OF FORMS fault message from the Liquid Crystal Display 8 Close the printer cover Close the cabinet front door 9 Press Start to place the printer in READY state and resume printing 10...

Page 49: ...he tractors Allow the paper to fall into the paper supply area Feed the paper up through the paper slot inside the cabinet Hold the paper to prevent it from slipping down through the paper slot Paper...

Page 50: ...tractor and close the tractor door Normally you should not need to adjust the position of the left tractor If adjustment is necessary unlock the left tractor Slide the tractor until it is directly to...

Page 51: ...s Then lock the tractor After both tractors are secured you may use the horizontal adjustment knob to make fine horizontal paper adjustments On pedestal models Guide the paper over the lower paper gui...

Page 52: ...corresponds approximately to 1 3 and 6 part paper thickness Adjust until you have the desired print quality Press Cancel to clear any fault messages such as END OF FORMS from the Liquid Crystal Displa...

Page 53: ...r at the perforation if necessary Allow the paper to fall to the back of the printer and into the paper stacking area Raise the forms thickness lever as far as it will go Open both tractor doors Press...

Page 54: ...eful when pulling any paper backwards through the paper path especially when using label stock If you are not careful labels can detach and adhere to the printer within the paper path where only an IB...

Page 55: ...inter is in READY state press Stop to place the printer in NOT READY state Open the printer cover Raise the forms thickness lever as far as it will go Press any key on the operator panel to silence th...

Page 56: ...urs If there is no data in the buffer you have not yet sent a print job to the printer the paper moves downward to the top of form position To verify the top of form setting run one of the operator pr...

Page 57: ...hat the paper folds the same way in the stacking area as it does in the supply area then close the cabinet back door On pedestal models When printing ensure that the paper folds the same way in the st...

Page 58: ...Open the printer cover Remove the old ribbon On pedestal models raise the operator panel Raise the forms thickness lever as far as it will go If you are using RibbonMinder and are changing the ribbon...

Page 59: ...ecessary clean the interior of the printer See page 71 Install the new ribbon With the ribbon to the outside place the right spool on the full hub Press down on the spool until the hub latch snaps in...

Page 60: ...cover Press Start to return the printer to READY state If you are using RibbonMinder and are changing the ribbon because the message Ribbon Out of Ink Change Ribbon is displayed raising the forms thi...

Page 61: ...ters using a coax interface in SCS mode Press Stop to place the printer in NOT READY state Press Cancel to clear the printer buffer This sends a cancel status message to the host which clears the prin...

Page 62: ...job For printers using a serial or parallel interface Press Stop to place the printer in NOT READY state From the host system stop the print job If the print job is not stopped from the host system be...

Page 63: ...47 Operator s Guide...

Page 64: ...Parameters and Configurations 49 Saving Configurations 51 Recalling Configurations 53 Deleting Configurations 55 The Power On Configuration 57 Protecting Custom Sets 59 Printing Configurations 61 Ope...

Page 65: ...arameters For example 8 lpi 10 cpi Data processing typeface etc Changing Parameters You can change a parameter by pressing keys on the operator panel or by sending a control code from the host compute...

Page 66: ...uration sets available for use They are a factory default four custom and four custom preloaded sets The factory default custom set cannot be modified of overwritten Custom Sets 1 4 can be configured...

Page 67: ...printer in the NOT READY state Press Scroll Scroll at the same time to unlock the program state Press Menu to access the OPERATOR MENU Press Scroll to scroll forward until you reach CONFIGURATION MAN...

Page 68: ...se your configuration Press Enter to select the custom set An asterisk appears next to the selected set in the display Press Scroll Scroll at the same time to lock the program state Press Start to exi...

Page 69: ...in the NOT READY state Press Scroll Scroll at the same time to unlock the program state Press Menu to access the OPERATOR MENU Press Scroll to scroll forward until you reach CONFIGURATION MANAGEMENT P...

Page 70: ...This selects the displayed custom set Press Scroll Scroll at the same time to lock the program state Press Start to return the printer to the READY state RECALL CUSTOM SET CUSTOM SET 1 READY OPERATOR...

Page 71: ...e to unlock the program state Press Menu to access the OPERATOR MENU Press Scroll to scroll forward until you reach CONFIGURATION MANAGEMENT Press Enter to enter this menu Press Scroll to reach DELETE...

Page 72: ...at the same time to lock the program state Press Start to return the printer to the READY state If the custom set you choose to delete has not previously been saved the following error message displa...

Page 73: ...For your convenience you can specify which custom set should be the power on set Press Stop to place the printer in the NOT READY state Press Scroll Scroll at the same time to unlock the program state...

Page 74: ...t Press Enter to select the Custom Set An asterisk appears next to the selected set in the display Press Scroll Scroll at the same time to lock the program state Press Start to return the printer to R...

Page 75: ...ate Press Menu to access the OPERATOR MENU Press Scroll to scroll forward until you reach CONFIGURATION MANAGEMENT Press Enter to enter this menu Press Scroll until you reach PROTECT CUSTOM SETS Press...

Page 76: ...t ENABLE An asterisk appears next to the word ENABLE Press Scroll Scroll at the same time to lock the program state Press Start to exit the menu and place the printer in the READY state OPERATOR MENU...

Page 77: ...sentative Press Stop to place the printer in the NOT READY state Press Scroll Scroll at the same time to unlock the program state Press Menu to access the OPERATOR MENU Press Scroll to scroll forward...

Page 78: ...ct the option An asterisk appears next to the selected set in the display Your configuration is printed The printer returns to the NOT READY state Press Scroll Scroll at the same time to lock the prog...

Page 79: ...ollowing procedure printing the error log is shown as an example Press Stop to place the printer in the NOT READY state Press Scroll Scroll at the same time to unlock the program state Press Menu to a...

Page 80: ...runs To halt the test press Enter again Additional tests can be run by returning to step 6 Press Stop to place the printer in NOT READY state Press Start to place the printer in READY state NOT READY...

Page 81: ...65 Operator s Guide...

Page 82: ...66 Operator s Guide Clearing Paper Jams 67 Cleaning the Printer 70 Solving Printer Problems 74 Fault Messages 76...

Page 83: ...an IBM service representative can remove them Open the printer cover Raise the forms thickness lever as far as it will go Press any key on the operator panel to silence the alarm Take care when press...

Page 84: ...o the ribbon path diagram on the shuttle cover Reload the paper on the tractors Lower the forms thickness lever Set it to match the paper thickness refer to the note on the shuttle cover Do not set th...

Page 85: ...e supply area Ensure that the paper is aligned with the label in the output area inside the cabinet Close the cabinet back door if the length of your forms allows this Some longer forms require the ba...

Page 86: ...of the Printer Clean the outside of the printer with a soft lint free cloth and mild detergent Dishwashing liquid works well Do not use abrasive powders or chemical solvents Clean the windows with pl...

Page 87: ...al for particles of paper and ink to accumulate inside the printer Paper dust and ink build up must be removed periodically to avoid degraded print quality To clean the interior of the printer perform...

Page 88: ...ttle cover Brush and vacuum accumulated dust or residue especially in the tractor hammer bank and base pan areas Wipe the splined shaft with a soft cloth Using a soft cloth lightly moistened with anhy...

Page 89: ...cabinet interior with a clean lint free cloth damp not wet with water and mild detergent Dry the lower cabinet interior with a dry clean lint free cloth On pedestal and cabinet models Reinstall the r...

Page 90: ...ust the paper tension horizontally by moving the right tractor Print quality can be affected if it is too loose or too tight 3 Make sure the ribbon threads around the ribbon guides and between the ham...

Page 91: ...atic character height Vertically deformed print Asterisk does not appear after you change a configuration parameter with the Enter key 1 Press Stop to place the printer in the NOT READY state Press Sc...

Page 92: ...o silence the alarm Take care when pressing the Form Feed key as the top of form setting will be lost You can correct most faults by performing a simple procedure such as clearing a paper jam or reloa...

Page 93: ...e Press Start to return to Ready state and resume printing If the fault message reappears power off the printer wait 15 seconds then power on the printer Run your print job again If the fault message...

Page 94: ...nt position 004 View Forms Non error status message Press View key to return paper to print position 006 Host System Request Attention Host attention message The host computer or printer controller re...

Page 95: ...l parameter value received in command code Contact your system administrator 011 SCS Command Error Printer received undefined control character Contact your system administrator 012 Structured Field E...

Page 96: ...erial port configuration setup Ensure that baud rate matches both host and printer settings 022 Unit Address Not Received Unit address not recognized by printer Ensure that printer address matches hos...

Page 97: ...ne minute Coax interface Check cable connection and host system 029 8344 Diagnostic Test Failed Link level code detects hardware failure Contact your IBM service representative 031 End of Forms Timeou...

Page 98: ...Ensure that the Data Terminal Ready setting matches both host and printer settings 042 Custom Set Does Not Exist This custom set does not exist Define and save it Refer to the Setup Guide 043 Custom S...

Page 99: ...s lever 058 Shuttle Jam No shuttle movement or the shuttle is moving at the wrong speed Make sure the ribbon is not twisted and the forms thickness lever is set to match thickness of media being used...

Page 100: ...Fault Sensors cannot detect current in fan circuit Refer to the Setup Guide for correction procedure 069 Data Cleared Appears when data is cleared out of printer after Cancel key has been pressed No...

Page 101: ...least one minute The Intervention Required parameter is set to Send to Host Close forms thickness lever 088 Controller 23 5V Controller voltage failure Contact your IBM service representative 089 Rib...

Page 102: ...ntact your IBM service representative 101 Upper Driver Short Hammer driver circuits on the controller board shorted to ground Contact your IBM service representative 102 Lower Driver Short Circuit s o...

Page 103: ...act your IBM service representative 112 Undefined OP Code Fatal firmware error on the controller board Contact your IBM service representative 113 Protected Instruction Fatal firmware error on the con...

Page 104: ...gal External Bus Access Fatal firmware error on the controller board Contact your IBM service representative 117 A to D Overrun Fatal firmware error on the controller board Contact your IBM service re...

Page 105: ...ot at Speed Fatal firmware error on the controller board Contact your IBM service representative 122 Paper Not Scheduled Fatal firmware error on the controller board Contact your IBM service represent...

Page 106: ...l firmware error on the controller board Contact your IBM service representative 128 Paper Feed Invalid Command Fatal firmware error on the controller board Contact your IBM service representative 129...

Page 107: ...d State Fatal firmware error on the controller board Contact your IBM service representative 134 Platen Invalid Command Fatal firmware error on the controller board Contact your IBM service representa...

Page 108: ...le Overspeed Fatal firmware error on the controller board Contact your IBM service representative 990 Machine Check Host status message No action necessary 998 Non Volatile Memory Failed Non volatile...

Page 109: ...its are active No action necessary Hammer Coil Bad Malfunction of one or more hammer coils Bad coils are indicated Contact your IBM service representative Not Ready Printer state message printer is of...

Page 110: ...t Passed Non error status message No action necessary P17 Security Violation Security code of PAL on controller board does not match firmware code Contact your IBM service representative Please Wait R...

Page 111: ...00 Service Menu first service test Non error status message No action necessary Testing Hardware Please Wait Status message when printer runs self tests and initialization routines No action necessary...

Page 112: ......

Page 113: ...Copyright IBM Corp 1995 1996 1997 S246 0115 02...

Reviews: